Building Custom Interactive Remote Push Notification in iOS
Published at Feb 17, 2020
Since iOS 10, Apple has already provided rich notification support for push notification with the introduction of new frameworks, UserNotifications and UserNotificationsUI. Using this framework, we can customize our push notification with abilities such as:
- Customize type and
content/UIof push notification. - Provide custom actions and responses for each of the types of notification.
- Mutate the content of received push notification before it delivered to the user.
- Customize custom trigger of the push notification such as in specific time interval and geographic region.
Besides all this rich notification support, Apple also added new interactive custom UI support in iOS 13. Before, we can only customize the actions for the user to select in action-sheet like iPhone UI. With the interactive notification, we can provide any user interface and interaction that we want in our push notification.
This addition is a real game-changer for push notification. For example, we can provide controls like text field, switch, slider, stepper, and any custom control that we want. Finally, we have the freedom to customize our push notification preview the way we want it to be.
In this article, we are going to build an interactive custom push notification UI to display a video preview of a trailer with buttons for users to add and favorite. Users can also provide ratings using the star and comment using a text field. Here is the list of tasks to do:
- Setup project and dependencies.
- Register push notification permission, type, and category.
- Simulate remote push notification for testing.
- Setup Notification Extension target info plist.
- Setup UI for the notification content.
- Handle on receive notification and UI interaction in code.
To simulate a remote push notification in the simulator, you need to download and install
Xcode 11.4beta from Apple developer website
You can download the completed project from the GitHub repository here.
Setup Project and Dependencies
To begin, create a new Xcode project using your unique Bundle Identifier. Then, navigate to the project signing & capabilities tab. Click on + Capabilities button and select push notifications from the list. The purpose is to associate the push notification with the App ID of the project.
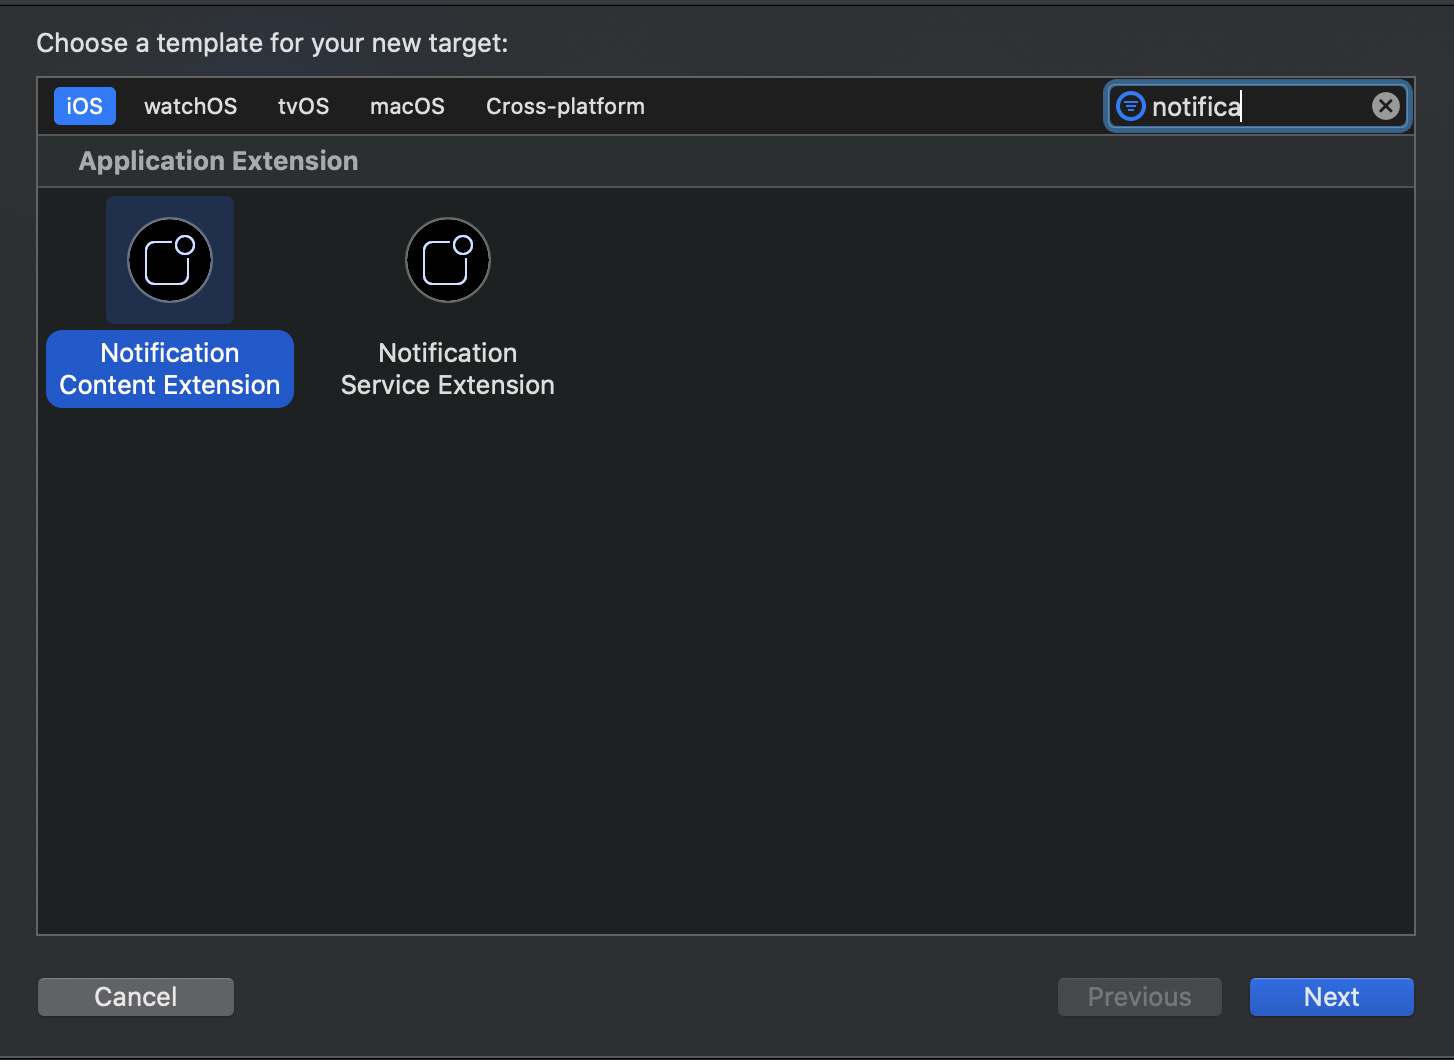
Next, we are going to add a new app extension target for the custom content notification UI. From the menu bar, click on File > New > Target. On the filter text field, type notification. Finally, select Notification Content Extension from the list. Give the name and click finish. After that, you can activate the scheme when in the alert dialog. Close the project.
Next, we are going to initialize Cocoapods for the project and declare the dependencies. Using the terminal, navigate to the project folder, and type pod init. After that, open the Podfile using your text editor and add the dependencies to the targets of the app. There are 2 dependencies to add:
- XCDYoutubeKit. A library to play YouTube video using the
AVPlayer. (warning: YouTube policy only allow the app to useWebViewwithiFrameto play video in-app). - Cosmos. A star rating control that we can use in our app.
# Uncomment the next line to define a global platform for your project
# platform :ios, '9.0'

target 'apnspushsimulate' do
  # Comment the next line if you don't want to use dynamic frameworks
  use_frameworks!

  # Pods for apnspushsimulate
  pod "XCDYouTubeKit", "~> 2.9"
  pod 'Cosmos', '~> 21.0'

end

target 'test' do
  # Comment the next line if you don't want to use dynamic frameworks
  use_frameworks!

  # Pods for test
  pod "XCDYouTubeKit", "~> 2.9"
  pod 'Cosmos', '~> 21.0'

end
Run pod install to install all the dependencies to all the targets. Open the project.xcworkspace in your Xcode to begin. Try to build with Command + B to make sure everything is good to go.
Register permission, type, and category for push notification
Next, we need to register permission to allow push notification in our app using the UNUserNotificationCenter. We add the code to do that in the AppDelegate inside the (_:didFinishLaunchingWithOptions:). Make sure to import the UserNotifications framework at the top of the source file. Here are the steps to do:
- First, we invoke the
requestAuthorizationpassing the array of authorization options. In this case, we want thealert,badge, andsound. - Second, we initialize the
UNNotificationCategorypassing the unique category string identifier. In this case, we don't want to have custom actions, so we pass an empty array. - Last, we invoke the
setNotificationCategoriespassing our custom notification category type inside an array.
import UIKit
import UserNotifications

@UIApplicationMain
class AppDelegate: UIResponder, UIApplicationDelegate {

    func application(_ application: UIApplication, didFinishLaunchingWithOptions launchOptions: [UIApplication.LaunchOptionsKey: Any]?) -> Bool {

        let center = UNUserNotificationCenter.current()
        center.requestAuthorization(options: [.alert, .sound, .badge]) { _, _ in }

        let testNotificationCategory = UNNotificationCategory(identifier: "testNotificationCategory", actions: [], intentIdentifiers: [], options: [])
        UNUserNotificationCenter.current().setNotificationCategories([testNotificationCategory])
        return true
    }

        ...
}
Simulate remote push notification for testing
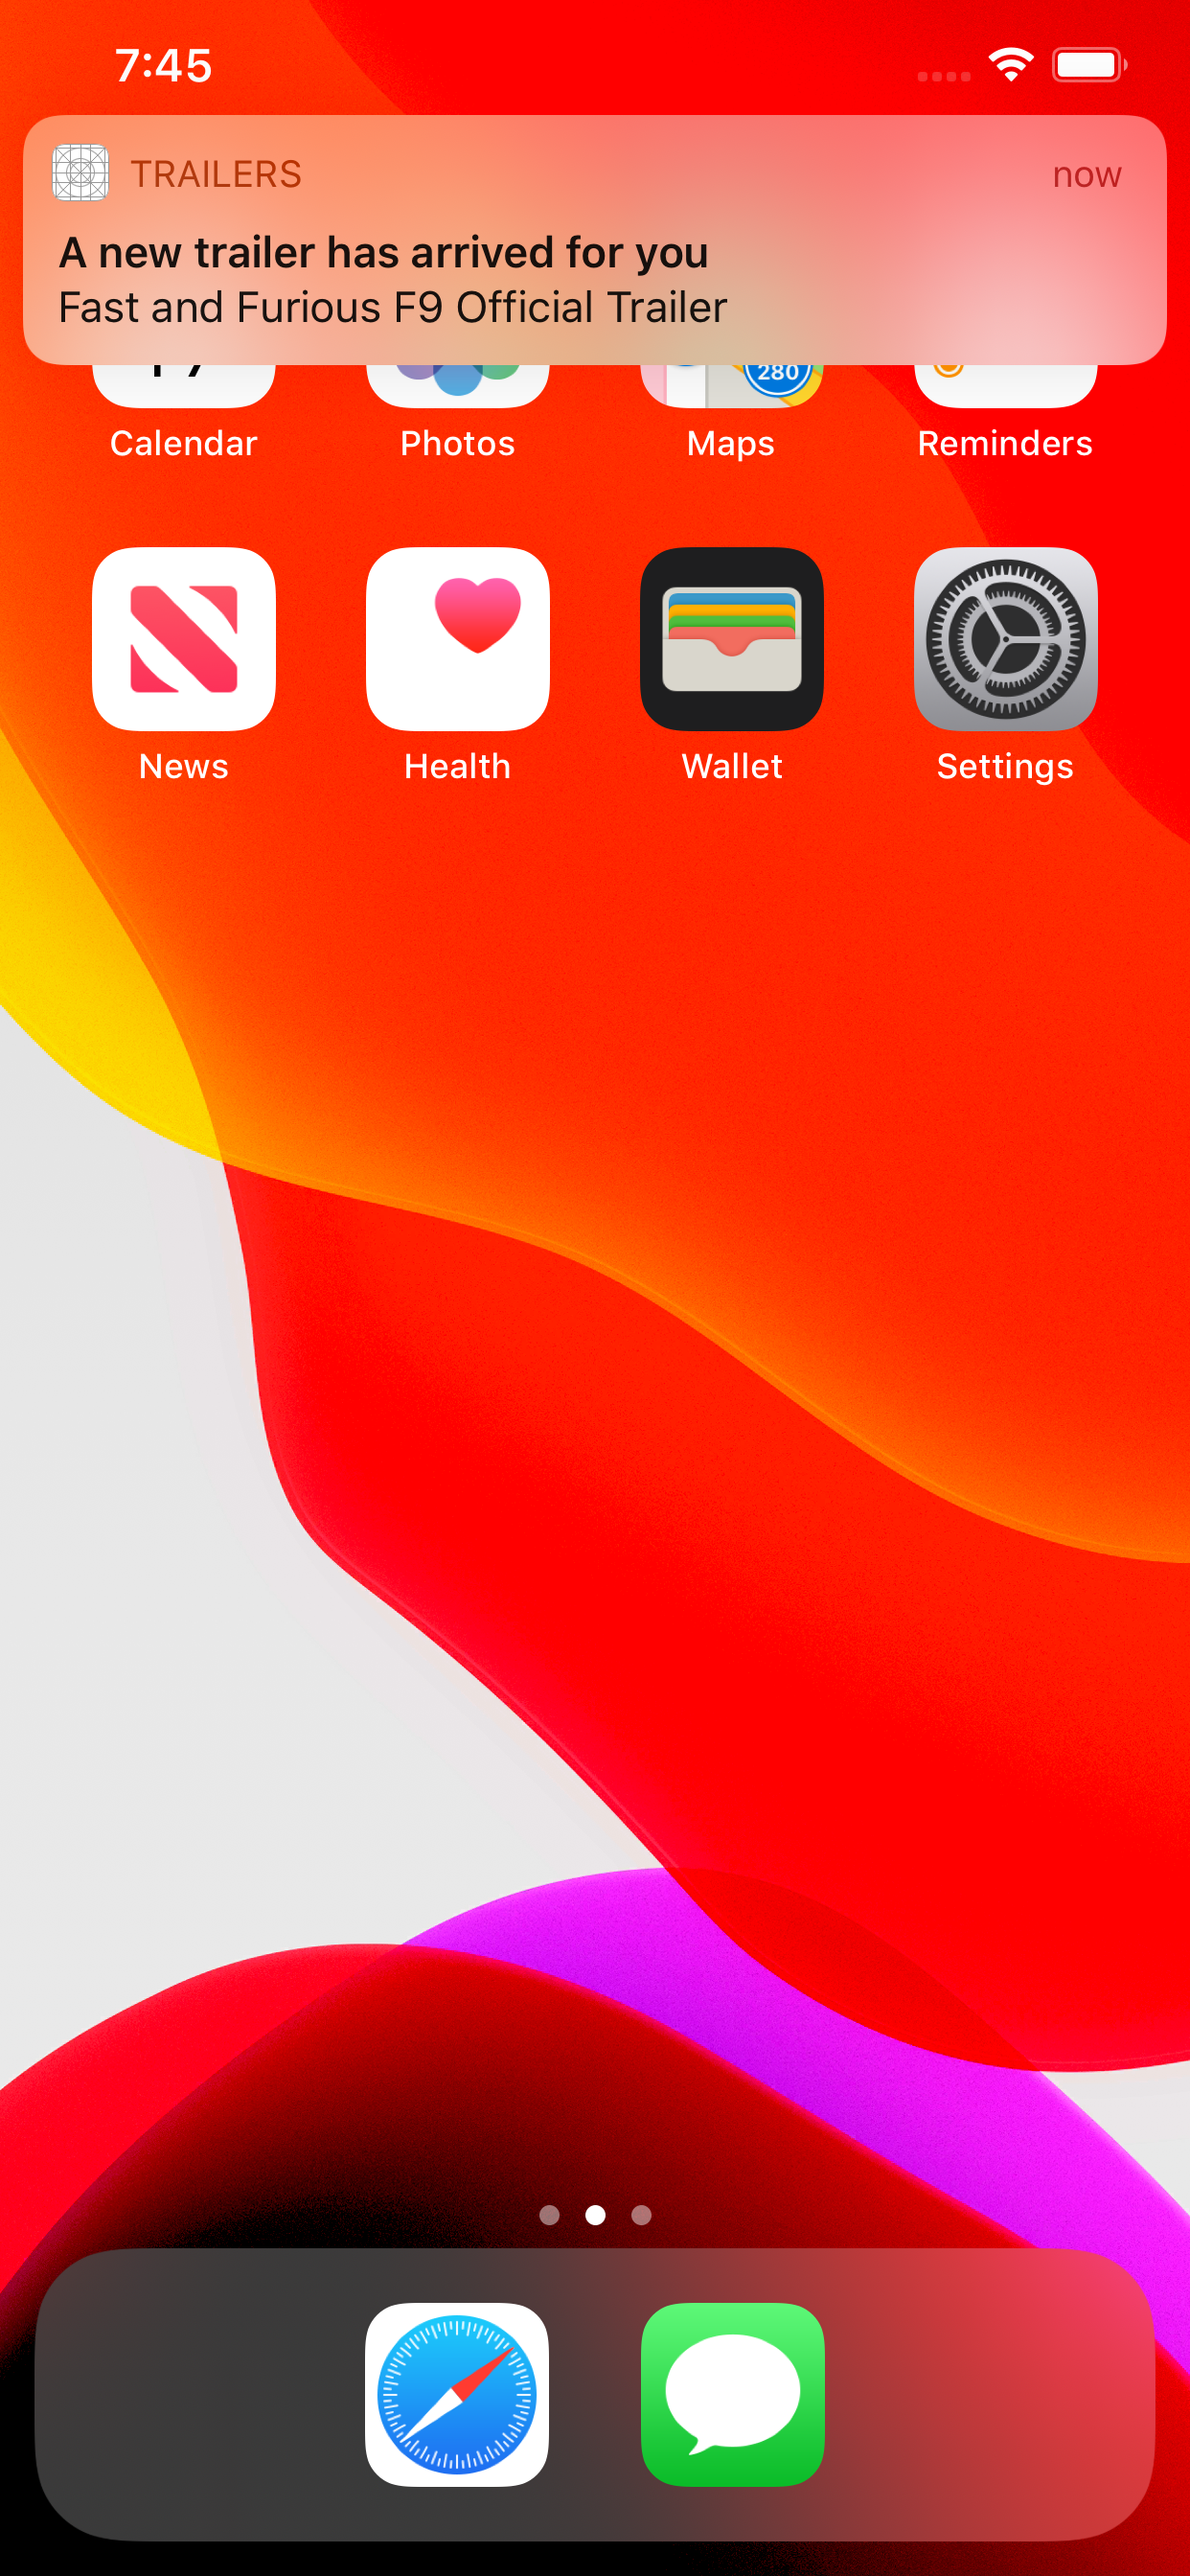
Xcode 11.4 finally introduced a new feature to simulate remote push notification locally. It's pretty simple to begin. We need to create the apns json file containing the payload. We also need to add additional key beside the aps, which is the Simulator Target Bundle containing the App ID of our app. The filename extension of the file must be using .apns instead of .json. You can take a peek of our sample apns file below.
{
   "aps" : {
      "alert" : {
         "title" : "A new trailer has arrived for you",
         "body" : "Fast and Furious F9 Official Trailer"
      },
      "category" : "testNotificationCategory",
      "sound": "bingbong.aiff",
      "badge": 3,
   },
   "videoId" : "Kopyc23VfSw",
   "description": "Release date: 05-21-2020",
   "Simulator Target Bundle": "com.alfianlosari.apnspushsimulate"
}
In this case, we also provide the additional key for videoId and description so we can retrieve the YouTube video URL and display custom description in the custom UI. To test the notification, run the app, and accept the notification permission. Then, put the app in background, drag, and drop the apns file into the simulator.
Setup Notification Extension target info plist.
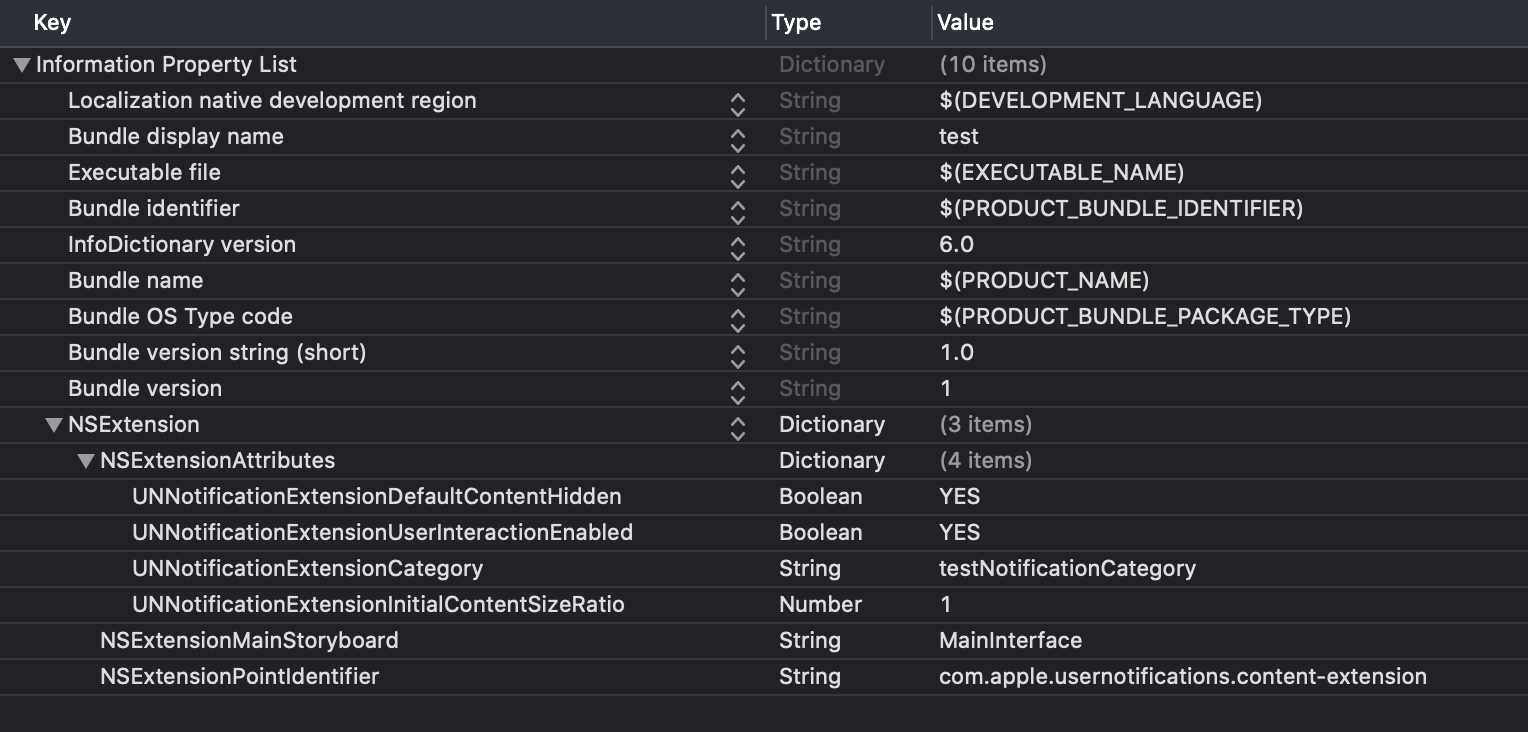
We need to add additional keys to the notification content application extension info.plist. Under the NSExtension > NSExtensionAttributes dictionary make sure you add all these keys and values:
UNNotificationExtensionDefaultContentHidden. This key determines whether to hide the default push notification title and body labels. In our case, we want to hide it, so we set the value toNO.UNNotificationExtensionUserInteractionEnabled. This key determines whether to make the UI interactive. We set this toYES.UNNotificationExtensionCategory. We need to set the value of this using the notification type category identifier that we register at theAppDelegate, which istestNotificationCategory.UNNotificationExtensionInitialContentSizeRatio. The initial content size ratio when the preview appears the first time. We set this to default,1.
Setup UI for the notification content preview
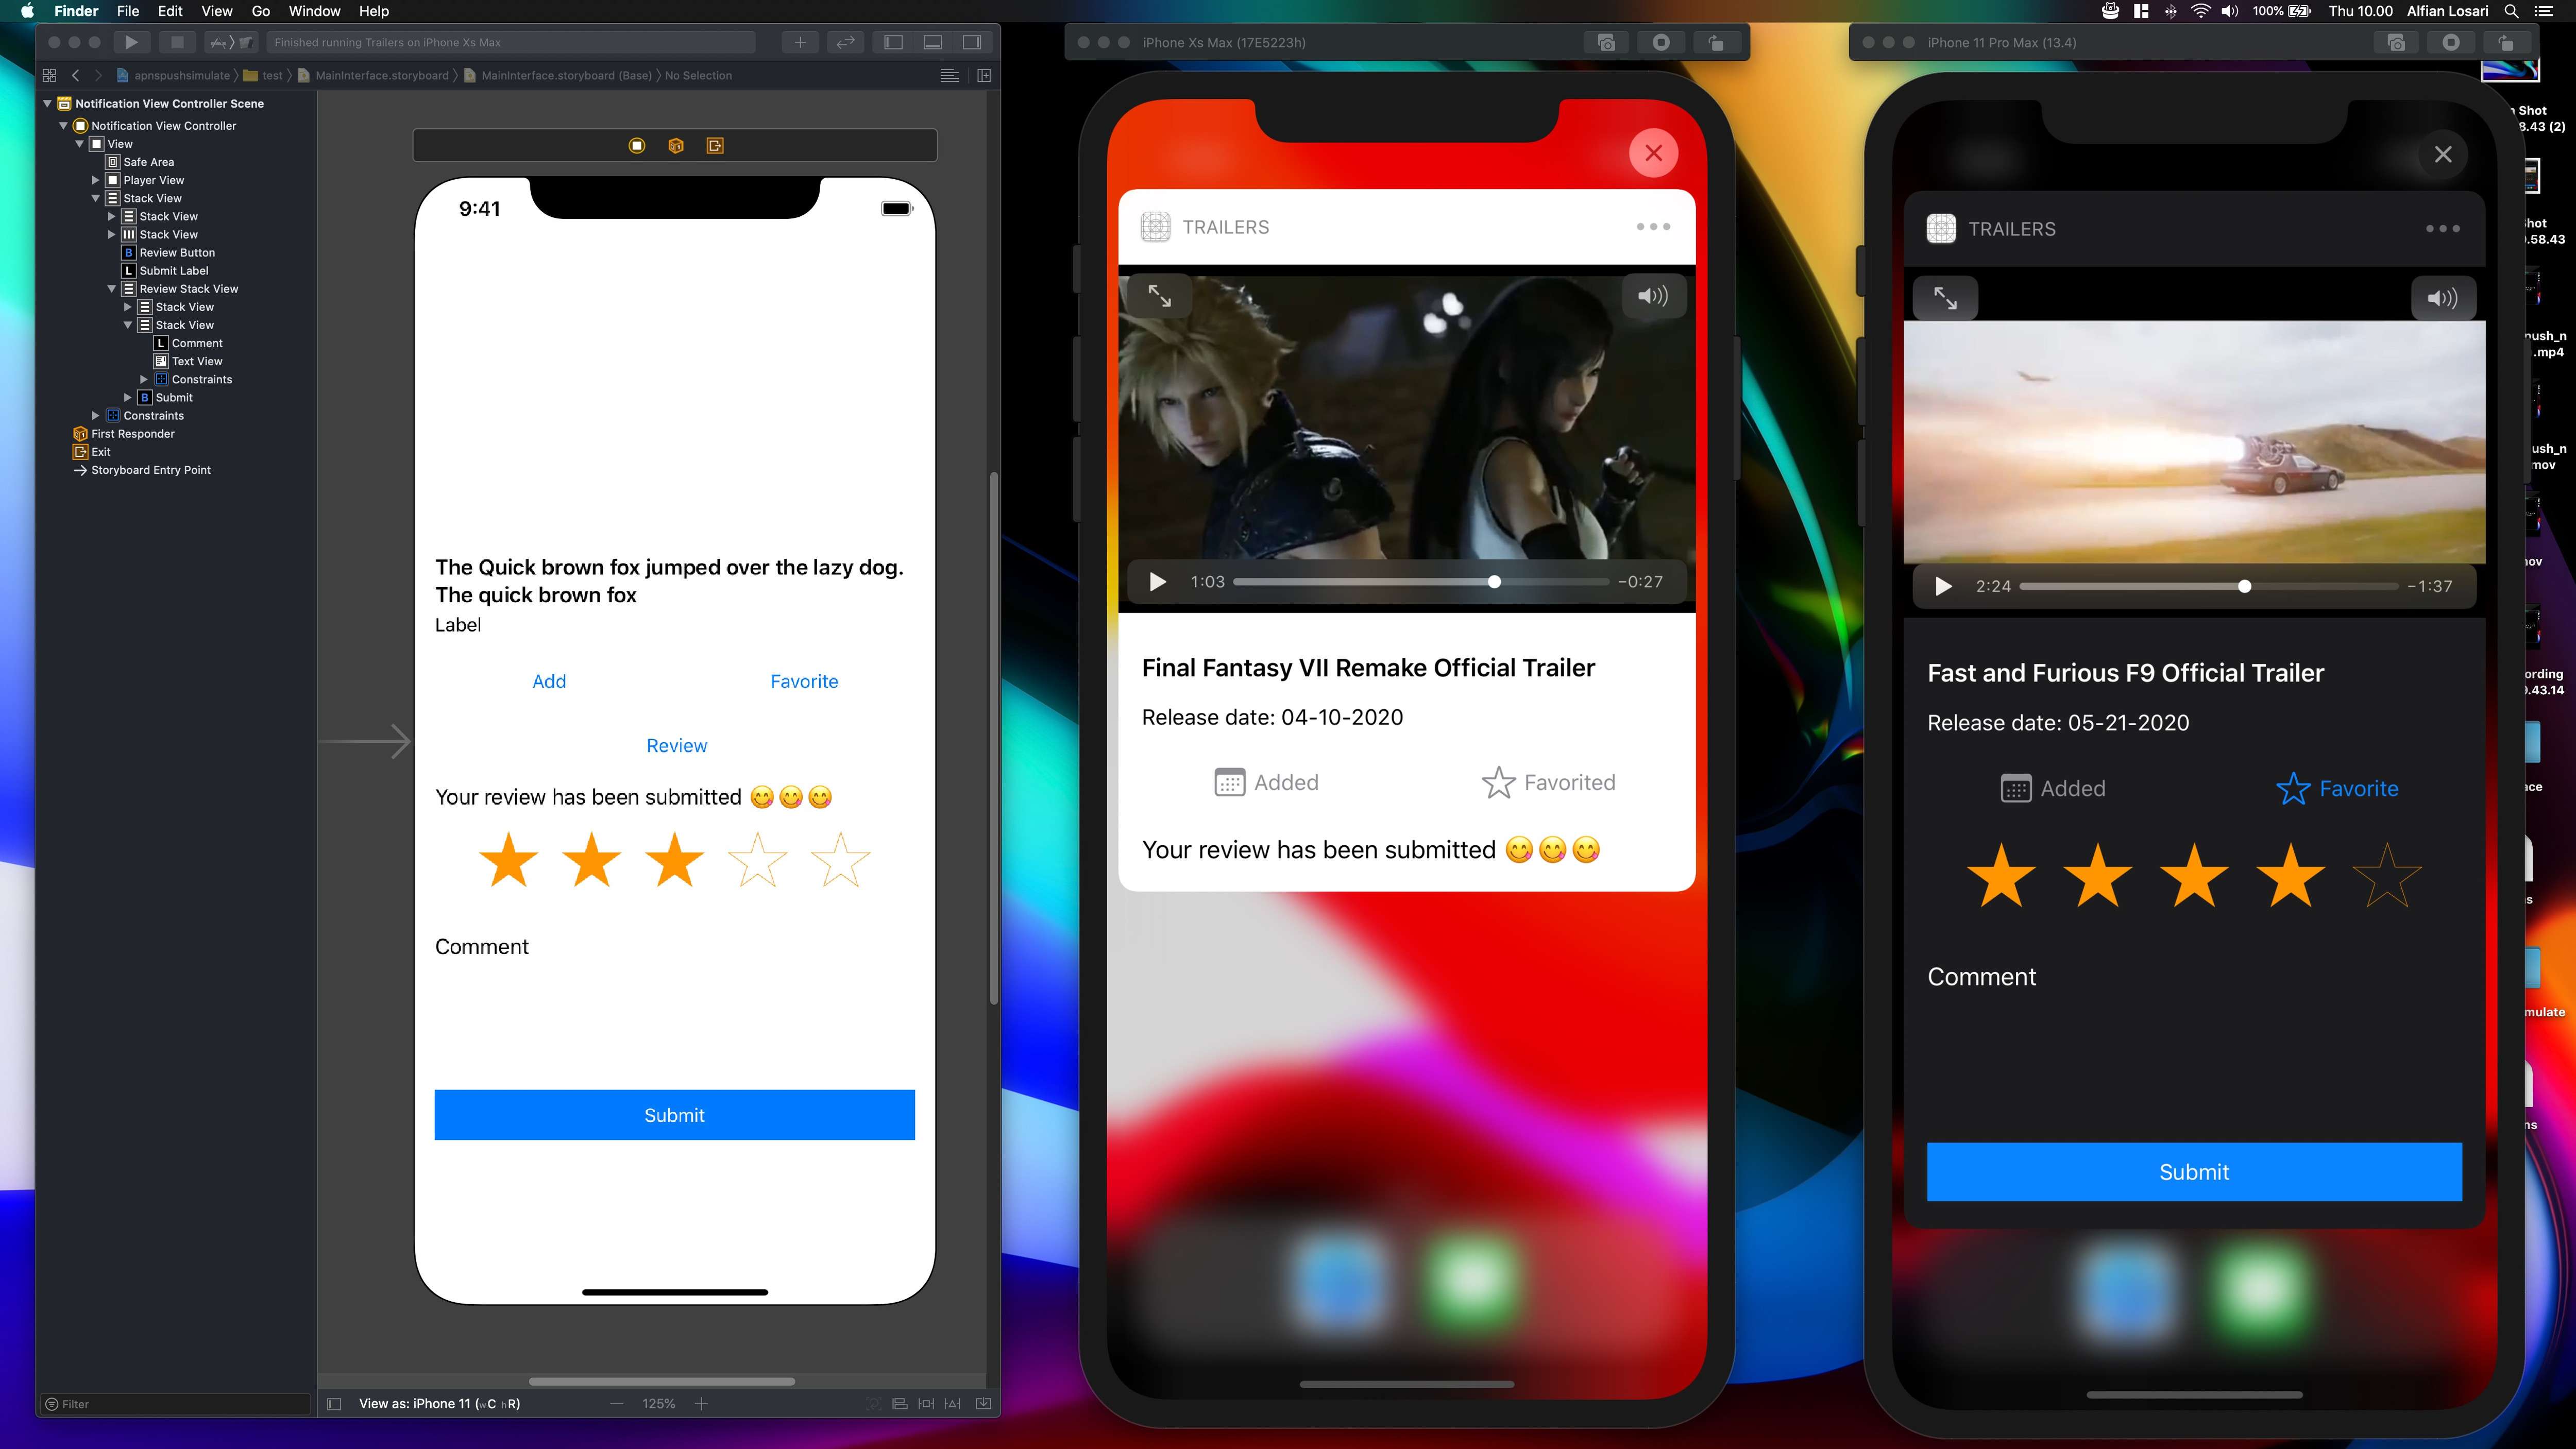
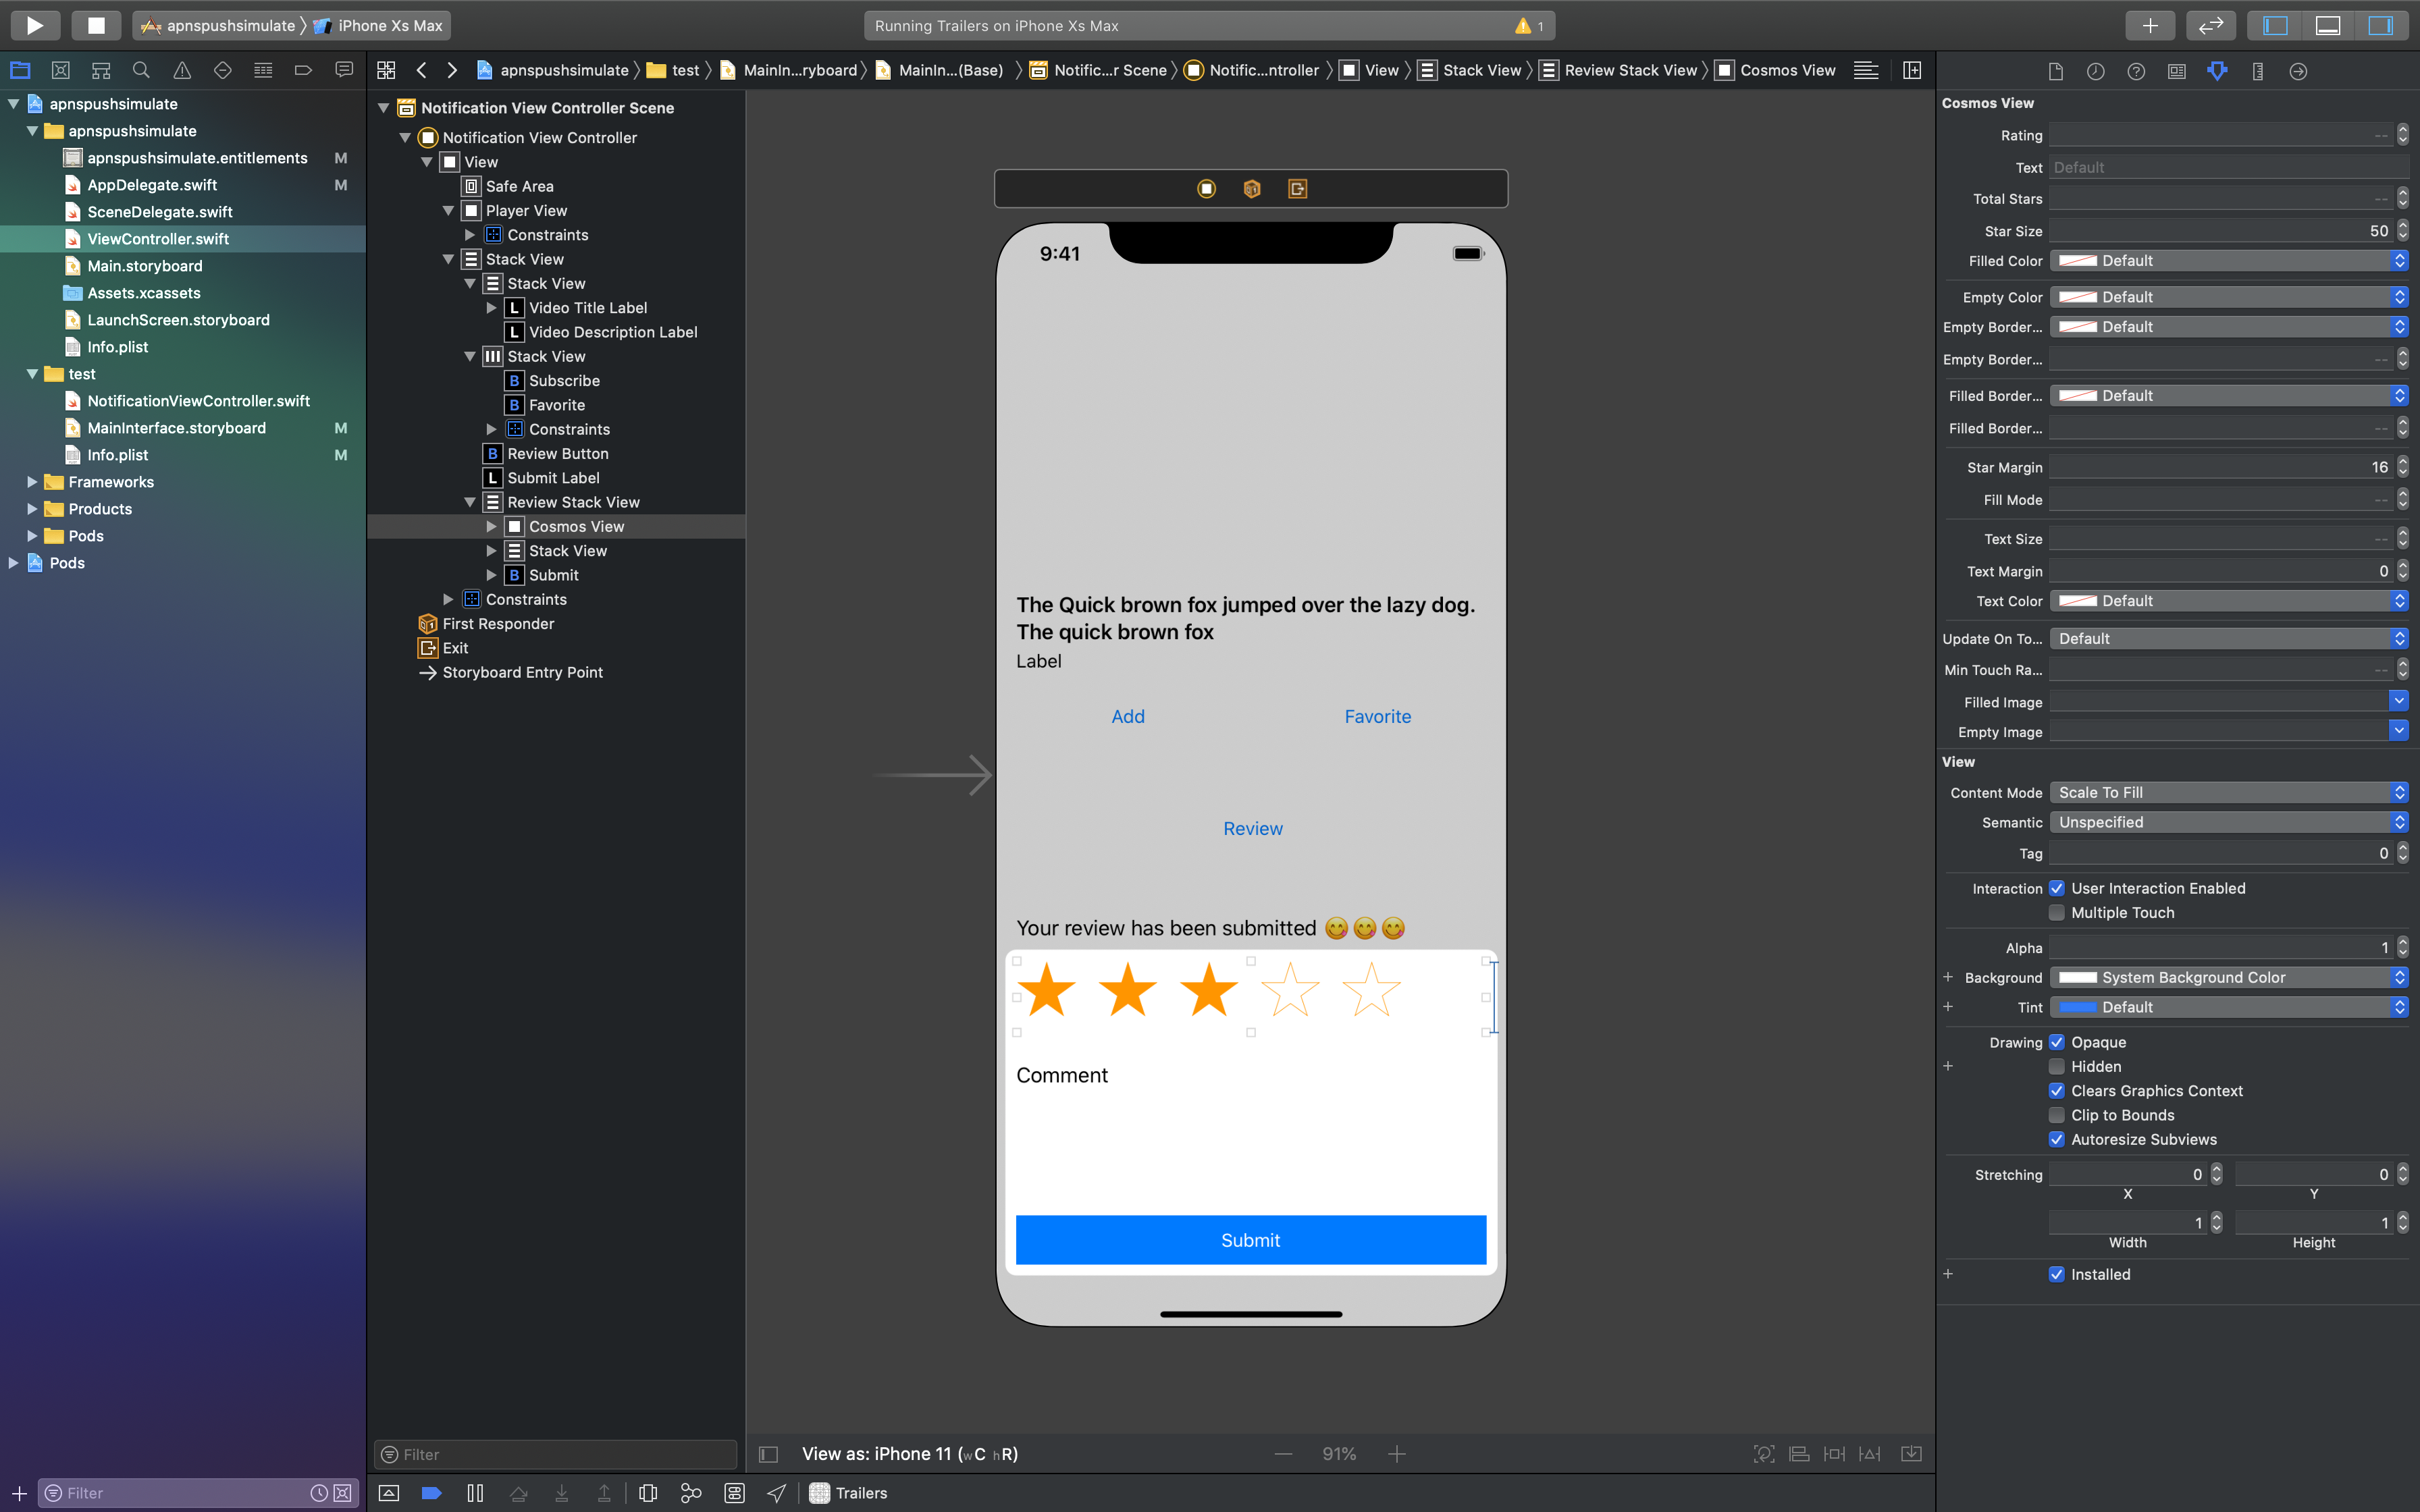
Let's move to the notification content preview UI. Open the MainInterface.storyboard in the notification extension target. Here are the steps to do:
- Drag a view to the View Controller canvas. Add these constraints:
Align top, leading, and trailing to Safe Area. Set theheight constraintsto240. Rename this view toPlayer View. This is the video player view that embeds theAVPlayerView. - Drag a
Stack Viewto the View Controller below thePlayer View. Add these constraints:Top Space to Player View with 16.Align leading, trailing, bottom to Safe Area. Set theaxistovertical,alignment and distributiontofill, and setspacingto16. Rename this toOuter Stack View. - Drag a
Stack Viewas a subview of theOuter Stack View. Add 2 labels inside this stack view,video title labelandvideo description label. Set theaxistovertical,alignment and distributiontofill, and setspacingto4. Set thevideo title labelline limit to2. - Drag a
Stack Viewas a subview of theOuter Stack View. Add 2 buttons inside this stack view,subscribe buttonandfavorite button. Set theaxistohorizontal,alignmenttofill,distributiontofill equally, and setspacingto4. - Drag a
Buttonas a subview of theOuter Stack View, rename this toReview Button. Set the text toReview. - Drag a
Labelas a subview of theOuter Stack View, rename this toSubmit Label. Set the text toYour review has been submitted! - Drag a
Stack Viewas a subview of theOuter Stack View. Set theaxistovertical,alignment and distributiontofill, and setspacingto24. Rename this toReview Stack View. - Drag a
Viewas a subview of theReview Stack View. Set the class toCosmosView. In the attribute inspector, set thestart margin to 16andstar size to 50. Set theheight constraint to 59. - Drag a
Stack Viewas a subview of theReview Stack View, below theCosmos View. Add a label inside this stack view,comment label,TextView, andButton. Set theaxistovertical,alignment and distributiontofill, and setspacingto8. Set theheight constraintto100. Make sure to set theComment labeltext tocomment. - Drag a
Buttonas a subview of theReview Stack Viewat the bottom. Set thetexttoSubmit, andconstraint the heightto40.
Handle on receive notification and UI interaction in code.
Open the NotificationViewController.swift file. There is a NotificationViewController class that subclass UIViewController and implements the UNNotificationContentExtension. The didReceive(_:) method is invoked when the push notification arrives passing the payload. Here is the brief overview of the code handling for the view, properties setup, didReceive and interaction handler:
- Imports all the required frameworks,
AVKit,UserNotifications,UserNotificationsUI,XCYoutubeKit, andCosmosat the top of the source file. - You need to also declare all the properties for labels, buttons, views, and text view.
- Declares all the
@IBActionmethod handling when the user taps on the respective button. In this case, subscribe, favorite, review, and submit handler. - Declares the properties for storing the state of
isSubscribedandisFavoritedwith the property observer. In this case, the text and color of the button change depending on thebooleanstate. - Declare the constants for storing the height of the view. In sake of this example, i already calculated the possible height when the view is expanded or collapsed.
- In
viewDidLoad, set up the initial view state of buttons and stack views. TheReview Stack ViewandSubmit Labelare hidden; the first time view appears. - In the
didReceive, we retrieve the content and set the text of labels for title and description. Also, we get thevideoIDand use theXCDYouTubeClientto get the video URL passing the identifier. - After we successfully retrieve the
URL, initializeAVPlayerViewControllerwith the URL, embed the view inside thePlayer Viewcontainer view, and play the content. - When the user tap on review button, unhide the
Review Stack View. When they tap on the submit button, hide theReview Stack Viewand show thesubmit label. For subscribing and favoriting, toggle the property to update the text and color of the buttons.
import UIKit
import AVKit
import UserNotifications
import UserNotificationsUI
import XCDYouTubeKit
import Cosmos

class NotificationViewController: UIViewController, UNNotificationContentExtension {

    @IBOutlet weak var playerView: UIView!
    @IBOutlet weak var reviewStackView: UIStackView!
    @IBOutlet weak var reviewButton: UIButton!
    @IBOutlet weak var videoTitleLabel: UILabel!
    @IBOutlet weak var videoDescriptionLabel: UILabel!
    @IBOutlet weak var submitLabel: UILabel!
    @IBOutlet weak var subscribeButton: UIButton!
    @IBOutlet weak var favoriteButton: UIButton!

    var playerController: AVPlayerViewController!
    let standardHeight: CGFloat = 432
    let reviewHeight: CGFloat = 658

    var isSubscribed = false {
        didSet {
            self.subscribeButton.tintColor = self.isSubscribed ? UIColor.systemGray : UIColor.systemBlue
            self.subscribeButton.setTitle(self.isSubscribed ? " Added" : " Add", for: .normal)
        }
    }

    var isFavorited = false {
        didSet {
            self.favoriteButton.tintColor = self.isFavorited ? UIColor.systemGray : UIColor.systemBlue
            self.favoriteButton.setTitle(self.isFavorited ? " Favorited" : " Favorite", for: .normal)
        }
    }

    override func viewDidLoad() {
        super.viewDidLoad()
        subscribeButton.setImage(UIImage(systemName: "calendar"), for: .normal)
        favoriteButton.setImage(UIImage(systemName: "star"), for: .normal)
        reviewButton.setImage(UIImage(systemName: "pencil"), for: .normal)

        reviewStackView.isHidden = true
        submitLabel.isHidden = true
    }

    func didReceive(_ notification: UNNotification) {
        playerController = AVPlayerViewController()
        preferredContentSize.height = standardHeight
        videoTitleLabel.text = notification.request.content.body
        videoDescriptionLabel.text = notification.request.content.userInfo["description"] as? String ?? ""

        guard let videoId = notification.request.content.userInfo["videoId"] as? String else {
            self.preferredContentSize.height = 100
            return
        }

        XCDYouTubeClient.default().getVideoWithIdentifier(videoId) { [weak self] (video, error) in
            guard let self = self else { return }

            if let error = error {
                print(error.localizedDescription)
                return
            }

            guard let video = video else {
                return
            }

            let streamURLS = video.streamURLs
            if let url = streamURLS[XCDYouTubeVideoQuality.medium360] ?? streamURLS[XCDYouTubeVideoQuality.small240] ?? streamURLS[XCDYouTubeVideoQuality.HD720] ?? streamURLS[18]   {
                self.setupPlayer(with: url)
            }
        }
    }

    private func setupPlayer(with url: URL) {
        guard let playerController = self.playerController else {
            return
        }

        let player = AVPlayer(url: url)
        playerController.player = player
        playerController.view.frame = self.playerView.bounds
        playerView.addSubview(playerController.view)
        addChild(playerController)
        playerController.didMove(toParent: self)
        player.play()
    }

    @IBAction func submitTapped(_ sender: Any) {
        UIView.animate(withDuration: 0.3) {
            self.reviewStackView.isHidden = true
            self.submitLabel.isHidden = false
            self.preferredContentSize.height = self.standardHeight
        }
    }

    @IBAction func reviewTapped() {
        UIView.animate(withDuration: 0.3) {
            self.preferredContentSize.height = self.reviewHeight
            self.reviewStackView.isHidden = false
            self.reviewButton.isHidden = true
        }
    }

    @IBAction func subscribeTapped(_ sender: Any) {
        self.isSubscribed.toggle()
    }

    @IBAction func favoriteTapped(_ sender: Any) {
        self.isFavorited.toggle()
    }
}
Before building and run, make sure to connect all the @IBOutlets and @IBActions from the storyboard to the code. To test, just drag and drop the apns file to the simulator, make sure to use the correct App ID. You can try to play with the videoId value of the file by using your video identifier. You can retrieve this from the URL parameters of the YouTube video in the browser address bar.
Conclusion
That's it! Congrats on your achievement on building the custom interactive push notification UI. There are many possibilities and use cases that you can explore using this new capability. To handle sharing data between the main app and extension target, you need to create app group id. Then, you can initialize a shared UserDefaults to store and retrieve local data. You can explore more about the UserNotifications framework from Apple documentation
Let's keep the lifelong learning goes on!