Building Swift Serverless REST API with AWS Lambda & DynamoDB
Published at July 12, 2020
Last month, The Swift Core Team & Swift Server Work Group had announced the availability of Swift AWS Lambda Runtime as well as support of Swift on Amazon Linux 2 OS. With both of this announcement, we finally have some official support to run Swift on AWS Lambda environment.
Swift has many advantages such as low memory footprint, high performance, and quick start time. The Swift AWS Lambda runtime also uses SwiftNIO to provide high performance non blocking networking engine for us to run asynchronous event driven code.
The runtime itself provides built-in support for many Lambda supported events such as HTTP request event from API Gateway, S3 object storage event, Simple Notification Service, and Simple Queue Service.
What We Will Build
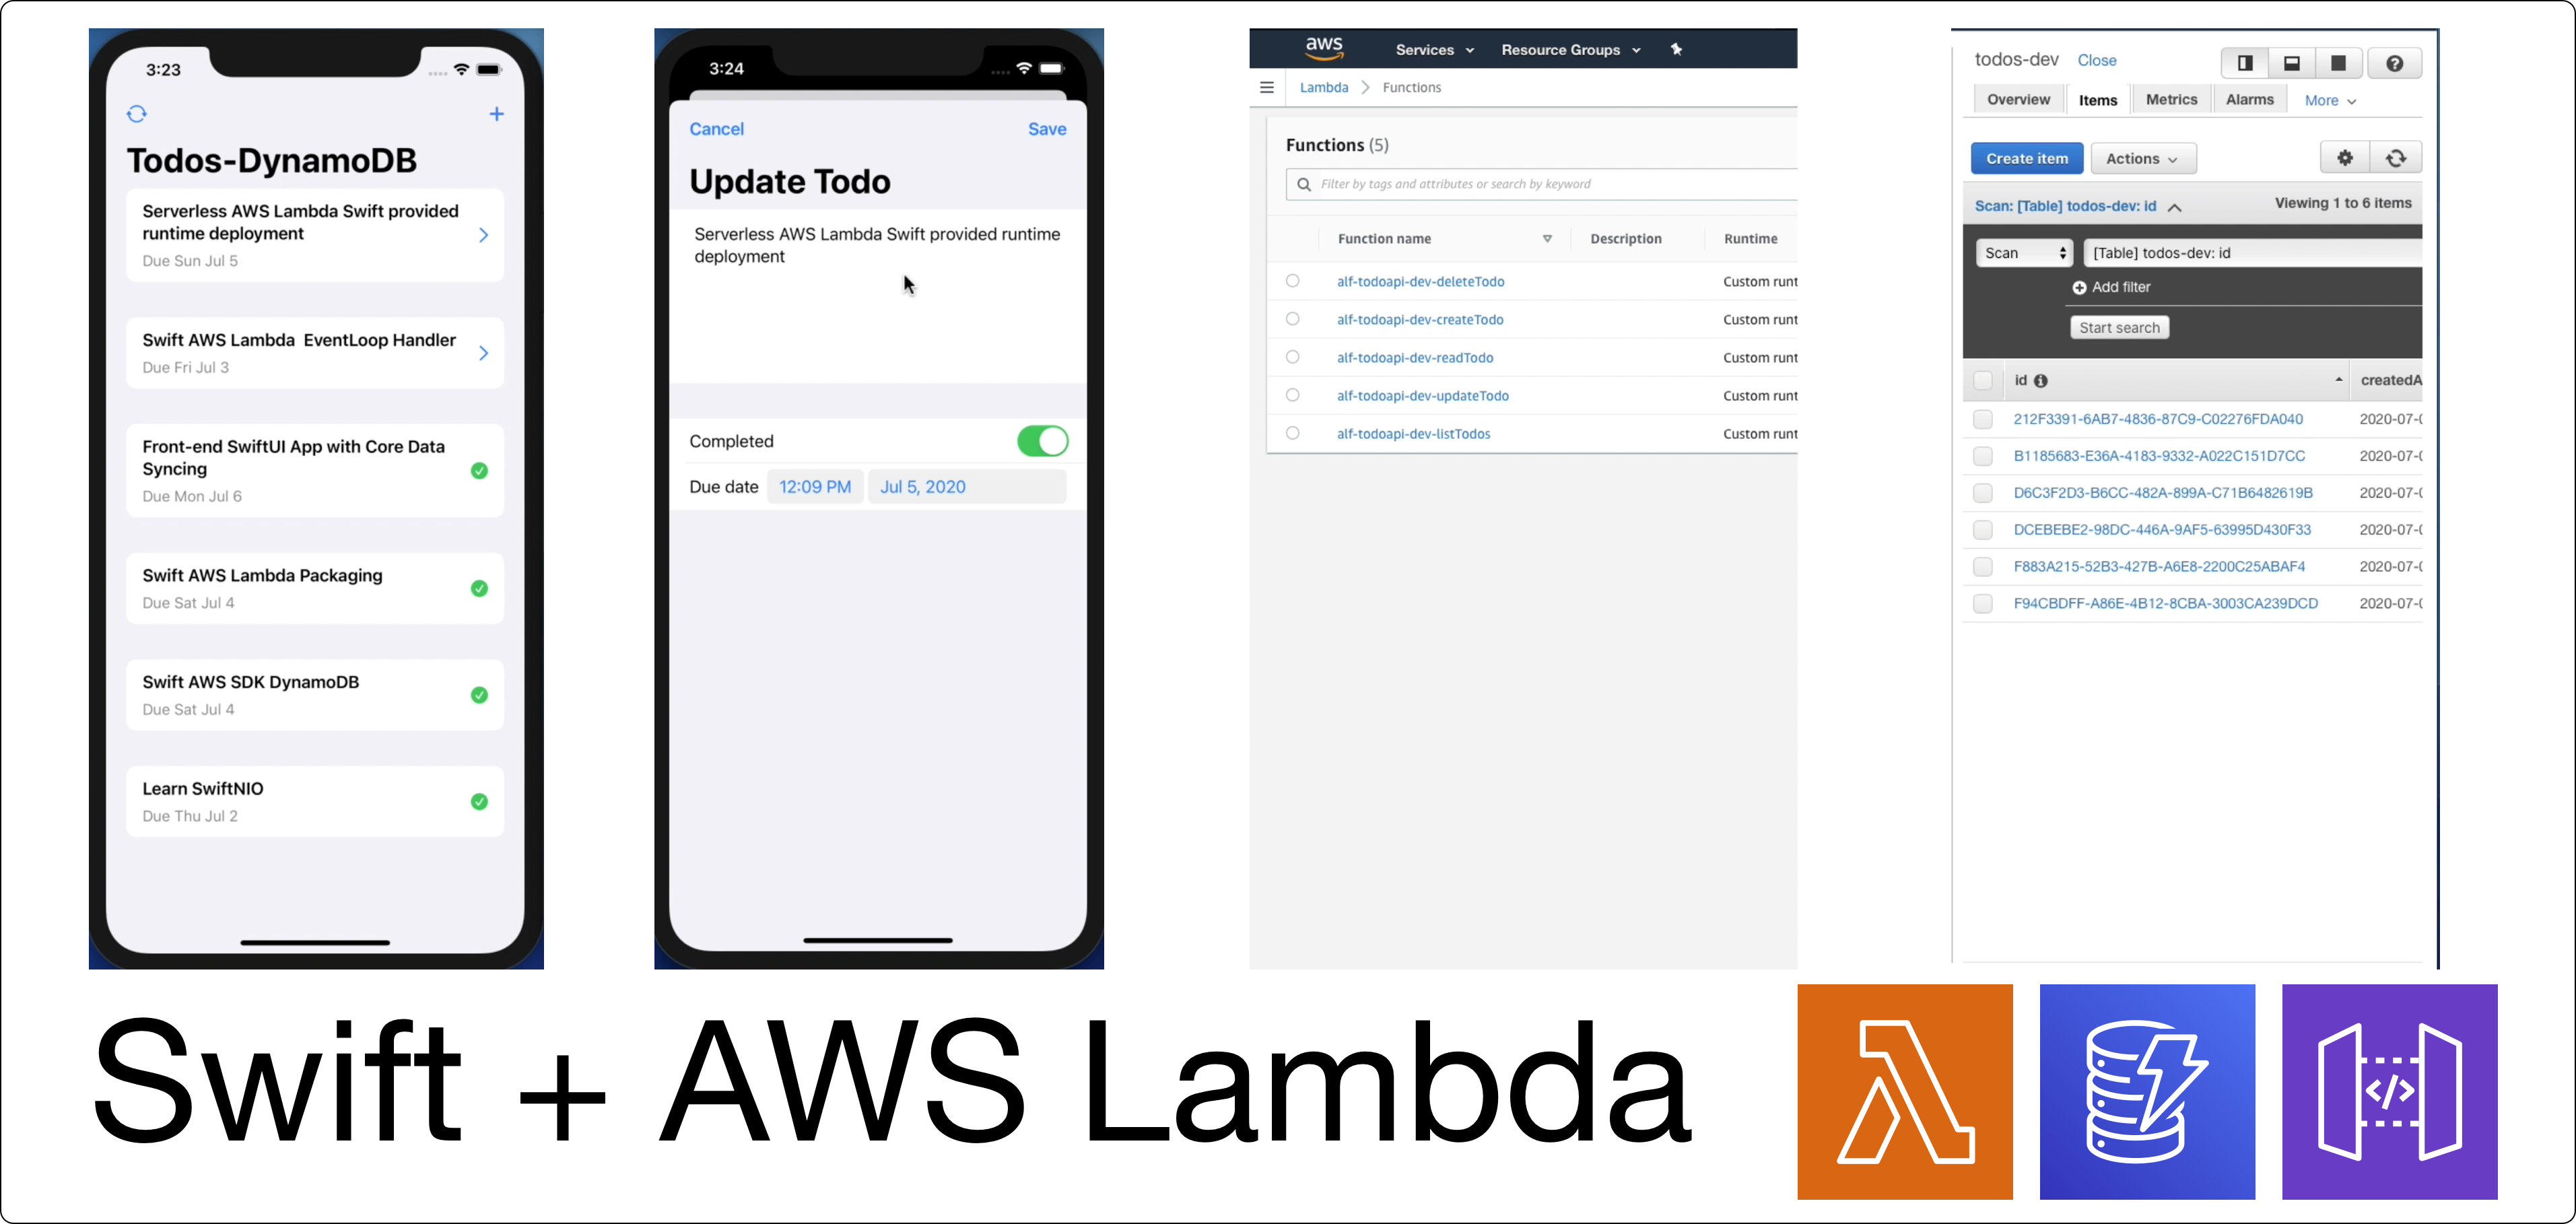
In this tutorial, we'll build a simple Swift Serverless REST API endpoints to create, update, delete, and retrieve list of todo. Here are the topics we'll learn:
- Swift Lambda Runtime to handle API Gateway request event.
- Swift AWS DynamoDB SDK to persist the todo data in the Cloud.
- SwiftNIO to handle asynchronous event processing in network using EventLoopFuture.
- Docker to build and package the Swift binary ready for AWS Lambda Custom provided runtime.
- Serverless Framework to provision and deploy to AWS Lambda with IAM Role.
You can download the completed project Source from the GitHub repository. I have provided the backend and iOS client app under one repository. Please follow the instruction on the README file to build. Completed Project GitHub Repository - Github.com
Let's begin to create a new Swift project and build the Todos REST API app.
Project & Dependencies Setup
First, let's open terminal, create a new directory named TodoAPI. You can put it anywhere you want.
mkdir TodoAPI && cd TodoAPI
Create a new swift executable using swift package init passing executable to the type flag. If you are using macOS, double click on the Package.swift file to open the project in Xcode automatically.
swift package init --type executable
Let’s add the required dependencies for our backend app. Open Package.swift file from the navigator and copy the following code
// swift-tools-version:5.2

import PackageDescription

let package = Package(
    name: "TodoAPI",
    platforms: [
        .macOS(.v10_14)
    ],
    dependencies: [
        .package(url: "https://github.com/swift-server/swift-aws-lambda-runtime.git", from: "0.2.0"),
        .package(url: "https://github.com/swift-aws/aws-sdk-swift.git", from: "5.0.0-alpha.4")
    ],
    targets: [
        .target(
            name: "TodoAPI",
            dependencies: [
                .product(name: "AWSDynamoDB", package: "aws-sdk-swift"),
                .product(name: "AWSLambdaRuntime", package: "swift-aws-lambda-runtime"),
                .product(name: "AWSLambdaEvents", package: "swift-aws-lambda-runtime")
            ]),
        .testTarget(
            name: "TodoAPITests",
            dependencies: ["TodoAPI"]),
    ]
)
Here's the things the we have added in the package:
macOS v10_14as the platform.Swift AWS Lambda Runtimepackage provided by The Swift Server Work Group, currently the version is0.2.0and its in pre-release stage.Swift AWS SDK, this package provides native Swift API for us to interact with various AWS Services such as DynamoDB, S3, and many more.AWSDynamoDB,AWSLambdaRuntime, andAWSLambdaEventsadded as the dependencies into theTodoAPItarget.
Make sure to save the file using Command + S shortcut. This will download and the resolve all the dependencies. You can view the progress from the dependencies section on the navigator.
After all packages has been downloaded, try to build and run to make sure there is no build time error.
Handling Function Invocation
Let's explore on how AWS Lambda Runtime handle the function invoked. There are 2 types of handler provided by the Swift AWS Lambda Runtime.
The first one is to use closure/callback. In this example, the request payload is a string, it can be also a JSON that conforms to decodable, and various AWS events such as S3, API Gateway, and many more. Make sure to invoke callback passing the response we want to return in the function.
import AWSLambdaRuntime

Lambda.run { (context, payload: String, callback) in
  callback(.success("Hello, \(payload)"))
}
The second one is to use EventLoopLambdaHandler, which is more suited to performance sensitive function, in this case the function will run in the same thread as the networking handlers, so no need for performance cost because of context switching between networking and processing threads. It used SwiftNIO EventLoop primitives, in this case our handler will return an event loop.
import AWSLambdaRuntime
import AWSLambdaEvents
import NIO

struct Handler: EventLoopLambdaHandler {
    typealias In = APIGateway.Request
    typealias Out = APIGateway.Response

    func handle(context: Lambda.Context, event: In) -> EventLoopFuture<Out> {
           return context.eventLoop.makeSucceededFuture(APIGateway.Response(
            statusCode: .ok,
            headers: [:],
            multiValueHeaders: nil,
            body: "Hello",
            isBase64Encoded: false
        ))
    }
}

Lambda.run(Handler())
If you are familiar with Javascript, the EventLoop concept is very similar to a Promise, which means the value will be resolved in the future.
We’ll be using the EventLoop lambda handler to build our REST API.
Building The Model
Let's create the model for the Todo first, create new directory named Models, and create a new Swift file named Todo. Then, let's create a Todo struct that conforms to Codable protocol. It has six properties:
idasString.nameasString.isCompletedasBoolean.dueDate,createdAt,updatedAtasDate.
Also to help us later when writing the model to dynamoDB dictionary, let's create a struct named DynamoDBField inside Todo struct. In this case, we just need to provide the key for each of the property using static constant.
public struct Todo: Codable {
    public let id: String
    public let name: String
    public let isCompleted: Bool
    public var dueDate: Date?
    public var createdAt: Date?
    public var updatedAt: Date?

    public struct DynamoDBField {
        static let id = "id"
        static let name = "name"
        static let isCompleted = "isCompleted"
        static let dueDate = "dueDate"
        static let createdAt = "createdAt"
        static let updatedAt = "updatedAt"
    }
}
Building Utils ISO8601 Date Formatter
Let's create a new file name Utils.swift, we'll use this to store the date formatter using ISO8601 format using the static constant inside the Utils struct. As DynamoDB doesn't provide support to store date as data type, we need to convert the date to the ISO8601 string using the formatter and store the date as string.
public struct Utils {

    public static let iso8601Formatter: DateFormatter = {
        let formatter = DateFormatter()
        formatter.dateFormat = "yyyy-MM-dd'T'HH:mm:ss.SSS'Z'"
        formatter.timeZone = TimeZone(secondsFromGMT: 0)
        return formatter
    }()

}

extension Date {

    var iso8601: String {
        Utils.iso8601Formatter.string(from: self)
    }
}
Below, let's create a simple extension for Date to convert the instance to iso8601 string using computed property. In this case, we just need to use Utils date formatter to convert to the date using the string(fromDate:) method passing self as the parameter.
Representing Error with APIError
Next, create a new file named APIError. We declare the APIError as enum that conforms to Swift Error protocol. Let's declare 3 cases: decodingError, requestError, todoNotFound.
enum APIError: Error {
    case decodingError
    case requestError
    case todoNotFound
}
Extending Todo Model For Encoding and Decoding of DynamoDB Item
Next, create a new file named Todo+DynamoDB.swift. In this file, we'll create an extension for Todo that will help us to convert Todo instance to dynamoDB dictionary. This will be used when we want to create and update item into DynamoDB. Make sure to import DynamoDB at the top of the source file.
import AWSDynamoDB
import Foundation

extension Todo {

    public var dynamoDbDictionary: [String: DynamoDB.AttributeValue] {
        var dictionary = [
            DynamoDBField.id: DynamoDB.AttributeValue(s: id),
            DynamoDBField.name: DynamoDB.AttributeValue(s: name),
            DynamoDBField.isCompleted: DynamoDB.AttributeValue(bool: isCompleted)
        ]

        if let dueDate = dueDate {
            dictionary[DynamoDBField.dueDate] = DynamoDB.AttributeValue(s: Utils.iso8601Formatter.string(from: dueDate))
        }

        if let createdAt = createdAt {
            dictionary[DynamoDBField.createdAt] = DynamoDB.AttributeValue(s: Utils.iso8601Formatter.string(from: createdAt))
        }

        if let updatedAt = updatedAt {
            dictionary[DynamoDBField.updatedAt] = DynamoDB.AttributeValue(s: Utils.iso8601Formatter.string(from: updatedAt))
        }

        return dictionary
    }

    public init(dictionary: [String: DynamoDB.AttributeValue]) throws {
        guard let id = dictionary[DynamoDBField.id]?.s,
            let name = dictionary[DynamoDBField.name]?.s,
            let isCompleted = dictionary[DynamoDBField.isCompleted]?.bool,
            let dueDateValue = dictionary[DynamoDBField.dueDate]?.s,
            let dueDate = Utils.iso8601Formatter.date(from: dueDateValue),
            let createdAtValue = dictionary[DynamoDBField.createdAt]?.s,
            let createdAt = Utils.iso8601Formatter.date(from: createdAtValue),
            let updatedAtValue = dictionary[DynamoDBField.updatedAt]?.s,
            let updatedAt = Utils.iso8601Formatter.date(from: updatedAtValue) else {
                throw APIError.decodingError
        }

        self.id = id
        self.name = name
        self.isCompleted = isCompleted
        self.dueDate = dueDate
        self.createdAt = createdAt
        self.updatedAt = updatedAt
    }

}
The dictionary uses String as the key and DynamoDB.AttributeValue as the value. We'll use the DynamoDBField constant that we have declared before inside Todo Struct as the key. Then, we can initialize DynamoDB.AttributeValue instance passing the correct data type, for string it will be s: and boolean is bool:. Make sure to convert the Date into the String before putting it into the dictionary.
Next, we also need to create an initializer that accepts DynamoDB Dictionary to initialize Todo instance. This will be used later when we retrieve todo items from DynamoDB SDK.
In this case, using the guard statement, we make sure all the properties exists in the dictionary and can be casted to the actual data type before we assign them to the properties. If one of them is not exists or the data type is incompatible, we throw a DecodingError.
Building The Todo Service to Interact with AWS DynamoDB SDK
Let's move on to create TodoService, this service has the responsibility to interact with AWSDynamoDB SDK to get list of items and also to read, create, update, and delete a single item.
Create a new file named TodoService.swift file and import AWS DynamoDB at the top of the source file. Declare TodoService class, we'll need 2 instance property. First is the instance of DynamoDB itself, the second one is the tableName of the todo item in AWS. We create an initializer to inject those 2 properties.
public class TodoService {

    let db: DynamoDB
    let tableName: String

    public init(db: DynamoDB, tableName: String) {
        self.db = db
        self.tableName = tableName
    }
}
Get All Todos
Next, create a new method named getAllTodos that returns an EventLoopFuture of Todo Array. In the implementation, we need to create the DynamoDB ScanInput instance passing the tableName. Next, we can use the dynamoDB scan method passing the input. We're going to chain the ScanOutput to todos array using the FlatMapThrowing operator, if you are familiar with Javascript promise patterN, you can think of this as the then operator. In case of this, as the mapping can throw an error, we need to use FlatMapThrowing operator.
//...
public func getAllTodos() -> EventLoopFuture<[Todo]> {
    let input = DynamoDB.ScanInput(tableName: tableName)

    return db.scan(input).flatMapThrowing { (output) -> [Todo] in
        try output.items?.compactMap { try Todo(dictionary: $0) } ?? []
    }
}
Get Single Todo
Let's create the method to read a single item given an ID of the Todo. We give it a name of getTodo and pass id of type String as single parameter. This will return an EventLoopFuture of Todo. In the implementation, we use the DynamoDB's GetItemInput passing the key, which is the dictionary containing the id key and DynamoDB Attribute value of String, we also need to pass the tableName. Then, we can use the GetItem passing the input as the parameter. We use FlatMapThrowing to convert the GetItemOutput to the TodoInstance passing the dictionary from the item, also if the output's item is nil, we'll throw a TodoNotFound APIError.
//...
public func getTodo(id: String) -> EventLoopFuture<Todo> {
    let input = DynamoDB.GetItemInput(key: [Todo.DynamoDBField.id: DynamoDB.AttributeValue(s: id)], tableName: tableName)

    return db.getItem(input).flatMapThrowing { (output) -> Todo in
        if output.item == nil { throw APIError.todoNotFound }
        return try Todo(dictionary: output.item ?? [:])
    }
}
Create Todo
For creating todo, create a new method named createTodo with a single parameter of Todo Model, the return type is EventLoopFuture of Todo. In the implementation, we copy the Todo struct to a new variable, then initialize current date. Then, we assign the updatedAt and createdAt property with the date. Next, we create a DynamoDB's PutItemInput passing the todo dynamoDB dictionary using the computed property we created before as well as the tableName. At last we invoke putItem method on the DB passing the input. In this case, we can just return the instance of Todo.
//...
public func createTodo(todo: Todo) -> EventLoopFuture<Todo> {
    var todo = todo
    let currentDate = Date()

    todo.updatedAt = currentDate
    todo.createdAt = currentDate

    let input = DynamoDB.PutItemInput(item: todo.dynamoDbDictionary, tableName: tableName)

    return db.putItem(input).map { (_) -> Todo in
        todo
    }
}
Updating Todo
For updating Todo, create a new method named updateTodo with a single parameter of Todo Model, the return type is EventLoopFuture of Todo. Create a new variable to copy the Todo struct instance, then we just assign the updatedAt with current Date. Implementation of UpdateItemInput is quite complex compared to CreateItemInput. We'll need to create the expressionAttributeNames Array containing the keys we want to update, then we create the expressionAttributeValues Array which are the values we want to update. Pass the key, which is the ID, returnValues to allNew, then make sure to pass the tableName, at last we use the update expression literal passing the placeholder attribute names and values we have created. At last, we can use the updateItem passing the input, then using FlatMap, we invoke the getTodo it em passing the ID to return a EventLoopFuture of Todo.
//...
public func updateTodo(todo: Todo) -> EventLoopFuture<Todo> {
    var todo = todo

    todo.updatedAt = Date()

    let input = DynamoDB.UpdateItemInput(
        expressionAttributeNames: [
            "#name": Todo.DynamoDBField.name,
            "#isCompleted": Todo.DynamoDBField.isCompleted,
            "#dueDate": Todo.DynamoDBField.dueDate,
            "#updatedAt": Todo.DynamoDBField.updatedAt
        ],
        expressionAttributeValues: [
            ":name": DynamoDB.AttributeValue(s: todo.name),
            ":isCompleted": DynamoDB.AttributeValue(bool: todo.isCompleted),
            ":dueDate": DynamoDB.AttributeValue(s: todo.dueDate?.iso8601 ?? ""),
            ":updatedAt": DynamoDB.AttributeValue(s: todo.updatedAt?.iso8601 ?? ""),

        ],
        key: [Todo.DynamoDBField.id: DynamoDB.AttributeValue(s: todo.id)],
        returnValues: DynamoDB.ReturnValue.allNew,
        tableName: tableName,
        updateExpression: "SET #name = :name, #isCompleted = :isCompleted, #dueDate = :dueDate, #updatedAt = :updatedAt"
    )

    return db.updateItem(input).flatMap { (output)  in
        self.getTodo(id: todo.id)
     }
}
Deleting Todo
At last, to delete an item, we need to create deleteTodo method passing the id of string as single parameter. The return type of this will be an EventFuture of Void. In the implementation, create DynamoDB deleteItemInput passing the key and tableName. At last, we invoke the db's deleteItemMethod passing the input. Using map we return a void closure.
//...
public func deleteTodo(id: String) -> EventLoopFuture<Void> {
    let input = DynamoDB.DeleteItemInput(
        key: [Todo.DynamoDBField.id: DynamoDB.AttributeValue(s: id)],
        tableName: tableName
    )

    return db.deleteItem(input).map { _ in }
}
That's it for the TodoService class. With this, we'll be able to perform CRUD operation to DynamoDB! Let's move on to create our LambdaHandler!
Building The TodoLambdaHandler to handle CRUD Operation
Create a new file named TodoLambdaHandler.swift. We need to import several frameworks into the source code.
import Foundation
import AWSLambdaEvents
import AWSLambdaRuntime
import AsyncHTTPClient
import NIO
import AWSDynamoDB
First, let's declare the TodoLambdaHandler as a struct that implements EventLambdaHandler Protocol. The protocol itself used associatedtype for the event Input and the response Output. In our case, we're going to use APIGateway Request for the input event and APIGateway Response for the output response. There are several other options you can explore such as S3, SQS, or DynamoDB events.
typealias In = APIGateway.Request
typealias Out = APIGateway.Response
The handler itself need to have reference to the DynamoDB instance and TodoService, as well as the HTTPClient. Let's declare this as the instance properties.
let db: AWSDynamoDB.DynamoDB
let todoService: TodoService
let httpClient: HTTPClient
Handling Initialization of DynamoDB, HTTP Client, and TodoService
Next, we need to create the initializer that accepts the Lambda.Initialization context, basically we need to initialize the DynamoDB instance and TodoService in the implementation.
First let's create HTTPClient instance, we need to pass this when initializing DynamoDB later. Declare the timeout variable and initialize it with HTTPClient.Configuration.Timeout passing 30 seconds to both connect and read parameters. Next, lets declare the httpClient variable and initialize HTTPClient passing the .shared with the current context eventLoop as the eventLoopGroupProvider, then for the configuration, we initialize HTTPClient.Configuration passing the timeout variable we created before.
let timeout = HTTPClient.Configuration.Timeout(
    connect: .seconds(30),
    read: .seconds(30)
)

let httpClient = HTTPClient(
    eventLoopGroupProvider: .shared(context.eventLoop),
    configuration: HTTPClient.Configuration(timeout: timeout)
)
Next, we need to retrieve the name of the table for our DynamoDB todo item, we'll be storing the tableName, AWS_REGION, and _HANDLER as the environment variables when we we deploy our function to AWS Lambda.
To retrieve the environment variable, we can use Lambda.env static method passing the name of the variable we want to retrieve from the environment.
Declare the tableName constant and pass the string of TODOS_TABLE_NAME as the parameter.
let tableName = Lambda.env("TODOS_TABLE_NAME") ?? ""
For the region, we pass AWS_REGION as the parameter, then using the value, we initialize the Region enum passing it to the rawValue parameter, if it doesn't exists, we provide a default fallback region which is us-west-2 at Oregon, US.
let region: Region
if let envRegion = Lambda.env("AWS_REGION") {
    region = Region(rawValue: envRegion)
} else {
    region = .uswest2
}
Next, we need to initialize the AWSDynamoDB instance. Declare the db constant and using DynamoDB initializer we pass the region and the httpClientProvider.
let db = AWSDynamoDB.DynamoDB(region: region, httpClientProvider: .shared(httpClient))
let todoService = TodoService(db: db, tableName: tableName)

self.httpClient = httpClient
self.db = db
self.todoService = todoService
For the TodoService, we can initialize it passing the instance of the db and the tableName.
At last, we assign all the property into the instance properties so we can reference to them later. That's it for the initialization! we have the DB instance and TodoService to perform the CRUD handling operation.
Handling CRUD Operation with Handler Enum
There is one required method we need to implement acting as the entry-point when handling the request into our app. It is handle(context:event:)->EventLoopFuture. This will be invoked passing the context and the request API Gateway event containing the HTTP payload. The return type expected is EventLoopFuture API Gateway response which is the representation of the HTTP response we want to return to the client.
As we are going to use a single binary to perform all the CRUD operations, we need to be able to know the type of the operation we need to perform when user hits our API. To do this, we need to create an enum named Handler. Basically, this enum represents all the supported operations in our API.
Create a new file named Handler inside Model folder. Import AWSLambdaRuntime at the top, and then declare enum Handler with type of String. Our API supports 5 different operations, create, update, delete, read, and list. To get the handler value, we'll declare a static computed property named current that returns the handler. We'll retrieve the handler from the environment variable named _HANDLER, we will set this environment variable for each of the operation when we deploy our function later using Serverless framework.
enum Handler: String {

    case create
    case update
    case delete
    case read
    case list

    static var current: Handler? {
        guard let handler = Lambda.env("_HANDLER") else {
            return nil
        }
        return Handler(rawValue: handler)
    }
}
Extension For API Gateway Request And Response
Before implementing the Handler, let's create a helper extension for the APIGateway Request and Response that will help us to decode the request into the Model and encode the model into the response as JSON string.
Create a new folder named extensions, then create a new file named APIGateway+Extension.swift inside. At the top import Foundation and AWSLambdaEvents.
First, let's declare the extension for the APIGateway.Request. We declare one helper method that will help us to decode the JSON body of the request to a Decodable type using generic placeholder. Let's declare the jsonDecoder static constant and set the date decoding strategy to custom formatter passing the ISO8601 date formatter from the Utils struct.
private static let jsonDecoder: JSONDecoder = {
    let decoder = JSONDecoder()
    decoder.dateDecodingStrategy = .formatted(Utils.iso8601Formatter)
    return decoder
}()

func bodyObject<D: Decodable>() throws -> D {
    guard let jsonData = body?.data(using: .utf8) else {
        throw APIError.requestError
    }
    let object = try APIGateway.Request.jsonDecoder.decode(D.self, from: jsonData)
    return object
}
In the bodyObject implementation, using the if let statements, we check whether the body data exists, if not we throw a Request Error. Then, using the JSON decoder, we just decode the type passing the jsonData, and finally return the decoded instance.
Next, let's create the helper extension for APIGateway Response. Let's begin by declaring the jsonEncoder static constant. Similar to the JSONDecoder, we set the dateDecodingStrategy to use custom ISO8601 date formatter.
private static let jsonEncoder: JSONEncoder = {
    let encoder = JSONEncoder()
    encoder.dateEncodingStrategy = .formatted(Utils.iso8601Formatter)
    return encoder
}()
Next, lets' declare the constant for the defaultHeaders. The value itself is a dictionary with type of String as the key and value. This will be used to set the HTTP response headers to allow CORS when invoked from a website and to allow all HTTP methods.
public static let defaultHeaders = [
    "Content-Type": "application/json",
    "Access-Control-Allow-Origin": "*",
    "Access-Control-Allow-Methods": "OPTIONS,GET,POST,PUT,DELETE",
    "Access-Control-Allow-Credentials": "true",
]
Let's move on to create a new initializer that accepts error and AWSLambdaEvents.HTTPResponseStatus. In this case we just invoke the initializer passing the status code, then pass the defaultHeaders to the HTTP headers, also in the body we pass hardcoded JSON string with the key of error and string value of the error. We'll use this later when we want to return an error as the response.
public init(with error: Error, statusCode: AWSLambdaEvents.HTTPResponseStatus) {
    self.init(
        statusCode: statusCode,
        headers: APIGateway.Response.defaultHeaders,
        multiValueHeaders: nil,
        body: "{\"error\":\"\(String(describing: error))\"}",
        isBase64Encoded: false
    )
}
The second initializer accepts an encodable object using generic placeholder and the HTTPResponseStatus. This will be helpful later when we want to return instance of Todo or Todo array as they both conforms to Codable protocol. In the implementation, we encode the instance using JSONEncoder and assign the String of the data to the body variable using UTF-8 encoding. At last, we invoke the initializer passing the status code, defaultHeaders, and the body.
public init<Out: Encodable>(with object: Out, statusCode: AWSLambdaEvents.HTTPResponseStatus) {
    var body: String = "{}"
    if let data = try? Self.jsonEncoder.encode(object) {
        body = String(data: data, encoding: .utf8) ?? body
    }
    self.init(
        statusCode: statusCode,
        headers: APIGateway.Response.defaultHeaders,
        multiValueHeaders: nil,
        body: body,
        isBase64Encoded: false
    )
}
At the bottom, create a new Struct named EmptyResponse that conforms to Encodable. The implementation is empty, as this will be used when we want to return a response with empty body such as when deleting a Todo item.
struct EmptyResponse: Encodable {}
Finally, let's move back to the TodoLambdaHandler to implement the handler method!
Using Enum Handler Enum to Handle Incoming Event
First, let's use a guard statement to get the current type of the handler operation using the Handler.current static property, if it is not exits, we just return a resolved successful eventLoopFuture passing the APIGateway.Response instance with APIError and badRequest HTTP Status Type. This will returns the response with 400 as the HTTP Status code containing the error message in the body.
guard let handler = Handler.current else {
    return context.eventLoop.makeSucceededFuture(APIGateway.Response(with: APIError.requestError, statusCode: .badRequest))
}
Then, we use the switch statement on the enum instance to handle all the possible operations. We'll create a method to handle each of the operation. All of them accept Lambda.Context and APIGateway.Request, then returns EventLoopFuture of APIGateway.Response.
switch handler {
case .create:
    return handleCreate(context: context, event: event)
case .read:
    return handleRead(context: context, event: event)
case .update:
    return handleUpdate(context: context, event: event)
case .delete:
    return handleDelete(context: context, event: event)
case .list:
    return handleList(context: context, event: event)
}
Handling Create Todo
First, let's declare the handleCreate method to handle creating single Todo Item. Using the guard statement, we decode the request body to Todo instance, if it doesn't exists, we return a resolved EventLoopFuture passing the APIGateway.Response of RequestError and badRequest httpStatus. Next, we invoke TodoService's createTodo method passing the todo instance. As this returns a Future of Todo, we need to map it to APIGateway.Response using the map operator. In the closure body, we initialize the APIGateway.Response passing the Todo instance and ok as the HTTPResponseStatus. This will encode the instance into the JSON data, then put in the response body and set the HTTP status code to 200.
Also in case there is an error in the eventLoop chain, we need to catch it and return the appropriate error. Let's declare a method named catchError that accept a Lambda context and error as the parameter, then return EventLoopFuture of APIGateway.Response. In the body, we just need to initialize the APIGateway.Response and pass the error, then return the resolved future passing the response.
func catchError(context: Lambda.Context, error: Error) -> EventLoopFuture<APIGateway.Response> {
    let response = APIGateway.Response(with: error, statusCode: .notFound)
    return context.eventLoop.makeSucceededFuture(response)
}
Going back to create method, to catch the error, we can use the flatMapError operator. This will be invoked if there is an error thrown in one of the upstream, think of this as the catch error promise in Javascript. In this case, we can just invoke the catchError method we created before to return the APIGateway.Response.
.flatMapError {
    self.catchError(context: context, error: $0)
}
Handling Read Todo
Next, let's create the handleRead method. In the implementation, we check if the pathParameters dictionary contains value with key of id, if not we just return resolved promise of response with request error and http status 400. Then, we just need to invoke todoService's getTodo method passing the value of id. Using map operator we transform the Todo instance to Response passing the todo instance to be encoded in the HTTP Body and set the status code to 200.
func handleRead(context: Lambda.Context, event: APIGateway.Request) -> EventLoopFuture<APIGateway.Response> {
    guard let id = event.pathParameters?[Todo.DynamoDBField.id] else {
        return context.eventLoop.makeSucceededFuture(APIGateway.Response(with: APIError.requestError, statusCode: .notFound))
    }
    return todoService.getTodo(id: id)
        .map { todo in
            APIGateway.Response(with: todo, statusCode: .ok)
        }.flatMapError {
            self.catchError(context: context, error: $0)
        }
}
Handling Update Todo
To update a todo item, let's create the handleUpdate method. Just like the handleCreate method, using the guard statement, we decode the http body to Todo instance. If fails, we just return resolved promise with response containing requestError and 400 as the http status code. Then, we invoke todo's service updateTodo method passing the updatedTodo item. Using the map operator, we transform the result of the todo item to APIGateway passing the todo instance to be encoded as JSON in the HTTP body, and set the status code to 200.
func handleUpdate(context: Lambda.Context, event: APIGateway.Request) -> EventLoopFuture<APIGateway.Response> {
    guard let updatedTodo: Todo = try? event.bodyObject() else {
        return context.eventLoop.makeSucceededFuture(APIGateway.Response(with: APIError.requestError, statusCode: .badRequest))
    }
    return todoService.updateTodo(todo: updatedTodo)
        .map { todo in
            APIGateway.Response(with: todo, statusCode: .ok)
        }.flatMapError {
            self.catchError(context: context, error: $0)
        }
}
Handle Delete Todo
Next, let's create the handleDelete for deleting a todo item. Just like handleRead method, we need to get the id to delete from the pathParameters passing id as the key to the dictionary. After that, we just invoke todoService's deleteTodo method passing the id. In this case, we just need to return APIGateway response with empty body and status code of 200.
func handleDelete(context: Lambda.Context, event: APIGateway.Request) -> EventLoopFuture<APIGateway.Response> {
    guard let id = event.pathParameters?[Todo.DynamoDBField.id] else {
        return context.eventLoop.makeSucceededFuture(APIGateway.Response(with: APIError.requestError, statusCode: .badRequest))
    }
    return todoService.deleteTodo(id: id)
        .map {
            APIGateway.Response(with: EmptyResponse(), statusCode: .ok)
        }.flatMapError {
            self.catchError(context: context, error: $0)
        }
}
Handle List Todos
The last handler, is the handleList method. In this handler, we just invoke todoService's getAllTodos method, then transform the result of the Todo Array into APIGateway Response passing the array to be encoded as JSON into the HTTP body and set the status code as 200.
func handleList(context: Lambda.Context, event: APIGateway.Request) -> EventLoopFuture<APIGateway.Response> {
    return todoService.getAllTodos()
        .map { todos in
            APIGateway.Response(with: todos, statusCode: .ok)
        }.flatMapError {
            self.catchError(context: context, error: $0)
        }
}
That's it for the TodoLambdaHandler, now let's put this into main.swift where we will run the Lambda passing the handler.
Lambda.run(TodoLamdaHandler.init)
We have completed building the app, now let's build the app and archive the app into a Zip file so it can be uploaded to AWS Lambda!
Building and Packaging Using Docker Swift Amazon Linux 2 Distro
Before we begin the process, make sure to install Docker into your operating system. Check the link to install docker from the description if you haven’t installed. We’re going to use Docker Container using official Swift Amazon Linux 2 Image to build the release, and package the binary into the bootstrap file required by the AWS Lambda to run the function.
Let's follow the instruction from Fabian Fett's website. He is one of the contributor of the Swift AWS Lambda library. He posted a great tutorial on building and packaging Swift into the zip file ready to be used in AWS.
Creating The Dockerfile
In this step, we need to create a Dockerfile on the project directory. So, let's open terminal and navigate to the project directory. Then, create a new file named Dockerfile. Open it in your editor, then copy and paste into the file.
FROM swiftlang/swift:nightly-amazonlinux2

RUN yum -y install \
    git \
    libuuid-devel \
    libicu-devel \
    libedit-devel \
    libxml2-devel \
    sqlite-devel \
    python-devel \
    ncurses-devel \
    curl-devel \
    openssl-devel \
    tzdata \
    libtool \
    jq \
    tar \
    zip
This will use the the Swift Nightly image for Amazon Linux 2 from SwiftLang docker repository, then add the required dependencies to build and run Swift.
Next, let's build the container using the Dockerfile. Let's give it a name of swift-lambda-builder. Type the following syntax.
docker build -t swift-lambda-builder .
Building The App from Docker Container
Wait after the container are created, then let's build the binary from the Docker container using this syntax.
docker run \
     --rm \
     --volume "$(pwd)/:/src" \
     --workdir "/src/" \
     swift-lambda-builder \
     swift build --product TodoAPI -c release
This will run the swift-lambda-builder container and set the current directory as the working directory, then execute swift build command passing the TodoAPI as the product flag and compile it in release mode.
Creating Script to Archive App and Dependencies
Next, let's create package the executables for the deployment. Basically, we need to create the bootstrap file and symlink all the executables, we also need to copy several Swift runtime library into the folder. To help us do this, let's create shell script. Create a new folder called scripts, then inside the folder, create a new shell file named package.sh. Copy and paste the code into the file, replace SquareNumber with TodoAPI.
#!/bin/bash

set -eu

executable=$1

target=.build/lambda/$executable
rm -rf "$target"
mkdir -p "$target"
cp ".build/release/$executable" "$target/"
cp -Pv \
  /usr/lib/swift/linux/libBlocksRuntime.so \
  /usr/lib/swift/linux/libFoundation*.so \
  /usr/lib/swift/linux/libdispatch.so \
  /usr/lib/swift/linux/libicu* \
  /usr/lib/swift/linux/libswiftCore.so \
  /usr/lib/swift/linux/libswiftDispatch.so \
  /usr/lib/swift/linux/libswiftGlibc.so \
  "$target"
cd "$target"
ln -s "$executable" "bootstrap"
zip --symlinks lambda.zip *
Don't forget to set the file as executable using
sudo chmod +x package.sh
Navigate back to project directory and run this syntax
docker run \
    --rm \
    --volume "$(pwd)/:/src" \
    --workdir "/src/" \
    swift-lambda-builder \
    scripts/package.sh TodoAPI
Just like before, this will run the swift-lambda-builder container, then execute package.sh inside the scripts folder.
We can check the result of the final zipped package, by navigating to build/lambda/TodoAPI. The Lambda.zip file should exists in the directory.
That's it for packaging! now let's move on to the next step, where we will use Serverless framework to handle deployment of our function to AWS.
Provisioning And Deployment with Serverless Framework
To begin, please make sure you have node.js installed in your system, you can install using the installer from the official website or using brew package manager.
After that run:
sudo npm install -g serverless
I assume you have already setup the AWS credentials in your user directory ~/.aws/credentials. If not, please create an IAM role from AWS console with required privileges, in my case, i usually provide full access to provision resources in my main machine.
To use serverless, we just need to create a Serverless yaml file in the project directory. This YAML contains all the declaration we need to provision the service. Let's create serverless.yml file in our project directory.
Open it with your code editor, be very careful with indentation when editing a YAML file, as it uses indentation to structure the data. It is preferred to use spaces instead of tabs when editing YAML file. In this case i use 2 spaces for the indentation.
service: alf-todoapi

package:
  artifact: .build/lambda/TodoAPI/lambda.zip

custom:
  todosTableName: todos-${self:provider.stage}

provider:
  name: aws
  runtime: provided
  stage: ${opt:stage, 'dev'}
  region: ${opt:region, 'us-west-2'}
  environment:
    TODOS_TABLE_NAME: "${self:custom.todosTableName}"
  iamRoleStatements:
    - Effect: Allow
      Action:
        - logs:CreateLogGroup
        - logs:CreateLogStream
        - logs:PutLogEvents
      Resource: "*"
    - Effect: Allow
      Action:
        - dynamodb:UpdateItem
        - dynamodb:PutItem
        - dynamodb:GetItem
        - dynamodb:DeleteItem
        - dynamodb:Query
        - dynamodb:Scan
        - dynamodb:DescribeTable
      Resource:
        - { Fn::GetAtt: [TodosTable, Arn] }

functions:
  createTodo:
    handler: create
    memorySize: 256
    events:
      - http:
          path: /todos
          method: post
          cors: true
  readTodo:
    handler: read
    memorySize: 256
    events:
      - http:
          path: /todos/{id}
          method: get
          cors: true
  updateTodo:
    handler: update
    memorySize: 256
    events:
      - http:
          path: /todos/{id}
          method: put
          cors: true
  deleteTodo:
    handler: delete
    memorySize: 256
    events:
      - http:
          path: /todos/{id}
          method: delete
          cors: true
  listTodos:
    handler: list
    memorySize: 256
    events:
      - http:
          path: /todos
          method: get
          cors: true

resources:
  Resources:
    TodosTable:
      Type: AWS::DynamoDB::Table
      Properties:
        TableName: ${self:custom.todosTableName}
        AttributeDefinitions:
          - AttributeName: id
            AttributeType: S
        KeySchema:
          - AttributeName: id
            KeyType: HASH
        BillingMode: PAY_PER_REQUEST
At the top, let's declare the service, you should provide your own unique value here. In this case, i named it as alf-todoapi. Next, declare the package, inside the package, we have one key, artifact. Let's put the directory of where our Lambda.zip is located inside the build folder. This will be used for deploying to AWS later.
Next, lets' declare custom key used for referencing resources in this YAML. We'll have one key which is todosTableName with value of todos-${self:provider.stage}.
Next, let's declare the provider. Inside the provider, set the name to aws and runtime as provided. For stage, we'll set it as dev, and region to us-west-2. For the environment, we have one variable, which is the TODOS_TABLE_NAME and for the value we can retrieve it from the custom.todosTableName we created earlier. Next let's declare the IAM role for the functions. For our functions, we only provide 2 IAM role, one is to write logs to CloudWatch, and the other one is to perform CRUD operation to DynamoDB. Other than those 2, our function won't be able to access other AWS services and resources.
Next, let's declare the functions. We have five functions that triggered from HTTP events:
createTodowith handler of create, we set the path to/todos, method toPOST, and enableCORS.readTodowith handler of read, set the path to/todos/{id}. method toGET. theidplaceholder can be retrieved from thepathParametersdictionary in the event request from API Gateway.updateTodowith handler of update, set the path to/todos/{id}and method toPUT. Make sure to enableCORS.deleteTodowith handler of delete, set the path to/todos/{id}and method toDELETE.listTodoswith handler of list, set the path to/todosand method toGET.
The handler value itself can be accessed from the _HANDLER environment variable. We are using that to initialize the handler operation in the code we have created.
Next, we need to provision the DynamoDB table resource. We need to put inside the resources. Give it name of TodosTable. The type is AWS::DynamoDB::Table. For the properties, TableName value can be retrieved from the custom.TodosTableName variable. The AttributeDefinition will have one single Attribute Name which is used as The Key for this table. Finally, set the BillingMode as PAY_PER_REQUEST.
That's it for the Serverless YAML file, you can learn more about Serverless by visiting the website that i provide in description below. Other than AWS, it also supports deployment to Google Cloud Function and Azure Function.
To deploy, from the project directory in terminal, we can just type:
sls -v deploy
This will parse the serverless YAML, create the resources on CloudFormation, upload the code to S3 bucket, provision the DynamoDB table, and handle the creation of API Gateway for our function!
Wait until, the deployment has completed. The output will provide us the endpoint that we can use to hit our CRUD API. We can also check the AWS Lambda web dashboard to check the status and logs of our function. Try to use POSTMAN or CURL to hit the endpoint. In my case, i already provided the iOS client app in the completed project repository which you can use to test. It is built with SwiftUI and use CoreData to sync the data.
Conclusion
That's if for this tutorial. To summarize, we have learned to build a backend REST API with Swift and DynamoDB as persistence layer in the cloud, then deploy it to AWS Lambda using Serverless framework. There are many other various cases we can use to build serverless app, such image processing after an image has been uploaded to S3 bucket, processing notification from SNS, and many more. Keep exploring, and i hope this video will be helpful to all of you.
Until the next one, let's keep the lifelong learning goes on. Bye!