Building Todo List iOS App with VIPER Architecture
Published at Jul 15, 2018
Deciding which application architecture to use when building an iOS application is one of the most challenging task, there are many architectures to choose from MVC, MVVM, MVP, View State, VIPER and many more. The architecture we choose will shape on how the software will be built and scale as it grows.
One of the architecture this article will approach is the VIPER architecture. VIPER divides the app structure into components inside a module/screen with single responsibility principle. This makes the application becomes more modular and less coupled with other component. Unit testing and Integration test becomes much more simpler because of the boundaries (protocol/interface) between each components.
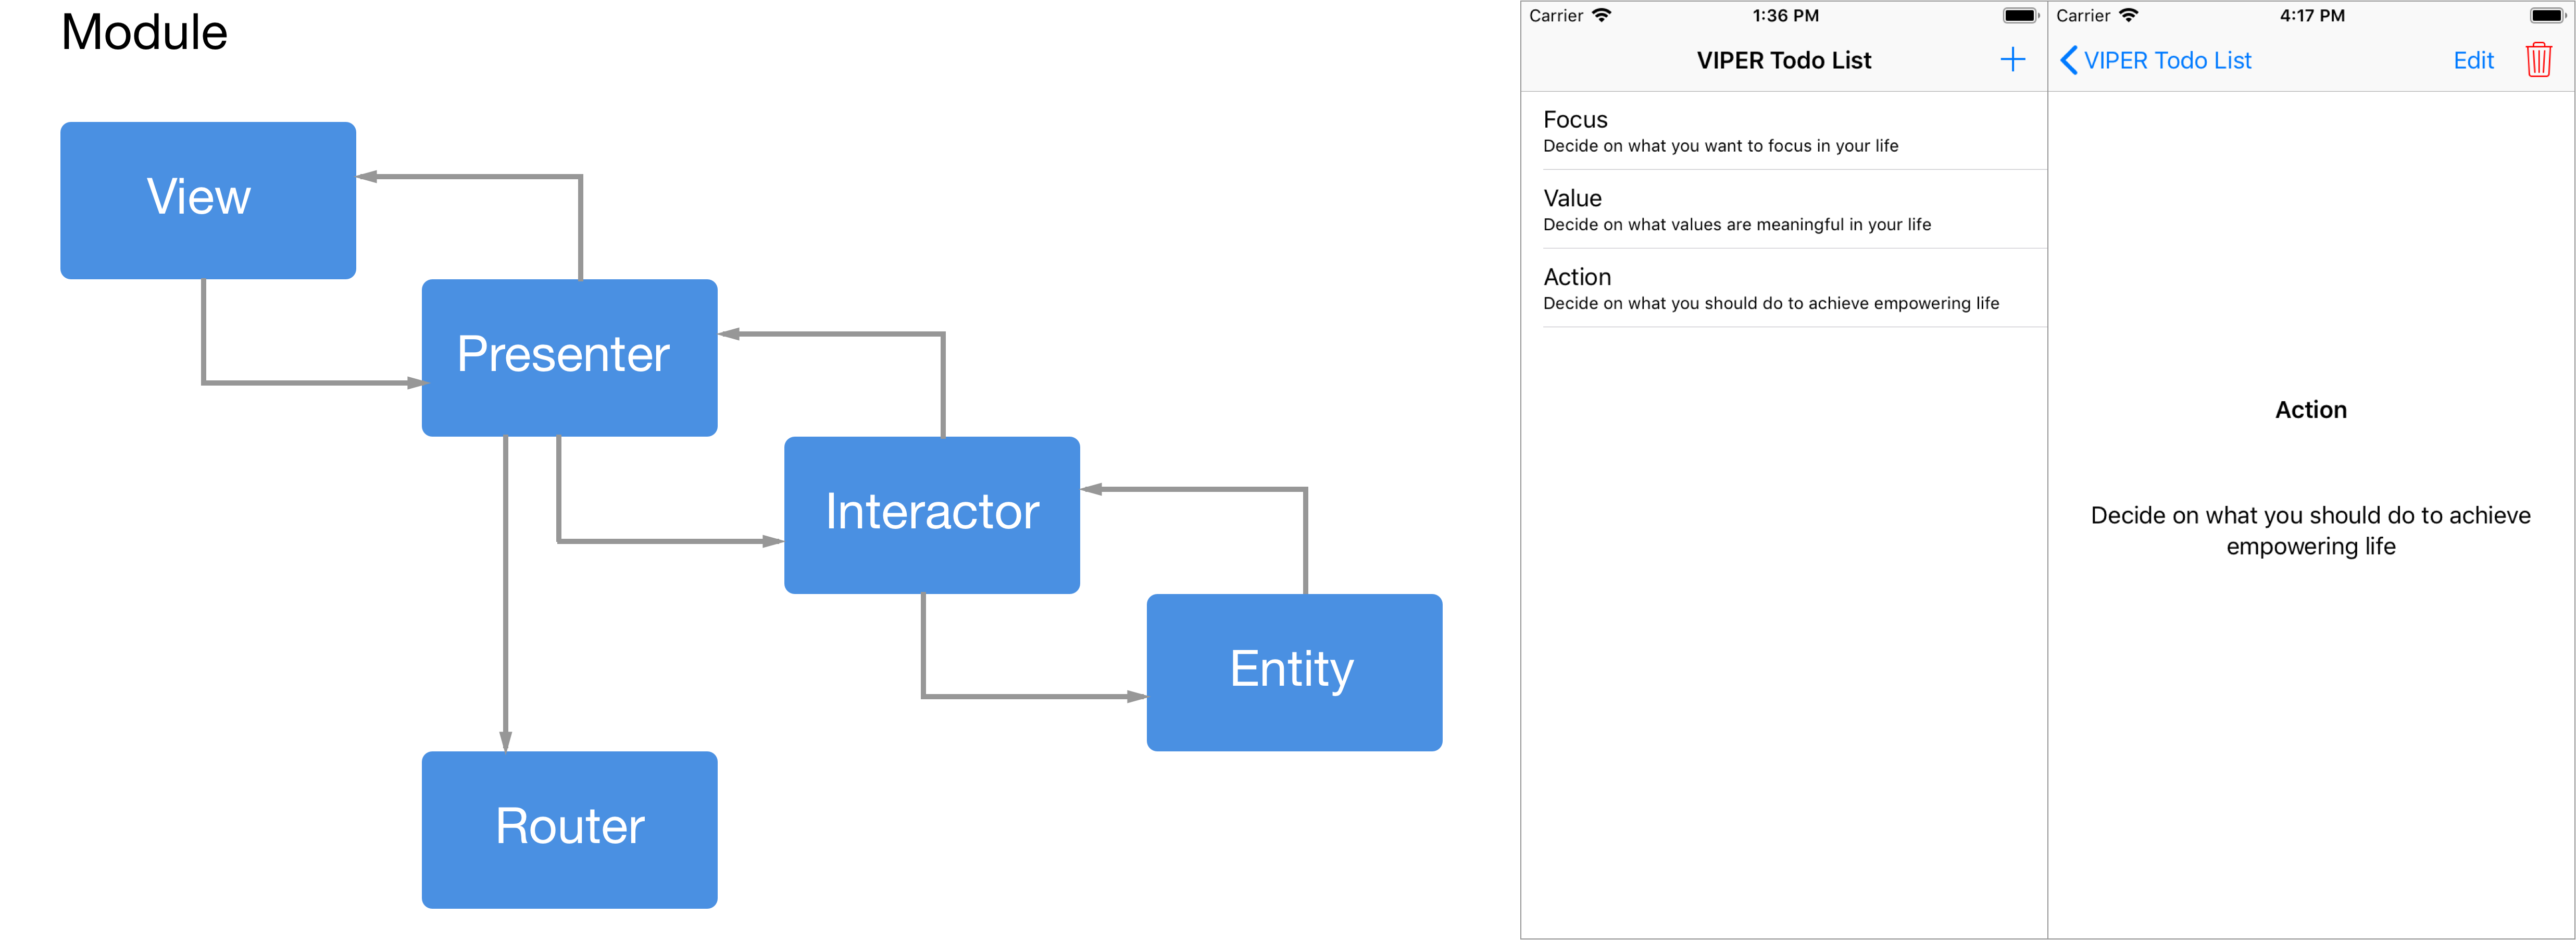
VIPER basic components are separated into 5 parts:
- View: Shows the user interface told by the presenter, it also communicates back the user input to presenter.
- Interactor: Process the business logic of the application, it communicates back and forth with the presenter
- Presenter: Fetch the data from the interactor and handle the logic of how the data will be displayed in view. It also relay the user input from the view and fetch/update the data from interactor.
- Entity: The model object that used by interactor. Usually the interactor fetch the entity from a separate data store object.
- Routing/Wireframe: Handle the navigation logic asked by the presenter object. It communicates with other module/screen to be shown.
Building Our Todo List App with VIPER
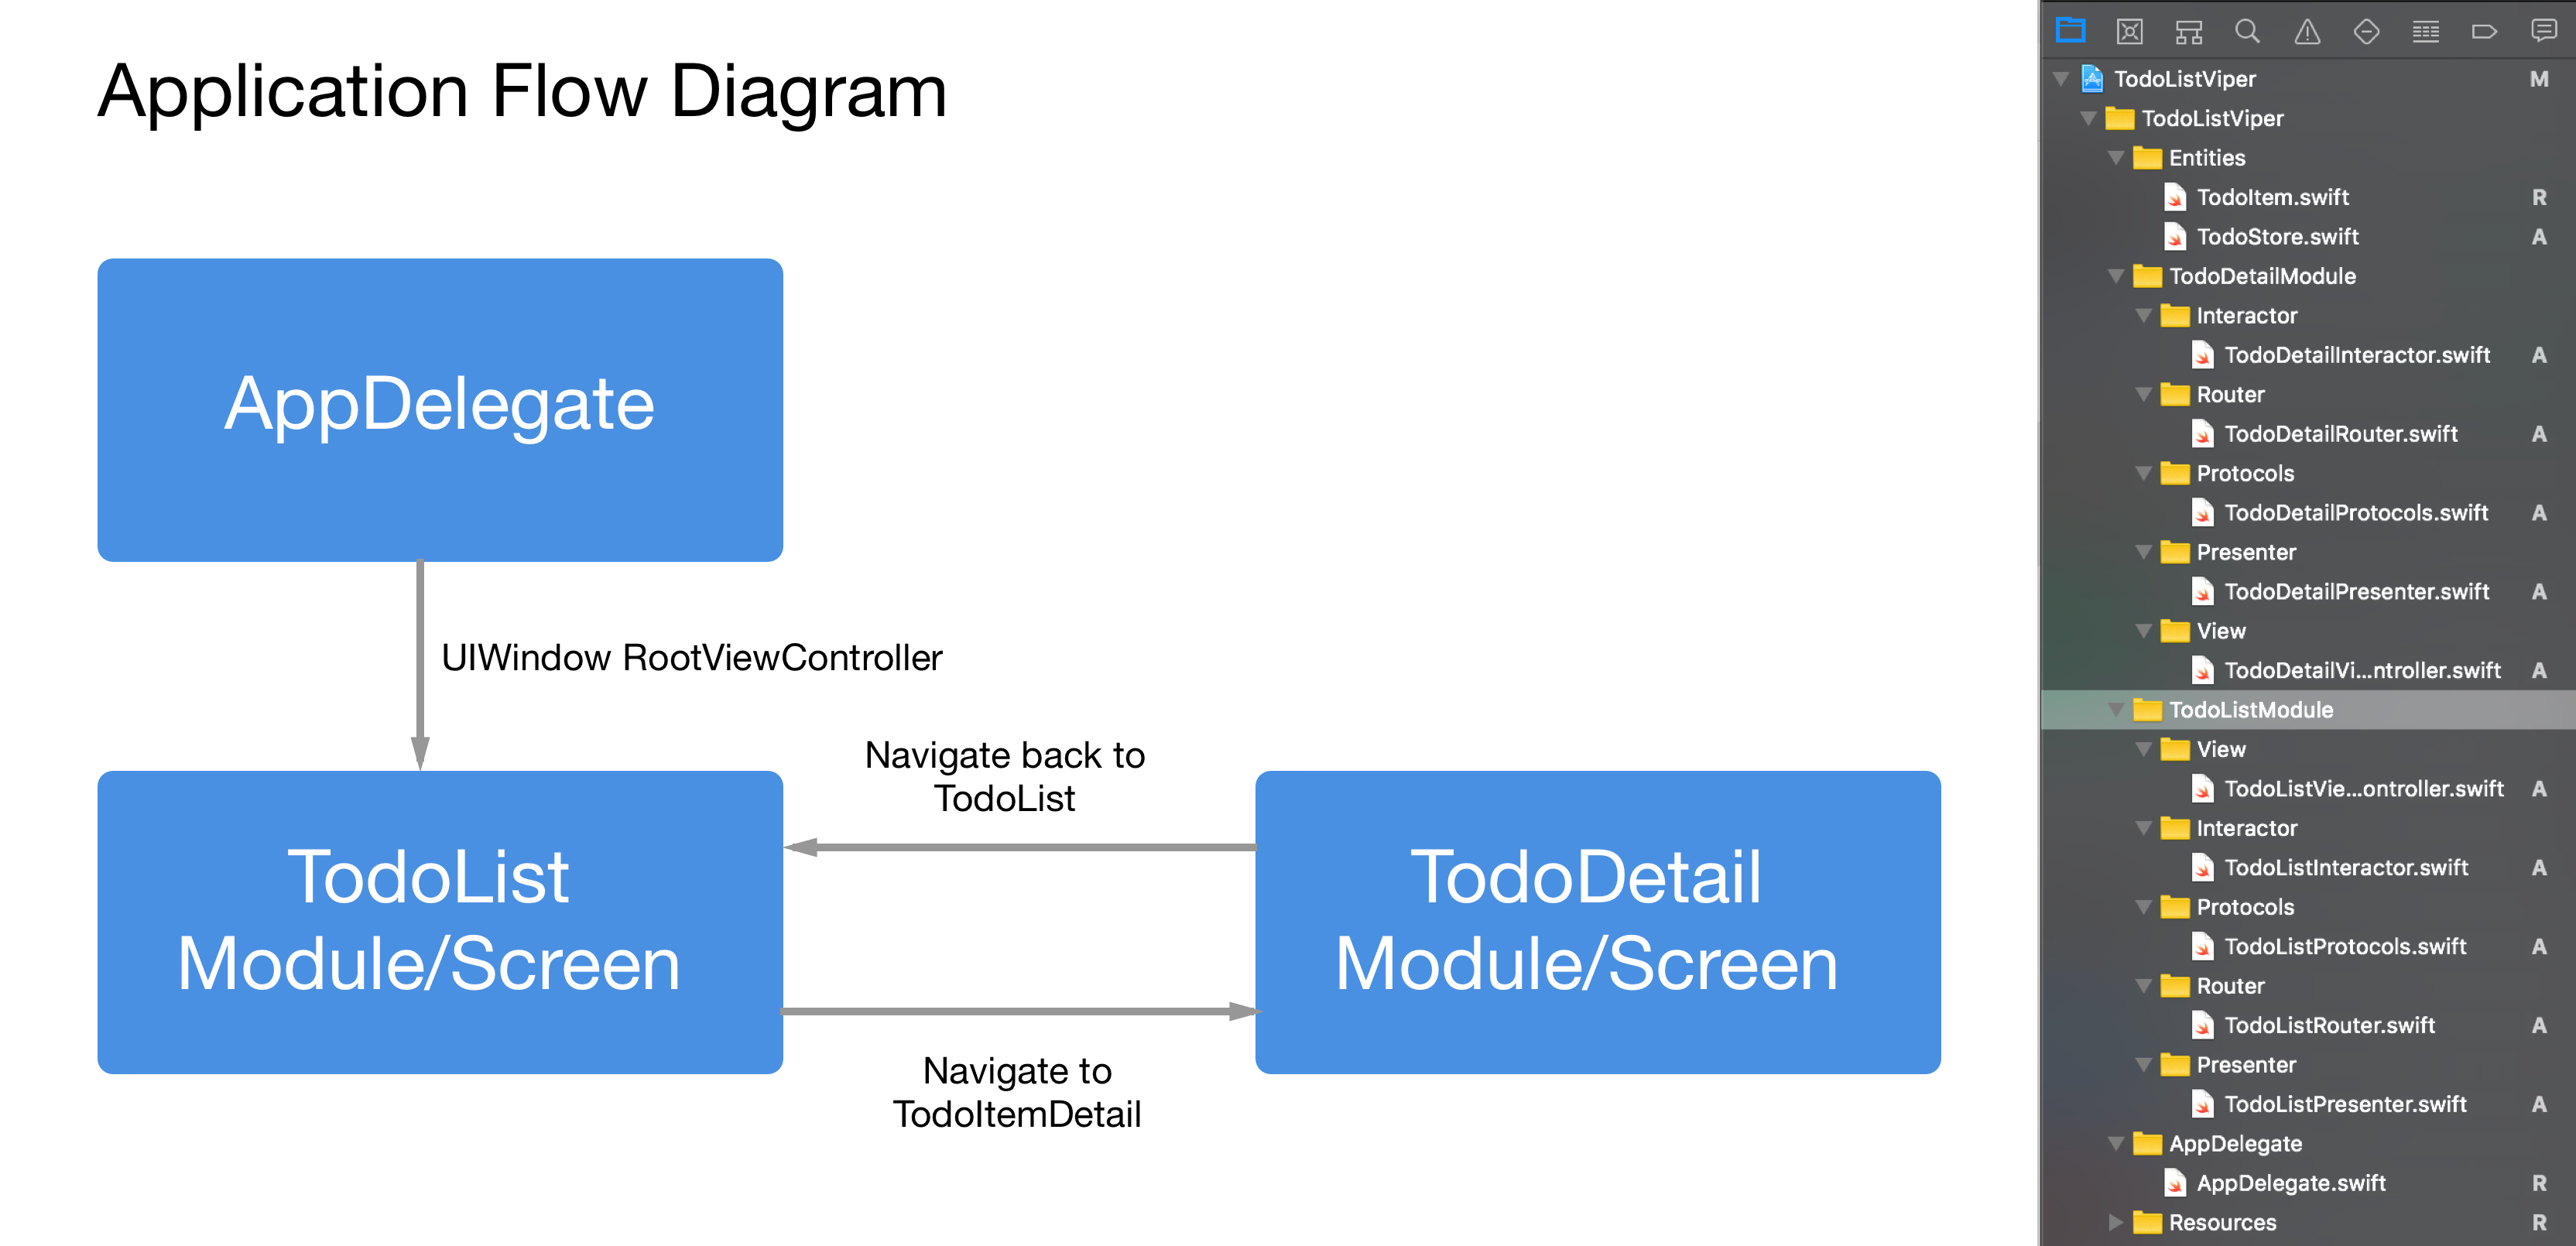
In this article we will build a simple TodoList app using VIPER as our application architecture. The project GitHub repository is available here. What we will build:
- TodoItem Entity and TodoStore: TodoItem is a basic Class object that represent a Todo item, TodoStore is our DataStore that store an array of TodoItem.
- TodoList Module/Screen: Display list of TodoItem in a UITableView to users and provide the features for user to add new TodoItem, delete TodoItem, and navigate to the TodoDetail Module/Screen.
- TodoDetail Module/Screen: Display the content of a TodoItem, provide the features for user to delete and edit the TodoItem. It navigates back to the TodoList Module/Screen.
- App Delegate Integration: Setup the root UIViewController of the application by instantiating TodoListView from TodoListRouter
Building Data Entity
TodoItem Entity
TodoItem Entity is just a plain class that represent a TodoItem object. It provides 2 properties, title String and content String.
import Foundation

class TodoItem {

    var title: String
    var content: String

    init(title: String, content: String) {
        self.title = title
        self.content = content
    }
}
TodoStore DataStore
TodoStore is the DataStore Singleton object that stores the list of TodoItem. Our application just stores the array in-memory, but we can extend to store the data in a File or CoreData in the future. It exposed the TodoItem array via todos property and methods to add TodoItem and remove TodoItem.
class TodoStore {

    private init() {}
    public static let shared = TodoStore()

    public private(set) var todos: [TodoItem] = [
        TodoItem(title: "Focus", content: "Decide on what you want to focus in your life"),
        TodoItem(title: "Value", content: "Decide on what values are meaningful in your life"),
        TodoItem(title: "Action", content: "Decide on what you should do to achieve empowering life")
    ]

    func addTodo(_ todo: TodoItem) {
        todos.append(todo)
    }

    func removeTodo(_ todo: TodoItem) {
        if let index = todos.firstIndex(where: { $0 === todo }) {
            todos.remove(at: index)
        }
    }

}
Building TodoListModule/Screen
TodoListModule Protocols
We use protocol for each component to define the boundaries of how each components will communicate in TodoList Module.
import UIKit

protocol TodoListViewProtocol: class {

    var presenter: TodoListPresenterProtocol? { get set }

    // PRESENTER -> VIEW
    func showTodos(_ todos: [TodoItem])
    func showErrorMessage(_ message: String)
}

protocol TodoListPresenterProtocol: class {

    var view: TodoListViewProtocol? { get set }
    var interactor: TodoListInteractorInputProtocol? { get set }
    var router: TodoListRouterProtocol? { get set }

    // VIEW -> PRESENTER
    func viewWillAppear()
    func showTodoDetail(_ Todo: TodoItem)
    func addTodo(_ todo: TodoItem)
    func removeTodo(_ todo: TodoItem)
}

protocol TodoListInteractorInputProtocol: class {

    var presenter: TodoListInteractorOutputProtocol? { get set }

    // PRESENTER -> INTERACTOR
    func retrieveTodos()
    func saveTodo(_ todo: TodoItem)
    func deleteTodo(_ todo: TodoItem)
}

protocol TodoListInteractorOutputProtocol: class {

    // INTERACTOR -> PRESENTER
    func didAddTodo(_ todo: TodoItem)
    func didRemoveTodo(_ todo: TodoItem)
    func didRetrieveTodos(_ todos: [TodoItem])
    func onError(message: String)
}

protocol TodoListRouterProtocol: class {

    static func createTodoListModule() -> UIViewController

    // PRESENTER -> ROUTER
    func presentToDoDetailScreen(from view: TodoListViewProtocol, for todo: TodoItem)
}
Implement TodoListViewProtocol
We create a TodoListViewController object that subclass UITableViewController and implement the TodoListViewProtocol. TodoListViewController responsibility is to display the user interface as told by the presenter. It keeps a reference to the presenter to relay user input and view lifecycle event to the presenter to react.
When the view will appear it will invoke the presenter viewWillAppear method so the presenter can retrieve the data from the interactor. The navigation add bar button item triggers an action that will display the UIAlertActionController with 2 textfields for the user to enter the title and content of the TodoItem. It then relay the user input back to the presenter. When user swipes the UITableViewCell and delete the row, the view redirects the user input to delete the associated ToDoItem back to presenter.
TodoListViewProtocol provide 2 method to implement, showTodos that pass array of ToDoItem that will be used to display list of TodoItem inside the UITableView. The showErrorMessage pass an error message in case of an error occurs from the presenter, the UIAlertController will be displayed containing the error message to the user.
import UIKit

class TodoListViewController: UITableViewController {

    var presenter: TodoListPresenterProtocol?
    var todos: [TodoItem] = [] {
        didSet {
            tableView.reloadData()
        }
    }

    override func viewDidLoad() {
        super.viewDidLoad()
        setupView()
    }

    override func viewWillAppear(_ animated: Bool) {
        presenter?.viewWillAppear()
    }


    private func setupView() {
        tableView.tableFooterView = UIView()
    }

    override func tableView(_ tableView: UITableView, numberOfRowsInSection section: Int) -> Int {
        return todos.count
    }

    override func tableView(_ tableView: UITableView, cellForRowAt indexPath: IndexPath) -> UITableViewCell {
        let cell = tableView.dequeueReusableCell(withIdentifier: "Cell", for: indexPath)
        let todo = todos[indexPath.row]
        cell.textLabel?.text = todo.title
        cell.detailTextLabel?.text = todo.content
        return cell
    }

    override func tableView(_ tableView: UITableView, didSelectRowAt indexPath: IndexPath) {
        let todo = todos[indexPath.row]
        presenter?.showTodoDetail(todo)
    }

    override func tableView(_ tableView: UITableView, commit editingStyle: UITableViewCell.EditingStyle, forRowAt indexPath: IndexPath) {
        if editingStyle == .delete {
            let todoItem = todos[indexPath.row]
            presenter?.removeTodo(todoItem)
        }
    }

    @IBAction func addTapped(_ sender: Any) {
        let alertController = UIAlertController(title: "Add Todo Item", message: "Enter title and content", preferredStyle: .alert)
        alertController.addTextField(configurationHandler: nil)
        alertController.addTextField(configurationHandler: nil)
        alertController.addAction(UIAlertAction(title: "Confirm", style: .default, handler: { [weak self](_) in
            let titleText = alertController.textFields![0].text ?? ""
            let contentText = alertController.textFields![1].text ?? ""
            guard !titleText.isEmpty else { return }
            let todoItem = TodoItem(title: titleText, content: contentText)
            self?.presenter?.addTodo(todoItem)
        }))

        alertController.addAction(UIAlertAction(title: "Cancel", style: .cancel, handler: nil))
        present(alertController, animated: true, completion: nil)
    }

}

extension TodoListViewController: TodoListViewProtocol {

    func showTodos(_ todos: [TodoItem]) {
        self.todos = todos
    }

    func showErrorMessage(_ message: String) {
        let alertController = UIAlertController(title: "Error", message: message, preferredStyle: .alert)
        alertController.addAction(UIAlertAction(title: "OK", style: .default, handler: nil))
        present(alertController, animated: true, completion: nil)
    }

}
Implement TodoListPresenterProtocol
The TodoListPresenter Class implements the TodoListPresenterProtocol and TodoListInteractorOutputProtocol. It stores weak reference to the TodoListViewProtocol so it can update the UI. It stores reference to the TodoListInteractorInputProtocol so the presenter can relay the user input to fetch or modify data through the interactor. It also stores the TodoListRouterProtocol object so it can navigate to the TodoDetailModule when user select a TodoItem from the table view.
By implementing TodoPresenterProtocol, the view will call the presenter viewWillAppear when view will appear in screeen. The presenter then ask yhe interactor to retrieve the TodoItem array. The implementation of TodoListInteractorOutputProtocol will be used by the interactor to return the TodoItem array by invoking didRetrieveTodos passing the data, the presenter then update the view by invoking view showTodos passing the data to update the Table View.
The presenter also implements didAddTodo and didRemoveToDo so when user add a new TodoItem or delete a TodoItem from the view, the presenter can relay the user action to the interactor respective saveTodo and deleteTodo method. The interactor will invoke didAddTodo and didRemoveTodo back to the presenter so the presenter can update the Table View.
import UIKit

class TodoListPresenter: TodoListPresenterProtocol {

    weak var view: TodoListViewProtocol?
    var interactor: TodoListInteractorInputProtocol?
    var router: TodoListRouterProtocol?

    func showTodoDetail(_ Todo: TodoItem) {
        guard let view = view else { return }
        router?.presentToDoDetailScreen(from: view, for: Todo)
    }

    func addTodo(_ todo: TodoItem) {
        interactor?.saveTodo(todo)
    }

    func viewWillAppear() {
        interactor?.retrieveTodos()
    }

    func removeTodo(_ todo: TodoItem) {
        interactor?.deleteTodo(todo)
    }

}

extension TodoListPresenter: TodoListInteractorOutputProtocol {

    func didAddTodo(_ todo: TodoItem) {
        interactor?.retrieveTodos()
    }

    func didRetrieveTodos(_ todos: [TodoItem]) {
        view?.showTodos(todos)
    }

    func onError(message: String) {
        view?.showErrorMessage(message)
    }

    func didRemoveTodo(_ todo: TodoItem) {
        interactor?.retrieveTodos()
    }
}
Implement TodoListInteractorProtocol
The TodoListInteractor implements the TodoListInteractorInputProtocol. It stores reference to the presenter object that impeements the TodoListInteractorOutputProtocol. It also has the TodoStore object assigned as the property to fetch the TodoItem list, add TodoItem, removeTodoItem from the TodoStore.
The TodoListPresenterProtocol invoke the action to retrieve TodoItem List, save TodoItem, delete TodoItem, the interactor then ask the TodoStore for each respective action then invoke the output method back to the presenter.
import Foundation

class TodoListInteractor: TodoListInteractorInputProtocol {

    weak var presenter: TodoListInteractorOutputProtocol?
    var todoStore = TodoStore.shared
    var todos: [TodoItem] {
        return todoStore.todos
    }

    func retrieveTodos() {
        presenter?.didRetrieveTodos(todos)
    }

    func saveTodo(_ todo: TodoItem) {
        todoStore.addTodo(todo)
        presenter?.didAddTodo(todo)
    }

    func deleteTodo(_ todo: TodoItem) {
        todoStore.removeTodo(todo)
        presenter?.didRemoveTodo(todo)
    }

}
Implement TodoListRouterProtocol
The TodoListRouter exposes static function that can be invoke to instantiate the TodoListModule, instantiate the concrete implementation of TodoListProtocols component, assigning the reference for each component, and then return the UIViewController to display.
It also provide the presentTodoDetailScreen that will be invoked by the TodoListPresenter when user select a TodoItem from TableView. This method instantiate TodoDetailModule passing the TodoItem from the TodoDetailRouter static method and navigate to the TodoDetailViewController by pushing the UIViewController through the UINavigationController stack.
import UIKit

class TodoListRouter: TodoListRouterProtocol {

    static var storyboard: UIStoryboard {
        return UIStoryboard(name: "Main", bundle: Bundle.main)
    }

    static func createTodoListModule() -> UIViewController {
        let navController = storyboard.instantiateViewController(withIdentifier: "TodoListNavigation") as! UINavigationController
        guard let todoListViewController = navController.topViewController as? TodoListViewController else { fatalError("Invalid View Controller") }
        let presenter: TodoListPresenterProtocol & TodoListInteractorOutputProtocol = TodoListPresenter()
        let interactor: TodoListInteractorInputProtocol = TodoListInteractor()
        let router = TodoListRouter()

        todoListViewController.presenter = presenter
        presenter.view = todoListViewController
        presenter.interactor = interactor
        presenter.router = router
        interactor.presenter = presenter

        return navController
    }


    func presentToDoDetailScreen(from view: TodoListViewProtocol, for todo: TodoItem) {

        let todoDetailVC = TodoDetailRouter.createTodoDetailRouterModule(with: todo)

        guard let viewVC = view as? UIViewController else {
            fatalError("Invalid View Protocol type")
        }

        viewVC.navigationController?.pushViewController(todoDetailVC, animated: true)
    }

}
Building TodoDetailModule/Screen
TodoDetailModule Protocols
Just like TodoListModule, protocol defines the boundaries of how each components will communicate in TodoDetail Module.
import UIKit

protocol TodoDetailViewProtocol: class {

    var presenter: TodoDetailPresenterProtocol? { get set }

    // PRESENTER -> VIEW
    func showToDo(_ todo: TodoItem)
}

protocol TodoDetailPresenterProtocol: class {

    var view: TodoDetailViewProtocol? { get set }
    var interactor: TodoDetailInteractorInputProtocol? { get set }
    var router: TodoDetailRouterProtocol? { get set }

    // VIEW -> PRESENTER
    func viewDidLoad()
    func editTodo(title: String, content: String)
    func deleteTodo()
}

protocol TodoDetailInteractorInputProtocol: class {

    var presenter: TodoDetailInteractorOutputProtocol? { get set }
    var todoItem: TodoItem? { get set }

    // PRESENTER -> INTERACTOR
    func deleteTodo()
    func editTodo(title: String, content: String)
}

protocol TodoDetailInteractorOutputProtocol: class {

    // INTERACTOR -> PRESENTER
    func didDeleteTodo()
    func didEditTodo(_ todo: TodoItem)
}

protocol TodoDetailRouterProtocol: class {

    static func createTodoDetailRouterModule(with todo: TodoItem) -> UIViewController

    // PRESENTER -> ROUTER
    func navigateBackToListViewController(from view: TodoDetailViewProtocol)

}
Implement TodoDetailViewProtocol
The TodoDetailViewController is an UIViewController subclass that implements the TodoDetailViewProtocol. When the View is loaded, it invoke the TodoDetailPresenter viewDidLoad method for the presenter to ask the interactor to fetch the ToDoItem to display in the UI.
The showTodoItem will be invoked by the presenter passing the TodoItem for the View to display the TodoItem title and content using UILabels. The view also relay the user action to edit and delete when the button is pressed to the deleteTodo method of the presenter. For the edit action, the UIAlertController containing the TextField filled with current TodoItem title and content will be displayed for the user to modify. When they confirm, the view relay back the user input from text fields back to the presenter passing the new value of the title and content.
import UIKit

class TodoDetailViewController: UIViewController {

    @IBOutlet var titleLabel: UILabel!
    @IBOutlet var contentLabel: UILabel!

    var presenter: TodoDetailPresenterProtocol?

    override func viewDidLoad() {
        super.viewDidLoad()
        presenter?.viewDidLoad()
    }

    @IBAction func deleteTapped(_ sender: Any) {
        presenter?.deleteTodo()
    }

    @IBAction func editTapped(_ sender: Any) {
        let alertController = UIAlertController(title: "Edit Todo Item", message: "Enter title and content", preferredStyle: .alert)

        alertController.addTextField { $0.text = self.titleLabel.text }
        alertController.addTextField { $0.text = self.contentLabel.text }
        alertController.addAction(UIAlertAction(title: "Confirm", style: .default, handler: { [weak self](_) in
            let titleText = alertController.textFields![0].text ?? ""
            let contentText = alertController.textFields![1].text ?? ""
            guard !titleText.isEmpty else { return }
            self?.presenter?.editTodo(title: titleText, content: contentText)
        }))

        alertController.addAction(UIAlertAction(title: "Cancel", style: .cancel, handler: nil))
        present(alertController, animated: true, completion: nil)

    }

}

extension TodoDetailViewController: TodoDetailViewProtocol {

    func showToDo(_ todo: TodoItem) {
        titleLabel.text = todo.title
        contentLabel.text = todo.content
    }

}
Implement TodoDetailPresenterProtocol
The TodoDetailPresenter implements the TodoDetailPresenterProtocol and TodoDetailInteractorOutputProtocol. When the view is loaded the presenter asks the interactor for the TodoItem, and then asks the view to display the TodoItem by invoking showTodo.
It also handle the relay of user action from the view for editing and deleting the TodoItem to the interactor. The implementation of TodoDetailInteractorOutputProtocol handles the result after the interactor successfully edit the item to update the view based on the new value, for the delete it invokes the TodoDetailRouterProtocol to navigate back to the TodoListView because the TodoItem has been deleted.
import UIKit

class TodoDetailPresenter: TodoDetailPresenterProtocol {

    weak var view: TodoDetailViewProtocol?
    var router: TodoDetailRouterProtocol?
    var interactor: TodoDetailInteractorInputProtocol?


    func viewDidLoad() {
        if let todoItem = interactor?.todoItem {
            view?.showToDo(todoItem)
        }
    }

    func editTodo(title: String, content: String) {
        interactor?.editTodo(title: title, content: content)
    }

    func deleteTodo() {
        interactor?.deleteTodo()
    }

}

extension TodoDetailPresenter: TodoDetailInteractorOutputProtocol {

    func didDeleteTodo() {
        if let view = view {
            router?.navigateBackToListViewController(from: view)
        }
    }

    func didEditTodo(_ todo: TodoItem) {
        view?.showToDo(todo)
    }

}
Implement TodoDetailInteractorProtocol
The TodoDetailInteractor implements the TodoDetailInteractorInputProtocol, it also has reference to the TodoStore and TodoItem object. The presenter can retrieve the TodoItem from the interactor by accessing the property. It also provide methods to delete TodoItem and edit TodoItem. The delete action will invoke the TodoStore removeTodo passing the TodoItem so the TodoItem can be deleted from the TodoStore.
import Foundation

class TodoDetailInteractor: TodoDetailInteractorInputProtocol {

    weak var presenter: TodoDetailInteractorOutputProtocol?
    var todoStore = TodoStore.shared
    var todoItem: TodoItem?

    func deleteTodo() {
        guard let todoItem = todoItem else { return }
        todoStore.removeTodo(todoItem)
        presenter?.didDeleteTodo()
    }

    func editTodo(title: String, content: String) {
        guard let todoItem = todoItem else { return }
        todoItem.title = title
        todoItem.content = content
        presenter?.didEditTodo(todoItem)
    }

}
Implement TodoDetailRouterProtocol
The TodoDetailRouter implements the TodoDetailRouterProtocol. It provides static method to instantiate the TodoDetailModule, setup all the components and associate them, then returns the UIViewController to display. It also exposes navigateBackToListViewController that will be invoked when user delete a TodoItem from TodoDetail Screen for navigation back after the TodoItem is deleted.
import UIKit

class TodoDetailRouter: TodoDetailRouterProtocol {

    func navigateBackToListViewController(from view: TodoDetailViewProtocol) {
        guard let viewVC = view as? UIViewController else {
            fatalError("Invalid view protocol type")
        }
        viewVC.navigationController?.popViewController(animated: true)
    }

    static func createTodoDetailRouterModule(with todo: TodoItem) -> UIViewController {

        guard let todoDetailVC = storyboard.instantiateViewController(withIdentifier: "TodoDetailViewController") as? TodoDetailViewController else {
            fatalError("Invalid view controller type")
        }

        let presenter: TodoDetailPresenter & TodoDetailInteractorOutputProtocol = TodoDetailPresenter()
        todoDetailVC.presenter = presenter
        presenter.view = todoDetailVC
        let interactor: TodoDetailInteractorInputProtocol = TodoDetailInteractor()
        interactor.todoItem = todo
        interactor.presenter = presenter
        presenter.interactor = interactor
        let router: TodoDetailRouterProtocol = TodoDetailRouter()
        presenter.router = router

        return todoDetailVC
    }

    static var storyboard: UIStoryboard {
        return UIStoryboard(name: "Main", bundle: Bundle.main)
    }

}
AppDelegate Setup And Integration
The AppDelegate setup is quite simple and direct, inside the applicationDidFinishLaunchingWithOptions we instantiate the TodoListViewController by invoking the TodoListRouter.createTodoListModule that setups TodoListModule components. We then instantiate the UIWindow and assign the ViewController as the rootViewController of the window as our initial screen.
import UIKit

@UIApplicationMain
class AppDelegate: UIResponder, UIApplicationDelegate {

    var window: UIWindow?

    func application(_ application: UIApplication, didFinishLaunchingWithOptions launchOptions: [UIApplication.LaunchOptionsKey: Any]?) -> Bool {

        let todoListView = TodoListRouter.createTodoListModule()
        window = UIWindow(frame: UIScreen.main.bounds)
        window?.rootViewController = todoListView
        window?.makeKeyAndVisible()

        return true
    }

}
Conclusion
Building an iOS Application with VIPER provides clean architecture paradigm by dividing the responsibilities of each app layer into separate component that makes our application becomes modular between the view logic and business logic, also it is an advantage in large scale application to be able to make our component modular so we can add more features more easily.
One of the main disadvantage of VIPER is that there is too many boilerplate code we need to write for each components protocols, which is an overkill in small application. At last, the decision whether to use VIPER or not in our project will depend on our project scale, how familiar our team on using it, and our app specific use cases.