Using Diffable Data Source iOS 13 API in UITableView
Published at Nov 11, 2019
Since the beginning of iOS SDK, UITableViewDataSource is the protocol that had the responsibility to drive the data and provide the cells in TableView. As good developers, we need to implement the protocol methods and making sure to sync our backing model with the data source properly to avoid any crashes because of inconsistencies between them.
optional func numberOfSections(in tableView: UITableView) -> Int
func tableView(_ tableView: UITableView, numberOfRowsInSection section: Int) -> Int
func tableView(_ tableView: UITableView, cellForRowAt indexPath: IndexPath) -> UITableViewCell
Also, when we need to perform granular updates for sections and rows in our TableView, we need to use the API like the sample code below.
tableView.beginUpdates()
// Delete section 3 and 4
tableView.reloadSections([3,4], with: .automatic)
// Insert at section 1 and row 0
tableView.insertRows(at: [IndexPath(row: 0, section: 1)], with: .automatic)
// delete at section 1 and row 1
tableView.deleteRows(at: [IndexPath(row: 1, section: 1)], with: .automatic)
tableView.endUpdates()
It's actually pretty hard to make sure all the section and rows are correctly updated for each insert, reload, and deletion based on the value between the old and new data. This is the error that UIKit threw when we incorrectly update the TableView.
*** Terminating app due to uncaught exception 'NSInternalInconsistencyException', reason: 'Invalid update: invalid number of sections. The number of sections contained in the table view after the update (10) must be equal to the number of sections contained in the table view before the update (10), plus or minus the number of sections inserted or deleted (0 inserted, 1 deleted).'
***
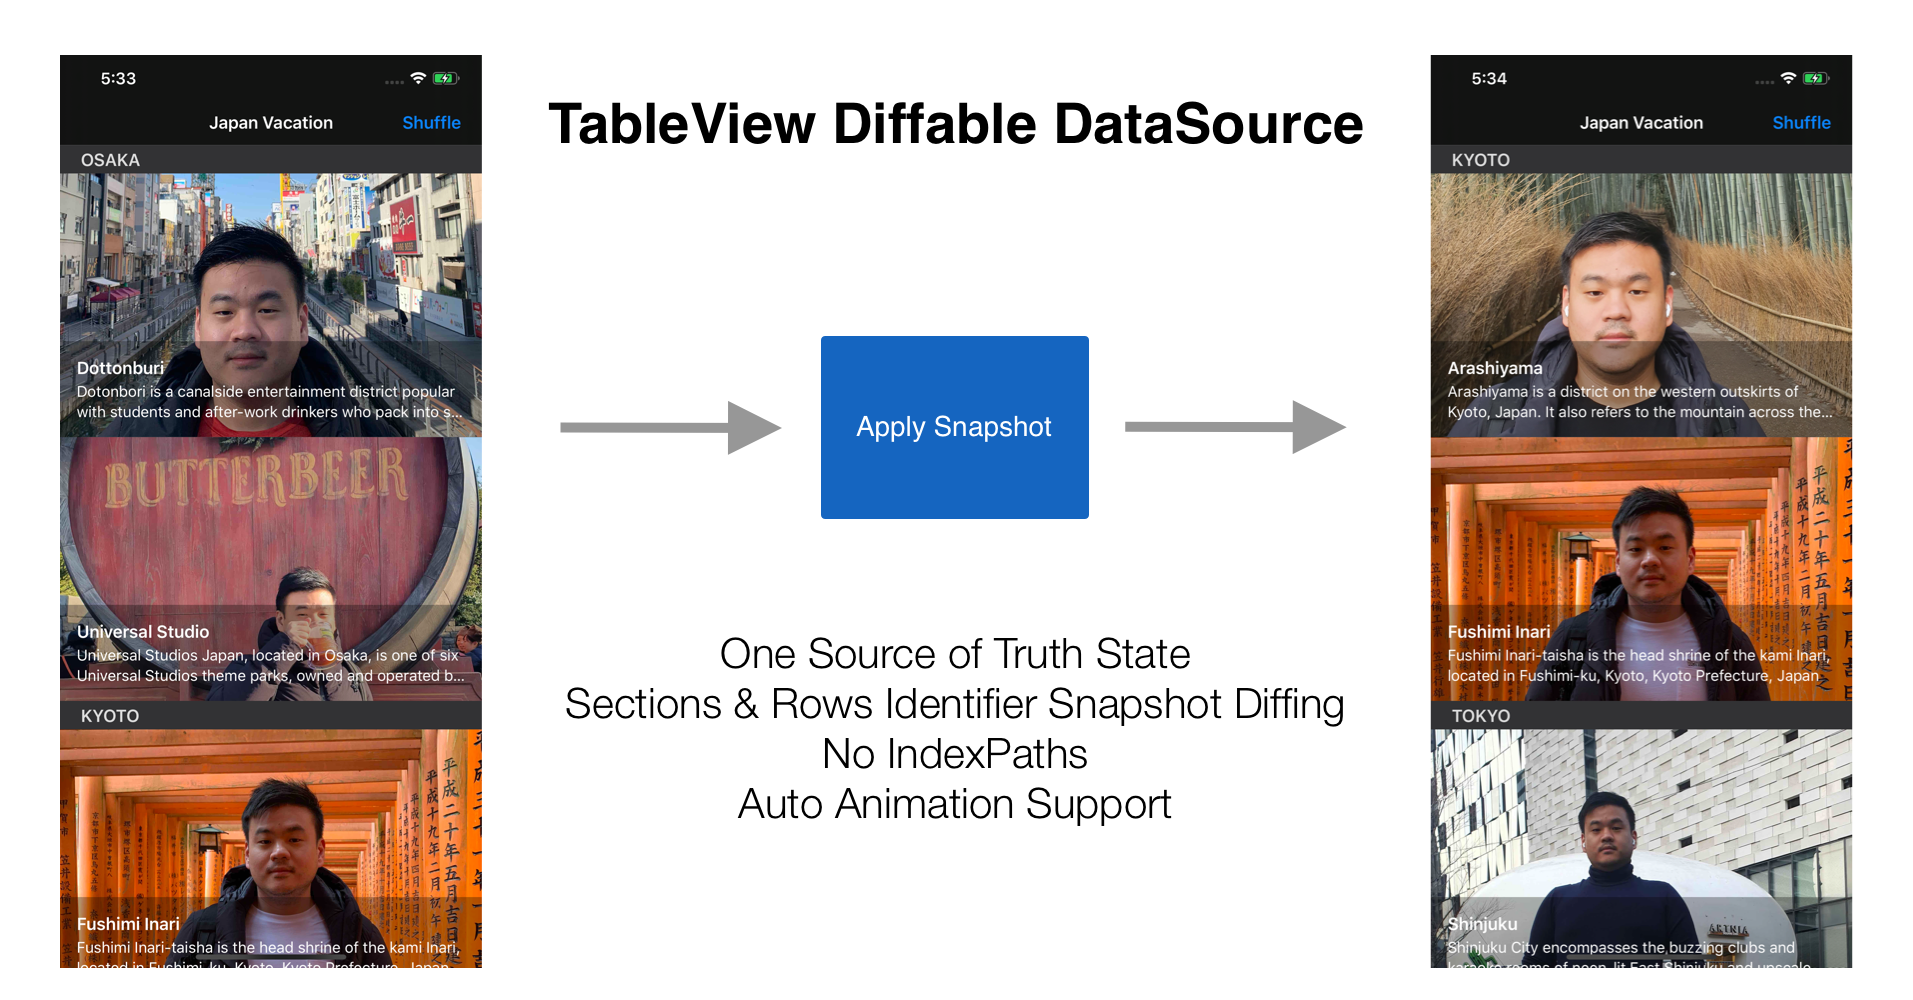
Just in time for WWDC 2019, Apple introduced a new API for managing data source for UITableView and UICollectionView in a much more simpler and safer way for developers to use without building their own diffing solution. It is called Diffable Data Source.
Diffable Data Source API helps us to manage data sources both in TableView and CollectionView by using snapshot. Snapshot acts as a source of truth between our view and data source, whenever there are changes in our model, we just need to construct a new snapshot and applies it to the current snapshot. All the diffing, view update with animation will be performed automagically for us. Also, we don't need to deal with indexPath when we dequeue our cell, the exact model will be given to us to render in the cell based on generic API.
You can read more about it by watching the Apple WWDC 2019 session Advances in Data Sources by Apple engineers. Advances in UI Data Sources.
Diffable Data Source Diffing Mechanism
There is a mandatory requirement that developer must follow to make sure the diffing works correctly. We need to provide sections and item type representation that can provide unique value. Both of them need to implement to Hashable protocol as we can see in the declaration of UITableViewDiffableDataSource class below.
@available(iOS 13.0, tvOS 13.0, *)
open class UITableViewDiffableDataSource<SectionIdentifierType, ItemIdentifierType> : NSObject, UITableViewDataSource where SectionIdentifierType : Hashable, ItemIdentifierType : Hashable
As we can see the SectionIdentifierType and ItemIdentifierType are generic that we must provide when we declare and initialise the class. We also need to make sure the hashValue are unique for each instance to avoid hash collision.
Beginning our sample project
Let's start working on a simple project to display data in UITableView using DiffableDataSource API!. There are several features that we want to build such as:
- Using Diffable Data Source API to load places in many cities from local JSON Stub file.
- Cities will be the sections and places will be the rows of the TableView.
- Navigation button that will shuffle the cities and places, then apply the new snapshot to the diffable data source with animation.
You can start by cloning the project from the GitHub Repository at StarterTableViewDiffableDataSource.
The Starter project
The starter project already provides the resources such as cells, image assets, and JSON stubs file for the cities and places. There are 3 JSON files representing city such as Osaka, Kyoto, and Tokyo. Here are the essential components from the starter project:
CityPlaceViewController. Our main ViewController class, it is a subclass of UITableViewController. With this, we already have built in TableView without additional setup.Bundle+Extension. A simple extension ofBundleclass that provide static method to load a decodable model from the main bundle resource given a filename of the JSON file.PlaceTableViewCell. ATableViewCellthat we will use to display the place. It has a thumbnail image view, along with title and description of the place.
Let's begin building our app by creating the model next!
Create Model for the Section Identifier
Our section will be represented by the City enum. In this case we have 3 cities: Osaka, Kyoto, and Tokyo. The enum underlying raw type will be String. This enum will automatically conforms to Hashable protocol using the rawValue as the unique hashValue.
Create a new file called City.swift inside the Models folder. Fill the file using the code below to create the enum for the City.
enum City {
    case kyoto
    case osaka
    case tokyo
}
Create Model for the Row Identifier
For the row representation, we will create struct called Place. The struct has several underlying properties such as name, description, imageName. We also have the UUID as the properties to make sure each of the place instance is unique.
Create a new file called Place.swift inside the Models folder. Fill the file using the code below to create the struct for the Place.
struct Place: Decodable {
    let uuid: String
    let name: String
    let description: String
    let imageName: String
}
Next, we need to make it conform the Hashable protocol. Below the code, create an extension for the Place that implements Hashable. Then, we need to provide the hasher value that will be used to create the hashValue. In this case we combine all the properties of the Place into the hasher.
extension Place: Hashable {

    func hash(into hasher: inout Hasher) {
        hasher.combine(uuid)
        hasher.combine(name)
        hasher.combine(description)
        hasher.combine(imageName)
    }
}
That's it our model for section and row are now unique and ready to be used for the snapshot diffing 😋.
Loading Stub Data for Places in Cities
To display data in the TableView we will be loading stub data from JSON file and decode it into Place instances. The starter project already provide a helper extension method for the bundle to load the data from a JSON file and decode it using generic method with Decodable type as the placeholder. You can take a peek at how it is implemented in the Extension+Bundle.swift file.
Inside the Place.swift source code, create an extension for Array with generic constraint for the element equal of Place. With the constraint, the extension will only be applied to array of Place. In the extension, we just create 3 static computed property that returns array of place for Osaka, Kyoto, and Tokyo using our extension bundle static method.
extension Array where Element == Place {

    static var osakaStubs: Self {
        try! Bundle.decodeJSONFromMainResources(filename: "osaka")
    }

    static var kyotoStubs: Self {
        try! Bundle.decodeJSONFromMainResources(filename: "kyoto")
    }

    static var tokyoStubs: Self {
        try! Bundle.decodeJSONFromMainResources(filename: "tokyo")
    }
}
Next, we will associate the stub places for each of the City enum. Go to City.swift source code and create an extension for the City. We declare a static computed property with array of tuple containing the city associated with array of places.
extension City {

    static var stubCitiesWithPlaces: [(city: City, places: [Place])] {
        [
            (.osaka, .osakaStubs),
            (.kyoto, .kyotoStubs),
            (.tokyo, .tokyoStubs)
        ]
    }
}
That's it! We now have our model with the stub data as well, let's move on to our ViewController to build our TableView using Diffable Data Source.
Using the TableViewDiffableDataSource in ViewController
Next, we will move on to the CityPlaceViewController source file. As a reminder, we are not going to use any of UITableViewDataSource protocol methods to drive the TableView. Instead, we are going to use the UITableViewDiffableDataSource class.
Subclassing UITableViewDiffableDataSource
We will be subclassing the UITableViewDiffableDataSource for this app because we need to override one of the method to provide city name as the header for our section. If your app don't have any section header, you don't need to subclass it. Declare the file at the top of the source code and fill the class like so.
class CityPlaceTableViewDiffableDataSource: UITableViewDiffableDataSource<City, Place> {

    override func tableView(_ tableView: UITableView, titleForHeaderInSection section: Int) -> String? {
        return snßapshot().sectionIdentifiers[section].rawValue.uppercased()
    }
}
In this case we just need to override one method, tableView(_:titleForHeaderInSection:). In the implementation, we can just access the snapshot property section identifiers array and passing the section index to retrieve the associated City. Then, we can access the rawValue and capitalized the string to be displayed in the header. We also fill the generic placeholder in the class declaration to make the City as the section and Place as the Item/Row.
Next, Let's move on to the CityPlaceViewController class!
Setting up the TableViewDiffableDataSource in TableView
Let's begin by declaring the instance properties that we will be using, there are 2 instance properties:
diffableDataSource. The type of this will be theCityPlaceTableViewDiffableDataSource.citiesWithPlaces. This will be our stub data, the array containing tuple of a city associated with places. City will be the section, and the places will be the rows inside the section.
Also, we need to add a method in the PlaceTableViewCell to setup the labels and image view given a place to render like so.
func setup(with place: Place) {
    titleLabel.text = place.name
    subtitleLabel.text = place.description
    placeImageView.image = UIImage(named: place.imageName)
}
Next, we will create setupTableView method in CityPlaceViewController. There are several tasks that we will perform inside this method, such as:
- Registering
PlaceTableViewCellnib to ourTableViewwith reuse identifier. - Initializing
CityPlaceTableViewDiffableDataSource. The initializer accepts theTableViewand a closure. The closure parameter are theTableView,IndexPath, and the associatedPlace, this closure will be invoked when theTableViewneeds to dequeue the cell.
We don't need to retrieve the place manually using the IndexPath anymore as it is already passed in the parameter. In this case we just need to dequeue the cell from the TableView using the reuse identifier and setup the cell with the place.
private func setupTableView() {
    tableView.register(UINib(nibName: "PlaceTableViewCell", bundle: nil), forCellReuseIdentifier: "Cell")
    diffableDataSource = CityPlaceTableViewDiffableDataSource(tableView: tableView) { (tableView, indexPath, place) -> UITableViewCell? in
        let cell = tableView.dequeueReusableCell(withIdentifier: "Cell", for: indexPath) as! PlaceTableViewCell
            cell.setup(with: place)
            return cell
    }
}
Setup and Applying Snapshot
For building and applying snapshot to diffable data source, we will create a method called buildAndApplySnapshot. Here are things that we will perform in this method:
- Initialize a new snapshot using the
NSDiffableDataSourceSnapshotclass using the City and Place as the generic placeholder to represent the section and item. - Looping the
citiesWithPlacesinstance property array, for each element we are appending the section/city to the snapshot and also the associated items/places to the section/city - Last, we just invoke the
diffableDataSourceapply method passing the new snapshot and set the diffing animation to true.
Next, we need to add the invocation of the methods in the viewDidLoad like so.
  override func viewDidLoad() {
    super.viewDidLoad()

    setupNavigationItems()
    setupTableView()
    buildAndApplySnapshot()
}
Try to build and run the app, voila we have successfully display cities and places using the Diffable Data Source in the TableView!
Implement the shuffle method
Finally, we are going to add the shuffle mechanism, that will shuffle our citiesWithPlaces property. In the shuffleTapped method, we will shuffle the cities and places in random position. At last, we just invoke the buildAndApplySnapshot to build new snapshot and apply it to the current snapshot with diffing animation.
@objc func shuffleTapped(_ sender: Any) {
    self.citiesWithPlaces = citiesWithPlaces.map {
        ($0.city, $0.places.shuffled())
    }.shuffled()

    buildAndApplySnapshot()
}
Conclusion
That's it folks! Pat yourself on the shoulder as you all have successfully build TableView using the new Diffable Data Source API. The API it's pretty simple and easy to use as well as providing safety for us by providing single source of truth for the data source in our app.
As SwiftUI is still in infancy, we can still use many UIKit class to build our app. Remember that diffable data source is also available for CollectionView and by using it with new Compositional Layout, we can create complex user interface easier and faster.
Let's keep the lifelong learning goes on and happy Swifting!!!
You can also download the completed project from the GitHub repository at CompletedTableViewDiffableDataSource.