Building Expense Tracker Apple TV App with SwiftUI & Core Data
Published at May 15, 2020
This tutorial is the final part of the tutorial series on how to build an expense tracker cross-platform App with SwiftUI, Core Data, & CloudKit. I recommend all of you to read the previous tutorials first before continuing, here are the previous tutorials:
Introduction

tvOS is the operating system used by Apple TV to deliver immersive and rich contents, media, games, apps to users through the living room. As developers, we can use many existing Apple technologies such as UIKit, CoreData, CloudKit, and Metal to create anything from utility apps, media streaming, and high performance 3D games. It also supports many new technologies such as 4K HDR10, Dolby Vision, and Dolby Atmos to deliver the best video and audio experience.
tvOS uses Siri Remote as the main input for users. With the touchpad, we can use gestures such as swipe, tap, and clicking to navigate through the operating system. It also has built-in accelerometer and gyroscope that can be used to built an interactive control for games.
Focus is used as the focal point when users navigate through each UI element using the remote. When element is in focus, it will be highlighted so users won't get lost when navigating through the contents. When designing app for tvOS, we need to really consider what elements are focusable.
Apps need to be immersive and maximizing the horizontal edge to edge space of the TV. As users will be interacting with the TV in distance, the UI elements such as Text and Button should be legible and large enough. You can learn more about the design guidelines from Apple HIG website on Apple TV.
We can leverage SwiftUI to build user interface for tvOS. The declarative, composable, and reactive paradigms of SwiftUI enables us to build dynamic user interface rapidly. Using SwiftUI, we can learn once and apply our knowledge to build user interfaces for any devices.
What We Will Build
In this tutorial, we'll be focusing to build Expense Tracker Apple TV App with the following features:
Dashboard Viewto view total spending for each category in a Pie Chart and List.List viewto show expenses with details such as name, amount, date, and category.Form Viewto create, edit, and delete expense.
To build our app, there are several main components we need to build along the way, here they are:
- Root View with Tab based navigation.
- Log View.
- Log Form View.
You can download the completed app from the GitHub repository. Try to play around with it using the Apple TV simulator in Xcode!
The Starter Project
To begin this project, you need to download the starter project from the GitHub repository. The starter project already includes many components that will help us to just focus on building the user interface for the current app, here they are:
- Completed Expense Tracker iOS, macOS, and watchOS App targets from the previous tutorials. To learn more about the Core Data part, please refer to the part 1 of this tutorial series, Building Expense Tracker iOS App with Core Data & SwiftUI.
- tvOS App Target with empty implementation.
- Shared Models, Core Data Managed Object Model, Utils, as well as extensions to help us build the project. These source files uses target membership to target macOS, iOS, watchOS, and tvOS platforms.
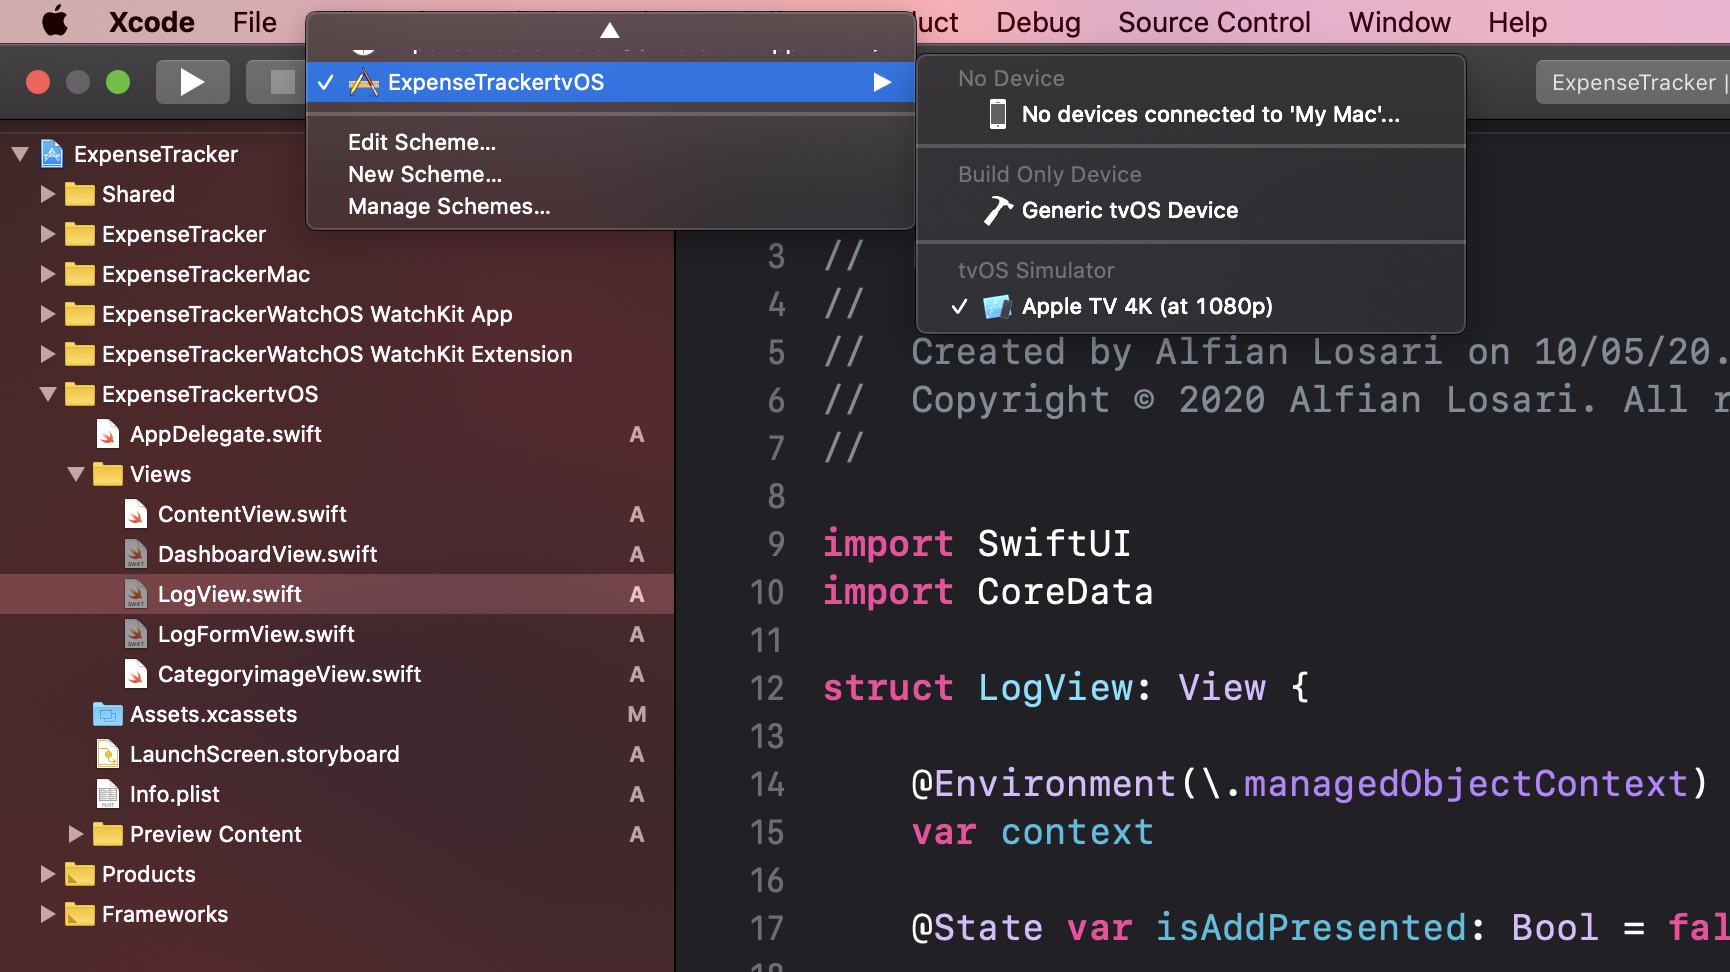
Make sure to select ExpenseTrackertvOS and Apple TV simulator from the scheme to build and run the project. Let's move on to the next section, where we will create the root tab based navigation for our App.
Building Root View with Tab

The Root View uses Tab Bar to group the Dashboard and Log View in the same hierarchy at the App level. The tab bar stays pinned at the top of the screen while people navigate between the view. Whenever user click on the menu button, the focus will return to tab bar.
Navigate to ContentView.swift, and copy the following code.
import SwiftUI

struct ContentView: View {

    @State private var selection = 0

    var body: some View {
        TabView(selection: $selection){
            DashboardView()
                .tabItem {
                    HStack {
                        Image(systemName: "chart.pie")
                        Text("Dashboard")
                    }
                }
                .tag(0)

            LogView()
                .tabItem {
                    HStack {
                        Image(systemName: "dollarsign.circle")
                        Text("Expenses")
                    }
                }
                .tag(1)
        }
    }
}
We use TabView passing the selection state property to bind the selected index. In the ViewBuilder, we declare the DashboardView and LogView with their respective tabItem. Each TabItem uses HStack to display the icon and text for the tab.
To pass the managed object context down to the app tree, we'll use environment modifier. Navigate to AppDelegate.swift, and copy the following code.
@UIApplicationMain
class AppDelegate: UIResponder, UIApplicationDelegate {

    var window: UIWindow?
    let coreDataStack = CoreDataStack.shared

    func application(_ application: UIApplication, didFinishLaunchingWithOptions launchOptions: [UIApplication.LaunchOptionsKey: Any]?) -> Bool {

        // Create the SwiftUI view that provides the window contents.
        let contentView = ContentView()
            .environment(\.managedObjectContext, coreDataStack.viewContext)
                // ...
    }
    // ...
}
We declare the CoreDataStack instance and store it as property, then we pass the viewContext using the environment modifier after we declare the ContentView. This will inject the context at the root level of the View.
Try to build and run the app, you should be able to see the tab bar at the top and to navigate between dashboard and log view!
To navigate in Apple TV Simulator, you can use the
arrow keysto simulate swipe,enterto simulateclick, andescapeto simulate clickingmenu.
Building The Log View
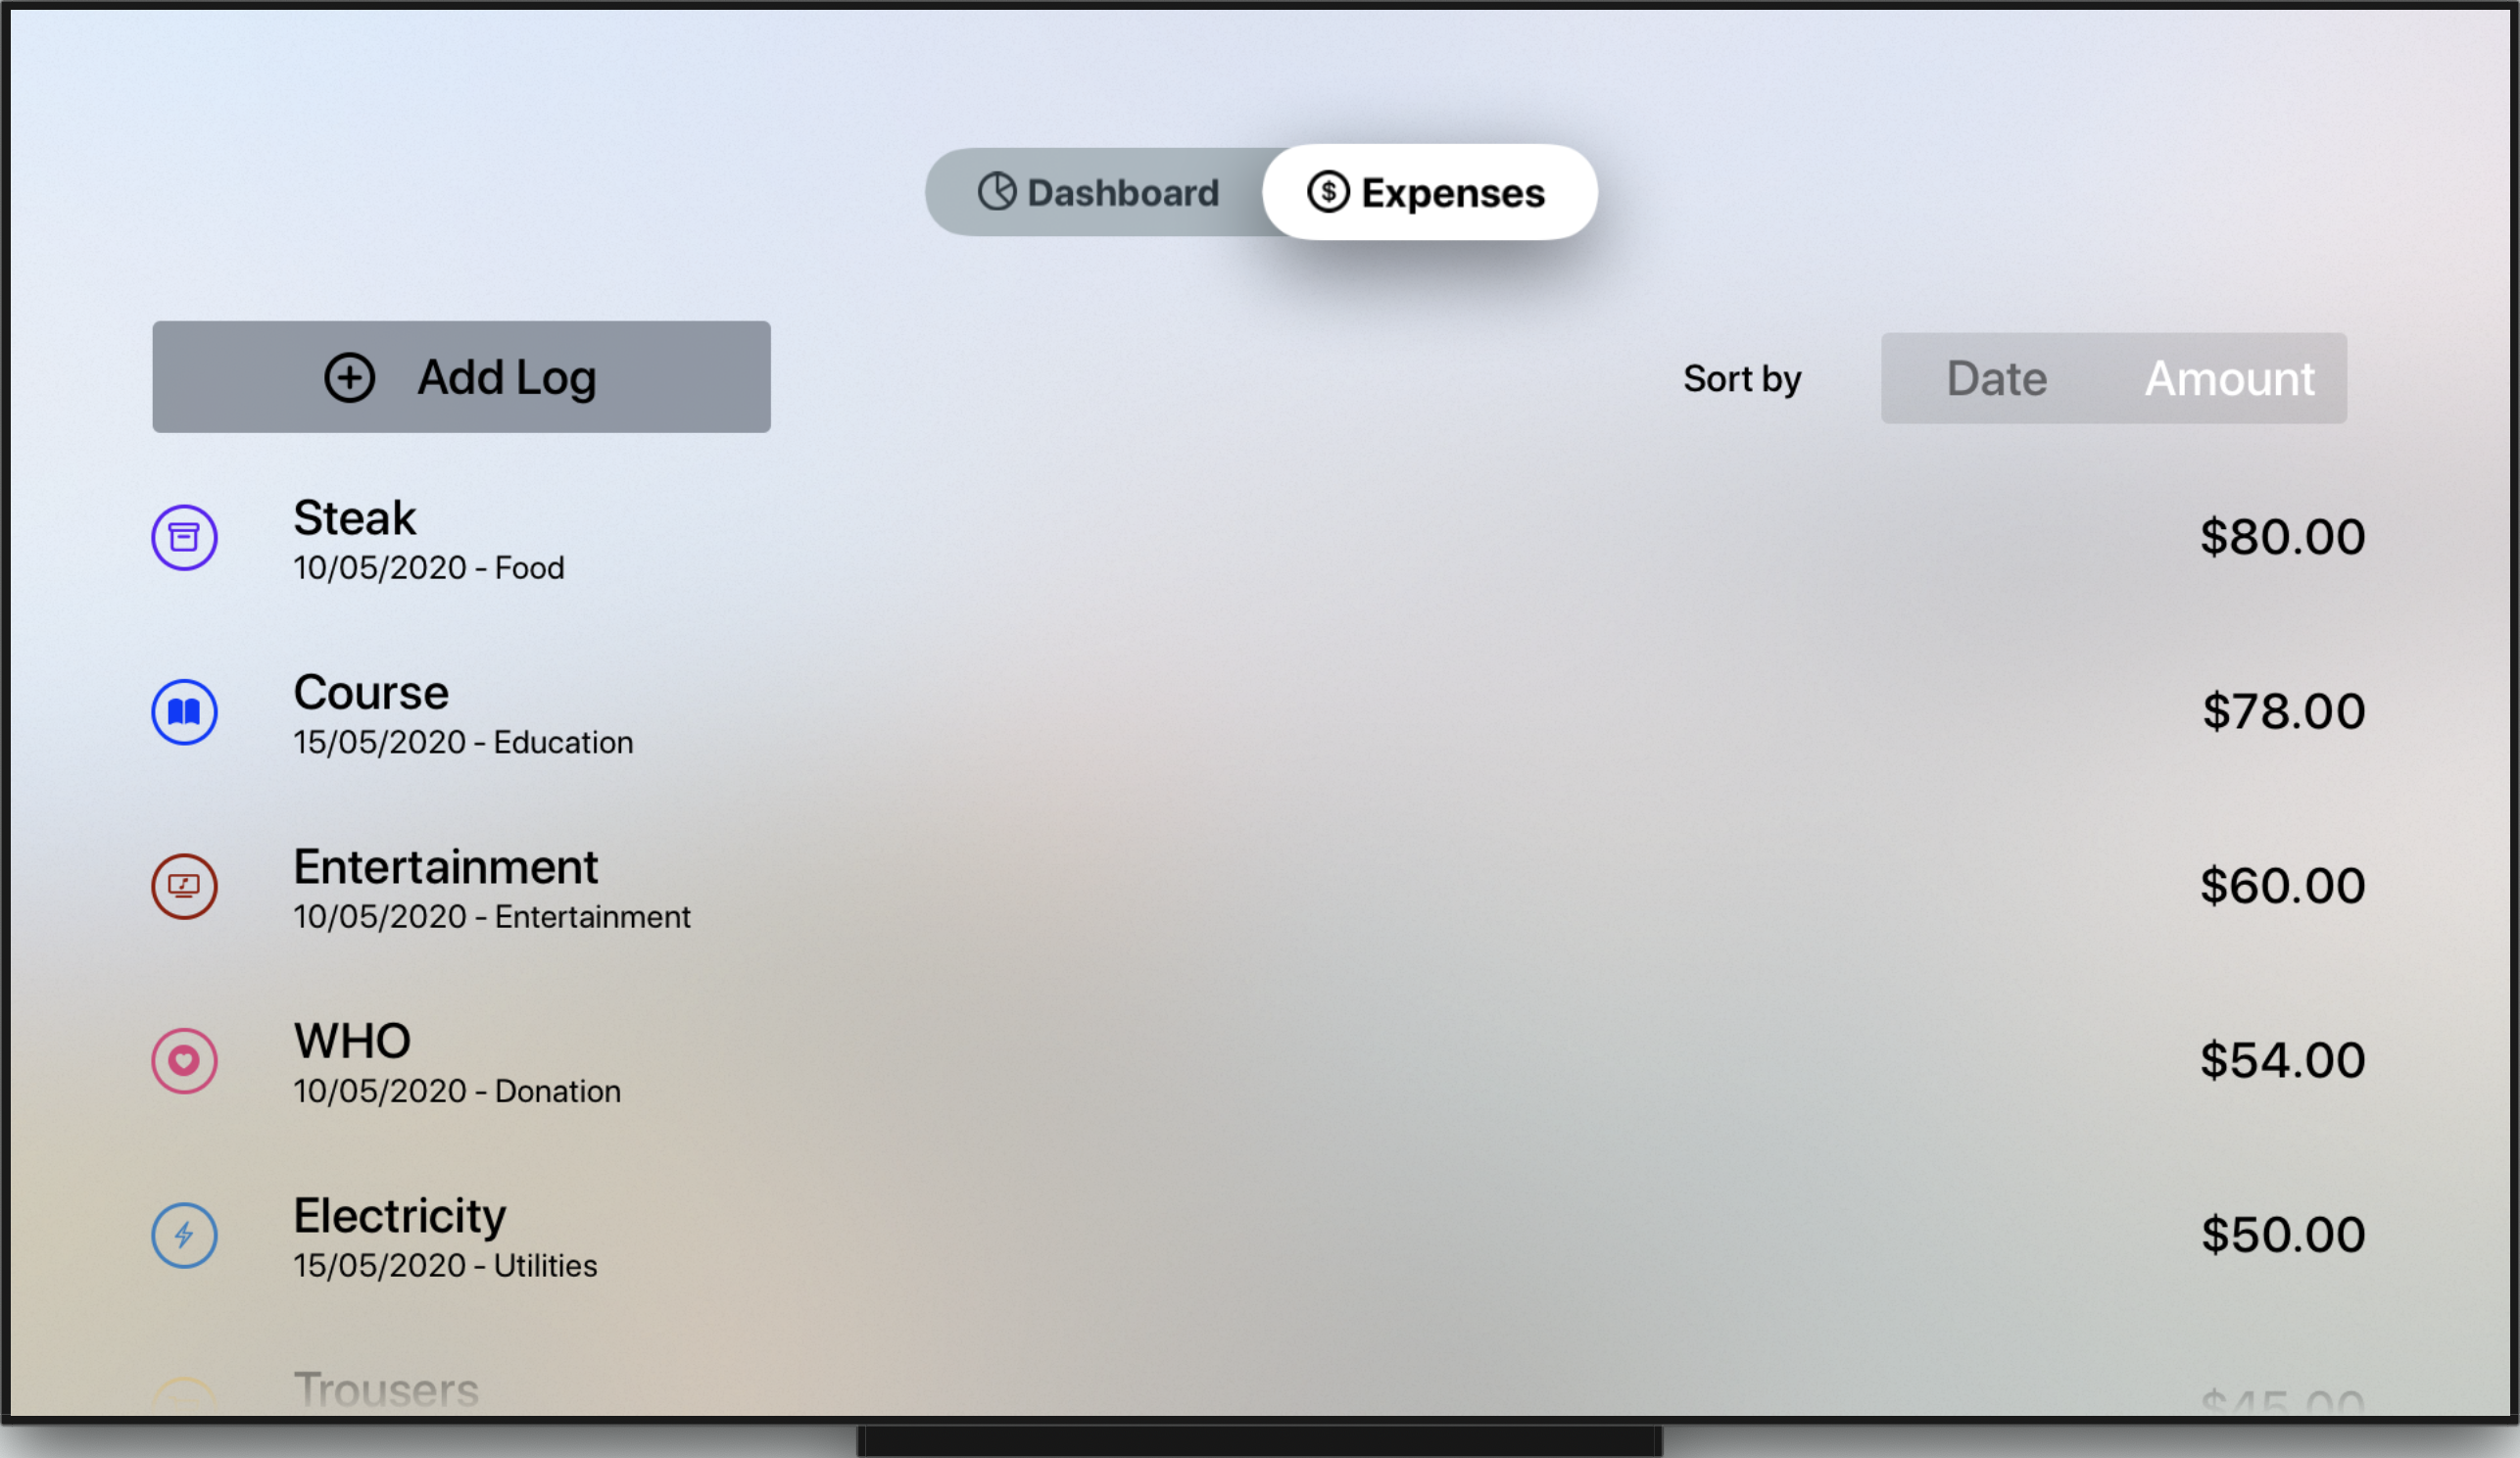
The LogView consists of List of expenses, Add Button, and Sort by Picker with Segmented style. We'll put the List into LogListView and the segmented picker into SelectSortOrderView.
Create a new SwiftUI View named SelectSortOrderView, and copy the following code.
struct SelectSortOrderView: View {

    @Binding var sortType: SortType
    private let sortTypes: [SortType] =  [.date, .amount]

    var body: some View {
        HStack {
            Text("Sort by")
            Picker(selection: $sortType, label: Text("Sort by")) {
                ForEach(sortTypes) { type in
                    Text(type.rawValue.capitalized)
                        .tag(type)
                }
            }
            .pickerStyle(SegmentedPickerStyle())
        }
        .padding(.horizontal)
    }
}
We use HStack to put a Text label and Picker. In the picker's ViewBuilder, we use ForEach to an array containing the SortType enum cases for date and amount. To bind the selected sort type, we declare the sortType property with @Binding so the parent view can pass the state down and get notification when the value changes.
The LogListView contains the expenses from the FetchedResults to the ExpenseLog entity using @FetchRequest property wrapper. To show each expense in a row, we'll need to build and use the LogRowView.
struct LogRowView: View {

    @Binding var log: ExpenseLog

    var body: some View {
        HStack {
            CategoryImageView(category: log.categoryEnum)
            VStack(alignment: .leading) {
                Text(log.nameText)
                HStack(spacing: 4) {
                    Text(log.dateText)
                    Text("-")
                    Text(log.categoryText)
                }
                .font(.caption)
            }
            Spacer()
            Text(log.amountText)
        }
        .font(.headline)
        .padding(.vertical)
    }
}
Using HStack, we use the provided CategoryImageView to show the image of the category, followed by a VStack containing the name and nested HStack of date and category text. Last, we show the amount text, to push to the trailing edge, we put a Spacer in between.
With LogRowView in place, now we can build the LogListView.
struct LogListView: View {

    @Environment(\.managedObjectContext)
    var context

    @State var logToEdit: ExpenseLog?
    @FetchRequest(
        entity: ExpenseLog.entity(),
        sortDescriptors: [
            NSSortDescriptor(keyPath: \ExpenseLog.date, ascending: false)
        ]
    )
    var result: FetchedResults<ExpenseLog>

    init(sortDescriptor: NSSortDescriptor) {
        let fetchRequest = NSFetchRequest<ExpenseLog>(entityName: ExpenseLog.entity().name ?? "ExpenseLog")
        fetchRequest.sortDescriptors = [sortDescriptor]
        _result = FetchRequest(fetchRequest: fetchRequest)
    }

    var body: some View {
        ForEach(self.result) { (log: ExpenseLog) in
            Button(action: {
                self.logToEdit = log
            }) {
                LogRowView(log: log)
            }
        }
        .sheet(item: self.$logToEdit) { (log: ExpenseLog) in
                // TODO: LogFormView
        }
    }
}
We use @FetchRequest property wrapper to fetch the ExpenseLog into FetchedResults. As the user can change the sort order based by amount or date, we'll add a custom initializer where we can inject a sortDescriptor to construct a new fetch request with it. Before we're able to fetch data with FetchRequest , we need to inject managed object context using the @Environment property wrapper.
In the body of the View, we use ForEach passing the fetched results array. In the ViewBuilder, we use Button passing an action closure to assign the logToEdit state property with the selected log. At last, in the button's ViewBuilder, we return the LogRowView passing the log. The logEdit state determines whether the modal sheet to present the form will be shown.
Buttonis afocusableelement which will get highlighted when the user navigates through it. When user click on the Siri Remote, it will invoke the action closure.
Finally, we can build the LogView from all the previous components we just built. Navigate to LogView and copy the following code.
struct LogView: View {

    // 1
    @State private var sortType = SortType.date
    @State private var isAddPresented: Bool = false

    var body: some View {
          // 2
        List {
                // 3
            HStack {
                Button(action: {
                    self.isAddPresented = true
                }) {
                    HStack(spacing: 32) {
                        Spacer()
                        Image(systemName: "plus.circle")
                        Text("Add Log")
                        Spacer()
                    }
                }
                .buttonStyle(BorderedButtonStyle())
                .font(.headline)

                Spacer()
                SelectSortOrderView(sortType: $sortType)
            }

            // 4
            LogListView(sortDescriptor: ExpenseLogSort(sortType: sortType, sortOrder: .descending).sortDescriptor)
        }
        .padding(.top)
        .sheet(isPresented: $isAddPresented) {
                // 5
                        // TODO: Return Log Form View
        }
    }
}
To explain all the code above, i provided several main points in a list, here they are:
- There are 2 state properties:
sortTypeto bind the selected sort type inSelectedSortOrderView, andisAddPresentedas a boolean state to determine the presentation ofmodal sheetwhen user taps on theAdd Button. - The
Listis the main container for all the views. Views placed in theViewBuilderare scrollable. - The first row in the
Listis aHStack. The stack shows theAdd Buttonand theSelectSortOrderViewsegmented picker. - For the remaining rows, we use the
LogListViewpassing the sort descriptor to the initializer. Notice that we useExpenseLogSortstruct to construct the sort descriptor based on the sort type and defaultdescendingsort order. - At last, we add a
sheetmodifier to theList. We'll return theLogFormViewthat we'll build on the next section.
That's it for the Log Tab! Try to build and run the project, you should be able to navigate to the expenses tab showing the add button and segmented picker. The list is empty for now, in the next section, we'll build the LogFormView so users can add and edit the expense!
Building The Log Form View
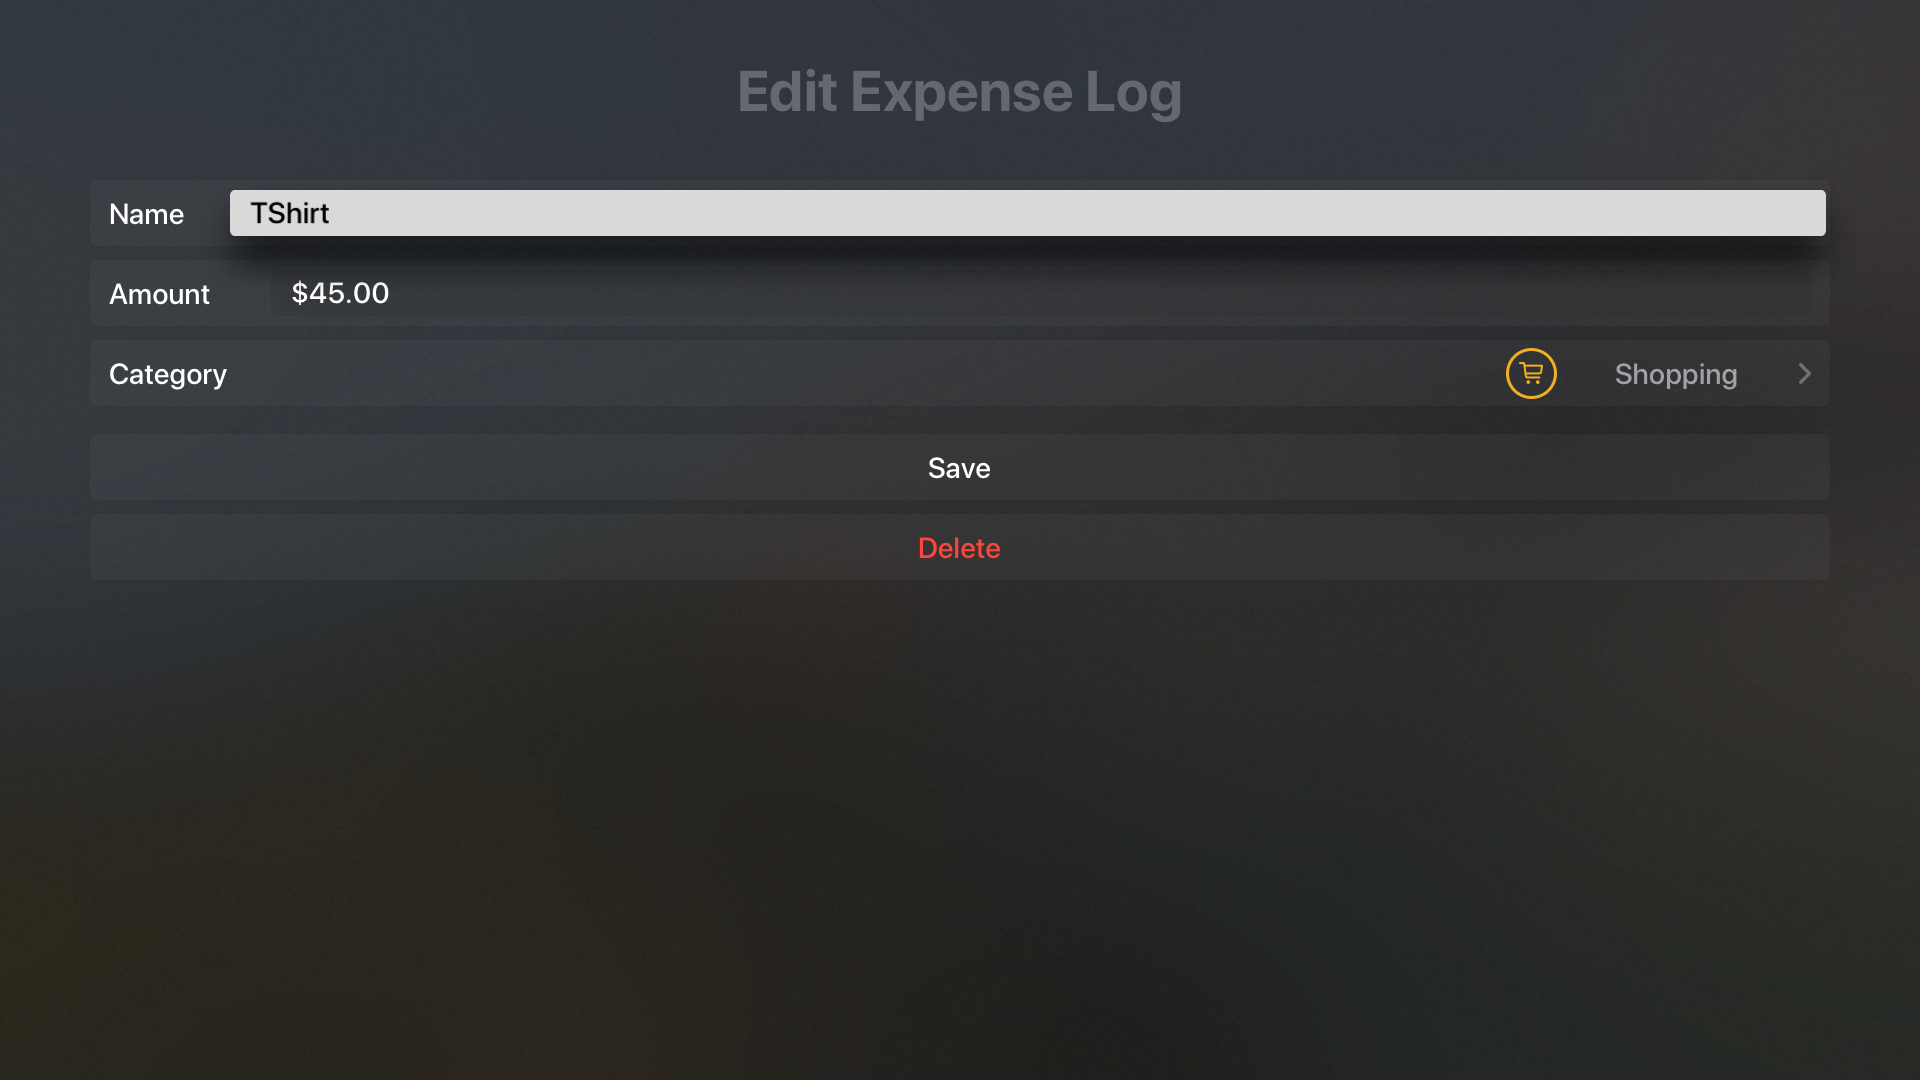
The LogFormView is a View containing the Form for the user to create or edit expense name, amount using the TextField and Picker for assigning category.
Create a new file named LogFormView.swift and copy the following code.
struct LogFormView: View {

    // 1
    @State private var name: String = ""
    @State private var amount: Double = 0
    @State private var category: Category = .utilities

    @Environment(\.presentationMode)
    var presentationMode

    // 2
    var logToEdit: ExpenseLog?
    var context: NSManagedObjectContext

    // 3
    var title: String {
        logToEdit == nil ? "Create Expense Log" : "Edit Expense Log"
    }

    var body: some View {
            // 4
        NavigationView {
            Form {
                  // 5
                Section {
                    HStack {
                        Text("Name")
                        Spacer()
                        TextField("Name", text: $name)
                    }

                    HStack {
                        Text("Amount")
                        Spacer()
                        TextField("Amount", value: $amount, formatter: Utils.numberFormatter)
                    }

                    Picker(selection: $category, label: Text("Category")) {
                        ForEach(Category.allCases) { category in
                            HStack {
                                CategoryImageView(category: category)
                                Text(category.rawValue.capitalized)
                            }
                            .tag(category)
                        }
                    }
                }

                // 6
                Section {
                    Button(action: self.onSaveTapped) {
                        HStack {
                            Spacer()
                            Text("Save")
                            Spacer()
                        }
                    }

                    if self.logToEdit != nil {
                        Button(action: self.onDeleteTapped) {
                            HStack {
                                Spacer()
                                Text("Delete")
                                    .foregroundColor(Color.red)
                                Spacer()
                            }
                        }
                    }
                }
            }
            .navigationBarTitle(title)
        }
    }

    // 7
    private func onSaveClicked() {
        let log: ExpenseLog
        if let logToEdit = self.logToEdit {
            log = logToEdit
        } else {
            log = ExpenseLog(context: self.context)
            log.id = UUID()
            log.date = Date()
        }

        log.name = self.name
        log.category = self.category.rawValue
        log.amount = NSDecimalNumber(value: self.amount)
        do {
            try context.saveContext()
        } catch let error as NSError {
            print(error.localizedDescription)
        }
        self.presentationMode.wrappedValue.dismiss()
    }

    // 8
    private func onDeleteClicked() {
        guard let logToEdit = self.logToEdit else { return }
        self.context.delete(logToEdit)
        try? context.saveContext()
        self.presentationMode.wrappedValue.dismiss()
    }
}
To help explaining all the code above, i have break down them into several main points, here they are:
- To bind all the attributes for the inputs in the
Form, we declare 3 state properties:name,amount, andcategory. - There are 2 properties that needs to be injected from the initializer:
logToEditwhich will be passed when user edit an existing log andcontextwhich is the managed object context to save the expense. - The
titleis a computed property, the value is determined by thelogToEdit. If it exists, the value will becreateand vice versa, the value will beedit. - We use
NavigationViewas the root view in thebody. We need to use this for thePickerto work properly when user click and navigate to the category selection screen. In theViewBuilderwe useFormto wrap all the remaining views. - In the first section, we put the text fields for
nameandamount. To be able to bind the amount text field to theamountproperty with type ofdouble, we need to pass theNumberFormatterwhich will be used to convert thestringtodoublewhen user tapsreturnon the keyboard. For category selection, we usePickerpassing all cases of the category. - In the second section, we have a
Save Buttonthat will invoke theonSaveTappedmethod when clicked. In addition, when users edit log, we show aDelete Buttonthat will invoke theonDeleteTappedmethod when clicked. - In the
onSaveClickedmethod, we create a newExpenseLoginstance with uniqueUUIDand currentDateiflogToEditisnil. Then, we retrieve and assign all the state properties to the expense log. At last, we save the context and dismiss the modal sheet using presentation mode that we retrieve using the@Environment. - In the
onDeleteClickedmethod, we delete thelogToEditfrom the context, save, and dismiss the modal sheet.
Before we can use the LogFormView, we need to add it in 2 places: LogView and LogListView. Navigate to LogView, find the sheet modifier, and add the following code.
.sheet(isPresented: $isAddPresented) {
    LogFormView(context: self.context)
}
Navigate to LogListView, find the sheet modifier, and add the following code.
  .sheet(item: self.$logToEdit) { (log: ExpenseLog) in
    LogFormView(
        logToEdit: log,
        context: self.context,
        name: log.name ?? "",
        amount: log.amount?.doubleValue ?? 0,
        category: Category(rawValue: log.category ?? "") ?? .food
    )
}
In the edit form, we'll also pass the log attributes it can fill the textfields and picker with the existing value.
Try to build and run the project, you should be able to click the Add Button from the expenses tab. Fill the form using your keyboard and save. Also, try to edit and delete an expense log to make sure all the features are working properly.
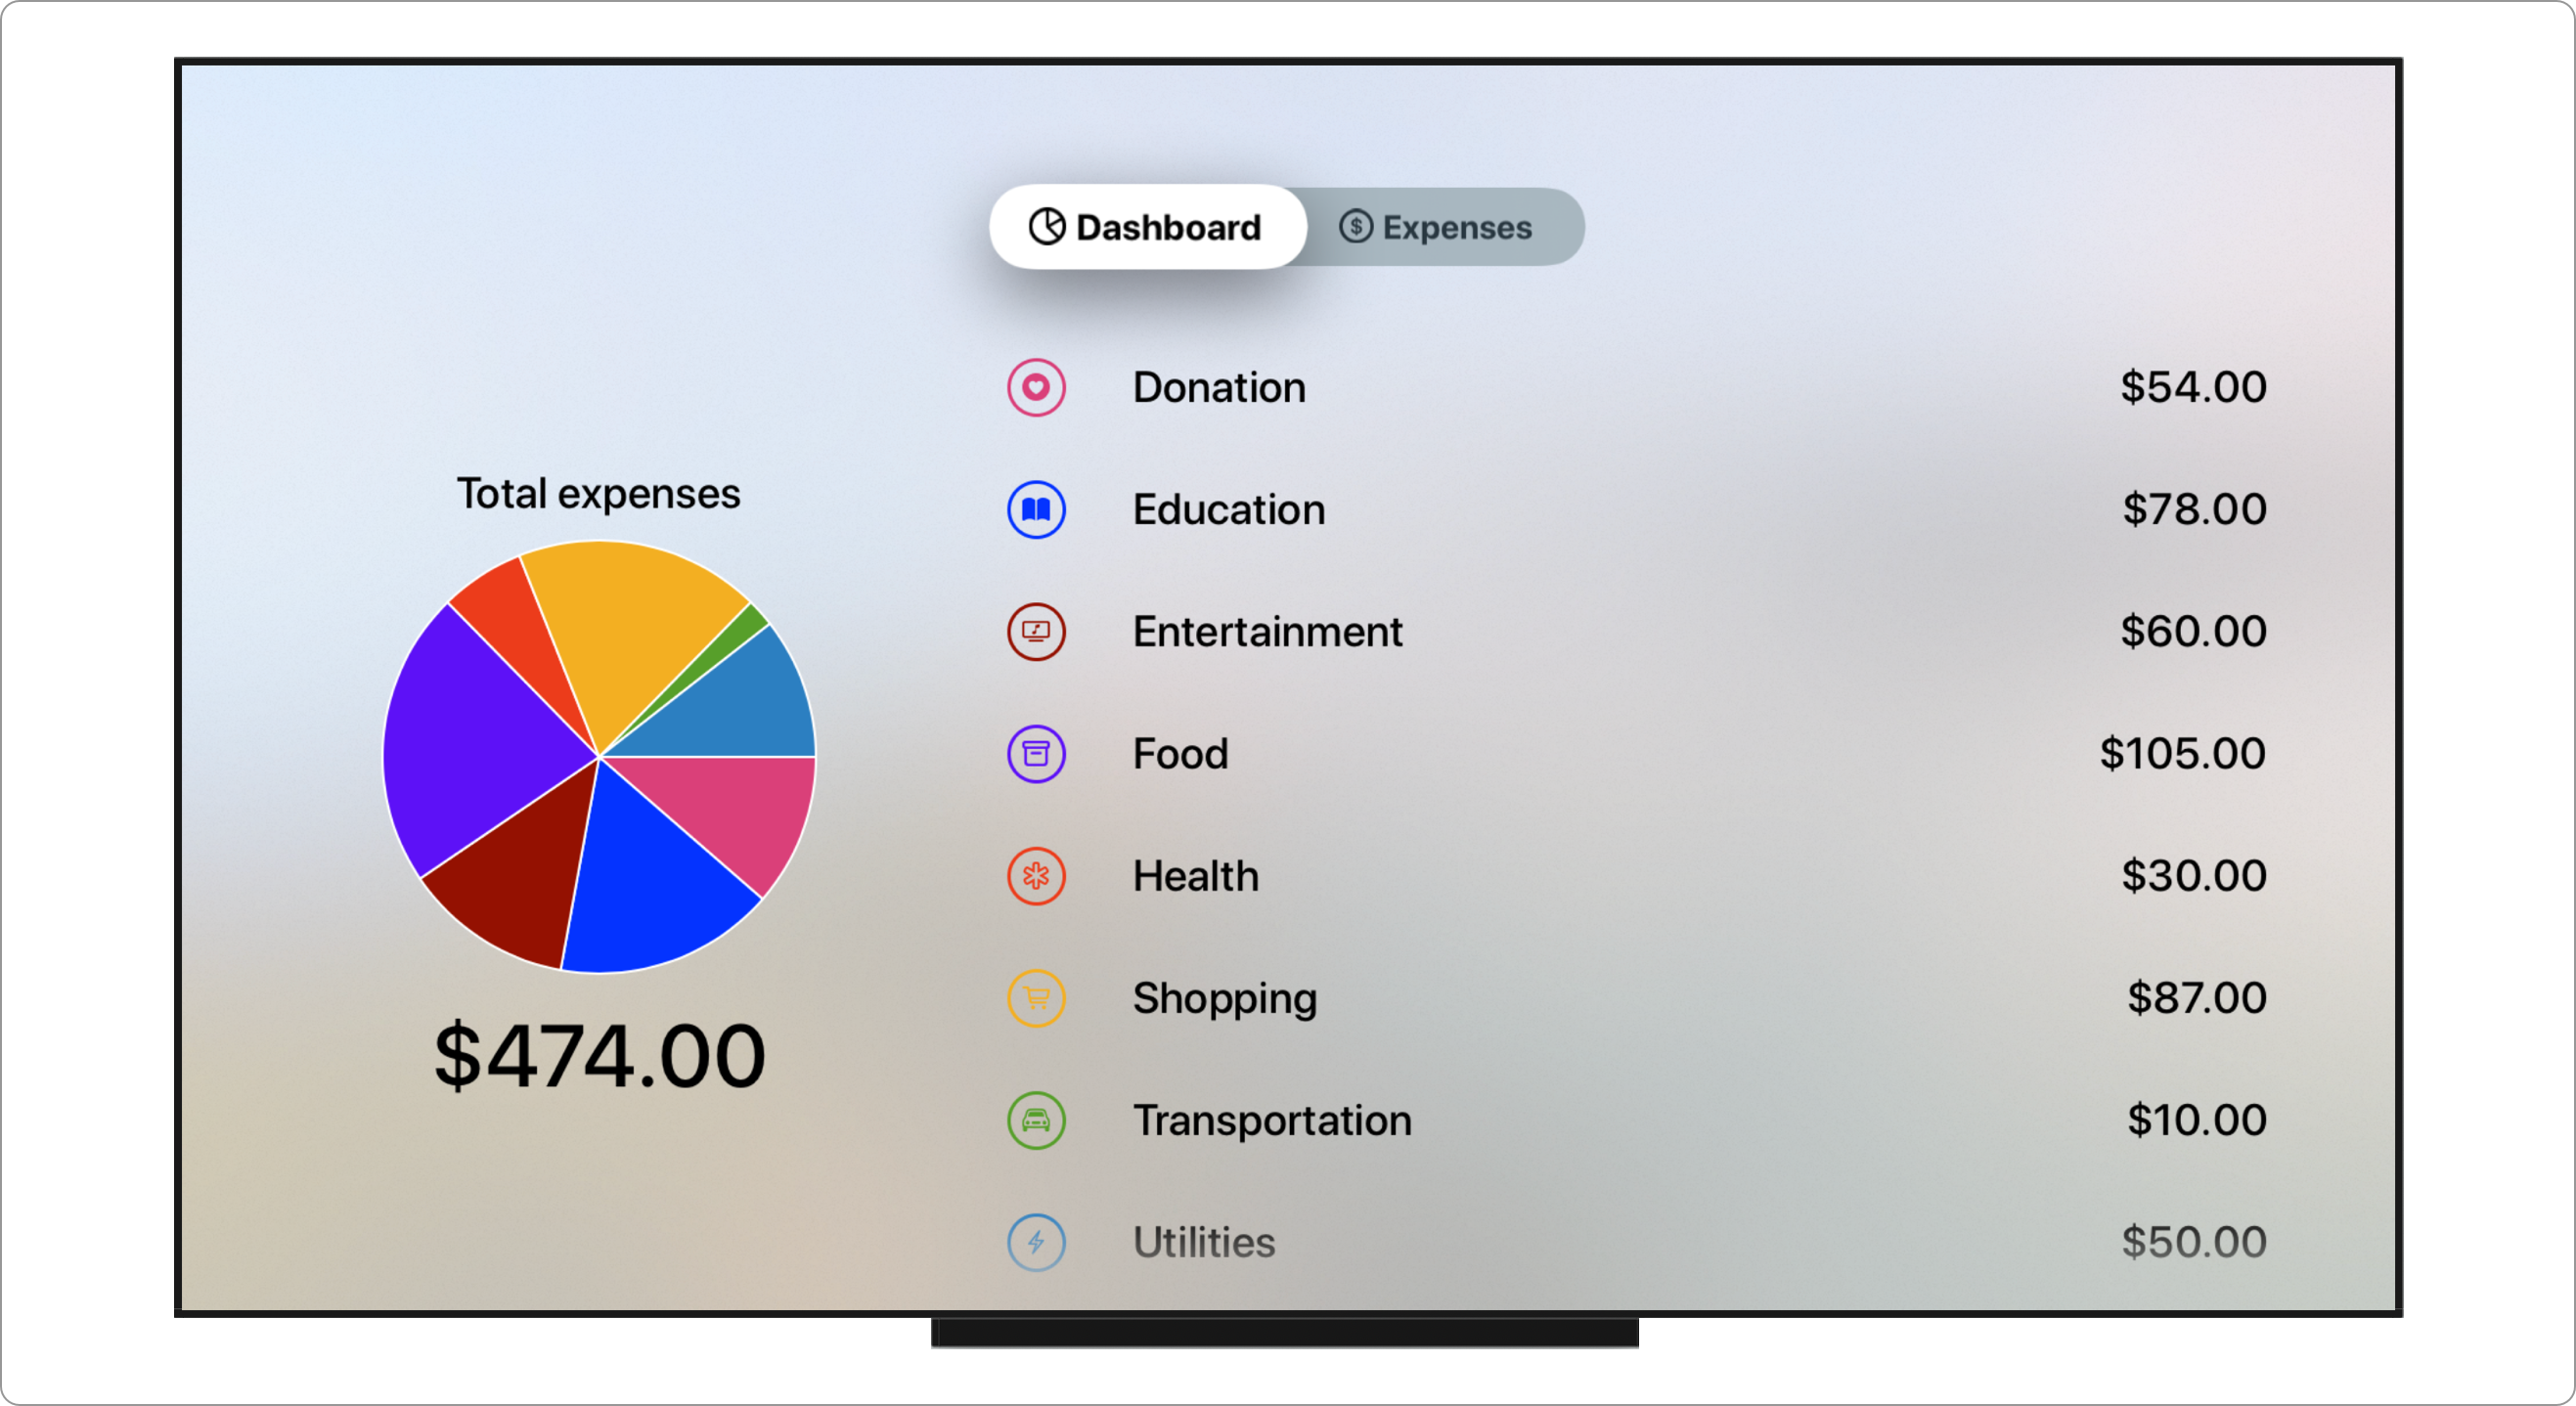
Building The Dashboard View

The DashboardView shows the Pie Chart of the total spending distribution for each category and List of category rows with total amount text side by side using a HStack . Before we build the DashboardView, let's build the CategoryRowView component first.
Create a View named CategoryRowView, and copy the following code.
struct CategoryRowView: View {
    let category: Category
    let sum: Double

    var body: some View {
        HStack {
            CategoryImageView(category: category)
            Text(category.rawValue.capitalized)
            Spacer()
            Text(sum.formattedCurrencyText)
        }
        .font(.headline)
        .padding(.vertical)
    }
}
We use HStack to show the CategoryImageView, name, and formatted amount text horizontally. To make sure the texts are legible, we add the headline font modifier.
With CategoryRowView in place, navigate to DashboardView and copy the following code.
struct DashboardView: View {

    // 1
    @Environment(\.managedObjectContext)
    var context

      // 2
    @State private var totalExpenses: Double?
    @State private var categoriesSum: [CategorySum]?

    var body: some View {
              // 3
        ZStack {
                // 4
            HStack(alignment: .center, spacing: 64) {
                if totalExpenses != nil && totalExpenses! > 0 {
                    VStack(alignment: .center, spacing: 2) {
                        Text("Total expenses")
                            .font(.headline)

                        if categoriesSum != nil  {
                            PieChartView(
                                data: categoriesSum!.map { ($0.sum, $0.category.color) },
                                style: Styles.pieChartStyleOne,
                                form: CGSize(width: 512, height: 384),
                                dropShadow: false
                            ).padding()
                        }
                        Text(totalExpenses!.formattedCurrencyText)
                            .font(.title)
                    }
                }

                // 5
                if categoriesSum != nil {
                    List(self.categoriesSum!) { (categorySum: CategorySum) in
                        Button(action: {}) {
                            CategoryRowView(category: categorySum.category, sum: categorySum.sum)
                        }
                    }
                    .listRowBackground(Divider())
                }
            }
            .padding(.top)

            // 6
            if totalExpenses == nil && categoriesSum == nil {
                Text("No expenses data\nPlease add log from the Expenses tab")
                    .multilineTextAlignment(.center)
                    .font(.headline)
                    .padding()
            }
        }
        .onAppear(perform: fetchTotalSums)
    }

    // 7
    func fetchTotalSums() {
        ExpenseLog.fetchAllCategoriesTotalAmountSum(context: self.context) { (results) in
            guard !results.isEmpty else {
                self.totalExpenses = nil
                self.categoriesSum = nil
                return
            }

            let totalSum = results.map { $0.sum }.reduce(0, +)
            self.totalExpenses = totalSum
            self.categoriesSum = results.map({ (result) -> CategorySum in
                return CategorySum(sum: result.sum, category: result.category)
            })
        }
    }
}
Explanation of each points in the code:
- We declare the
@Environmentproperty wrapper to retrieve the managed object context passed down from the parent view. - There are 2 state properties:
totalExpenseswhich is the value of the total spending for all categories combined andcategoriesSumwhich is the array ofCategorySumstruct representing total spending of a category. - We use
ZStackas the root view so we're able to add anTextshowing info to users when the expenses are empty. We'll also add theonAppearmodifier that will invoke thefetchTotalSumsmethod when the view appears. - To show
PieChartandListside-by-side horizontally, we useHStack. At leading side, we check iftotalExpenseis notniland the value is larger thanzerobefore we show thePieChartand the total expense text in aVStack. - Before showing the
List, we check if thecategoriesSumis notnil. If exists, we declareListpassing thecategoriesSumwhich already conforms toIdentifiableprotocol. To make the rowfocusablewhen user scrolls, we wrap theCategoryRowViewin aButtonwith empty action closure. - If the
totalExpensesandcategoriesSumarenil, we show aTextcontaining the information for users to add new expense from the expenses tab. - In
fetchTotalSumsmethod, we invoke theExpenseLogstatic method to fetch the total sum for all the categories. In the closure, we assign thetotalExpenseproperty by usingreducemethod to sum all the categories total sum. ForcategoriesSum, we transform the results usingmapmethod by returningCategorySuminstance containing the category with total sum.
Build and run the project to view the stats in PieChart and List in their glory! Make sure you have added several expense log with different categories before.
Setup Core Data CloudKit Syncing in tvOS Target
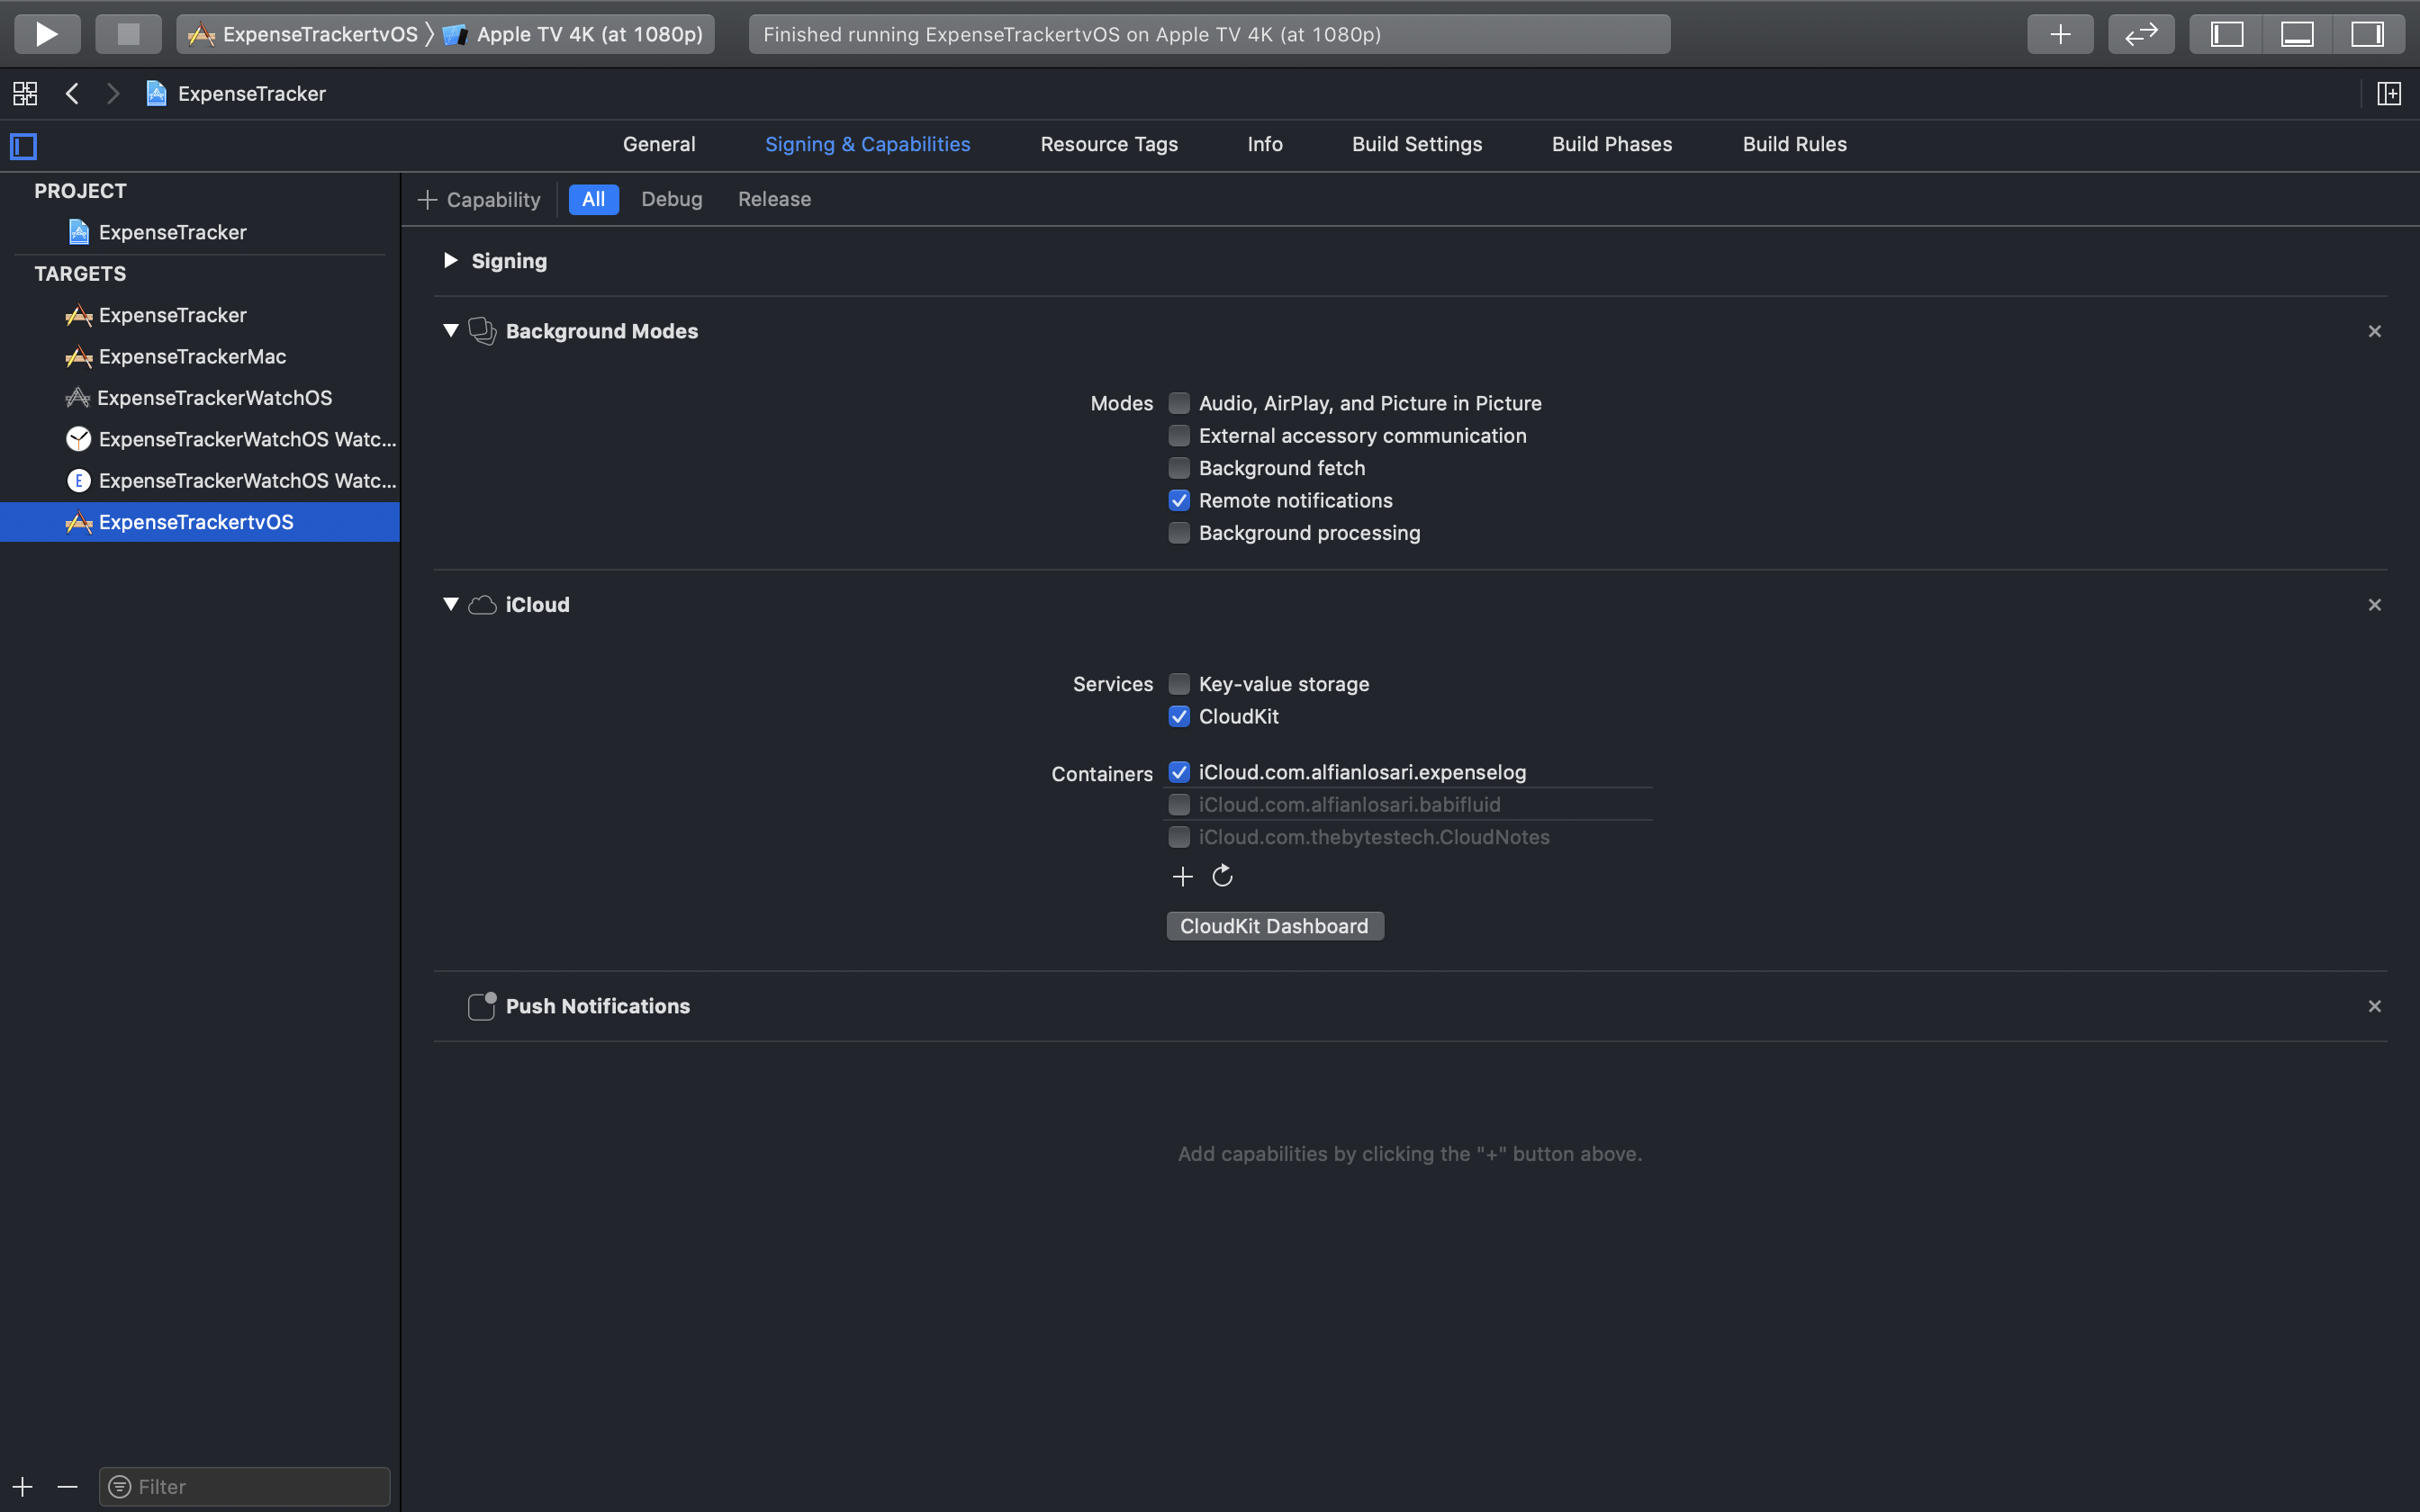
To make sure Core Data CloudKit syncing is working, you need to add a valid CloudKit container with the same identifier to all the targets. To try this, make sure you sign in into iCloud in the simulator or your physical devices when you want to test.
Conclusion
Congratulations! you have successfully built the Expense Tracker Apple TV App with SwiftUI and Core Data. With this knowledge and experience, you should be able to create more amazing apps with your awesome creativity and ideas. This final part concludes the tutorial series on building an Expense Tracker cross-platform App with SwiftUI and Core Data.
Until the next one! Let's keep the lifelong learning goes on!